
Creating photographic quality images of your SolidWorks models can be challenging, but there are some simple things that can make the difference between a good and a great image. While the release of PhotoView 360 is going to allow the majority of users to take advantage of rendering technology with little hassle, many are going to have PhotoWorks around for some time. So here are ten ways to make the most of it.

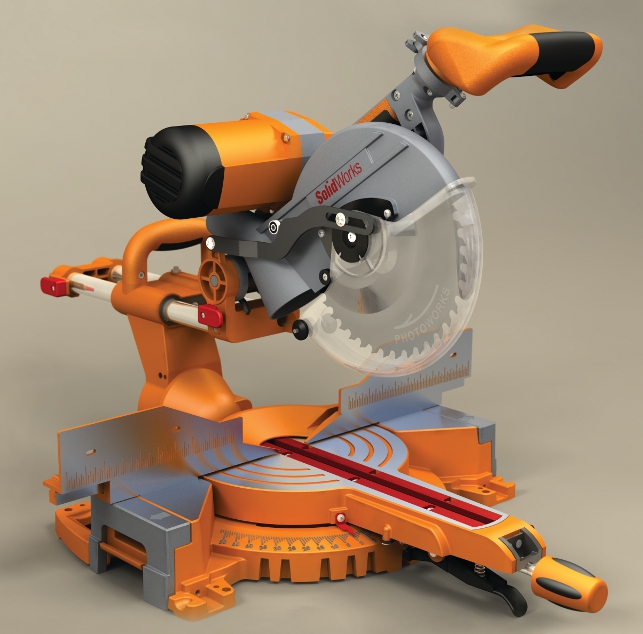
With due care and attention to detail, material texture use, lighting and camera angles, PhotoWorks can produce amazing results
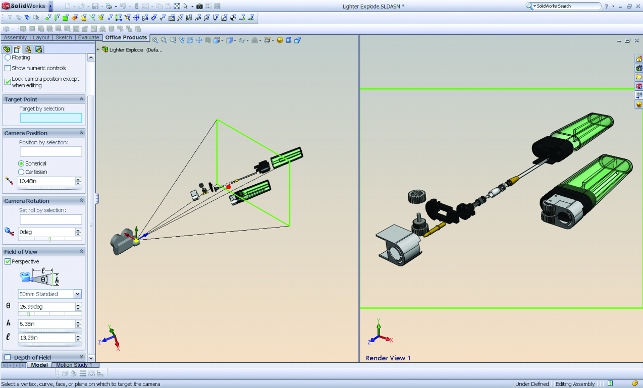
Use cameras: it will put things in perspective
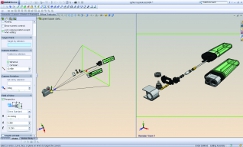
Fortunately for Photoworks users SoliWorks has a camera tool
Give your image depth by using a camera for your rendering view. The human eye sees objects is perspective – they have a vanishing point which gives a perception of depth. The standard SolidWorks camera doesn’t see your model in perspective, but fortunately for PhotoWorks users SolidWorks has a camera tool. In the ‘lights, cameras and scene’ folder, choose the ‘add camera’ option. From there, setting up your new camera is pretty straightforward. Set the target point, adjust the camera position, choose a pre-defined lens or create one of your own. To add a nice special effect, check the ‘depth of field’ box at the bottom of the property manager and choose which areas of your image are in and out of focus.
Image Quality: smooth those edges
More for the novice PhotoWorks user, this simple tip ensures your swoopy shapes appear that way in your rendering. Go to TOOLS/OPTIONS/DOCUMENT PROPERTIES/IMAGE QUALITY and be sure the adjustment slider is shifted to the far right, just shy of the red zone. If you’re working with an assembly file, be sure the ‘apply to all referenced part documents’ box is checked.
Appearances: apply them wisely
PhotoWorks 2008 changed the appearance hierarchy rules to be consistent with SolidWorks colours. Knowing the rules can make initial appearance application faster and save time when the inevitable changes come near the tail end of your project. You need to decide if your appearance is applied at the part or assembly level. I prefer to apply my appearances at the part level, but assembly level appearances do have their benefits. You’ll have to decide which is best for your particular rendering, and understanding the appearance hierarchy will make it easier.
Lighting: it’s all about the image
PhotoWorks includes many default image based lighting set-ups
Image based lighting is the fastest, easiest way to light your scene and produce high quality images. Set up is a snap and simply changing the image can change the entire look of your rendering. PhotoWorks includes many default image based lighting set-ups, or you’re free to browse your own collection of images. HDR or HDRI images give the best results, but LDR image formats (jpg, tif, bmp) can be used as well with good results.
Reflection/refraction: it’s all about the bounce
Transparent and reflective appearances look great when these settings are correct. Go to PHOTOWORKS OPTIONS/DOCUMENT PROPERTIES/RAY TRACING. The ‘reflection’ setting is set to 1 by default and controls how many times your reflection will bounce. If you have objects with adjacent reflective appearances, increasing the ‘reflection’ setting will cause your reflection to bounce more times. You see reflections of reflections in your objects and this increases the realism of your image.
The ‘refraction’ setting determines how many transparent layers light will bounce through. For example, if you had a hollow cube with a glass appearance applied, you’d have to look though four transparent layers to see what was behind the cube if viewing straight from the front to the rear. Each wall of the cube has a front and a back, meaning each wall has two transparent layers. Add a glass center divider to the cube and you have six transparent layers to view through. Since the default ‘refraction’ setting is 4, your cube with a center divider rendering would be grey in the center. To have a clear view through the cube, you’d need to adjust the refraction setting to 6. Use caution when adjusting: too little and your rendering won’t live up to expectations. Too much and your image processing time will increase dramatically.
Decals: they just fade away
When you create a PhotoWorks decal you have the option to use a mask
Appearances that fade from one colour or one appearance to another don’t exist in PhotoWorks, but you can still create the effect using decals – the secret is in the mask. When you create a PhotoWorks decal you have the option to use a mask. Decal masks work on a grayscale rule: any portion of your mask that’s pure black will be masked out; pure white will be transparent. The grayscale values between pure black and pure white give you degrees of transparency. A black to white gradient mask will create the ‘fade’ effect.
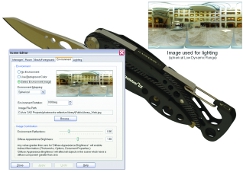
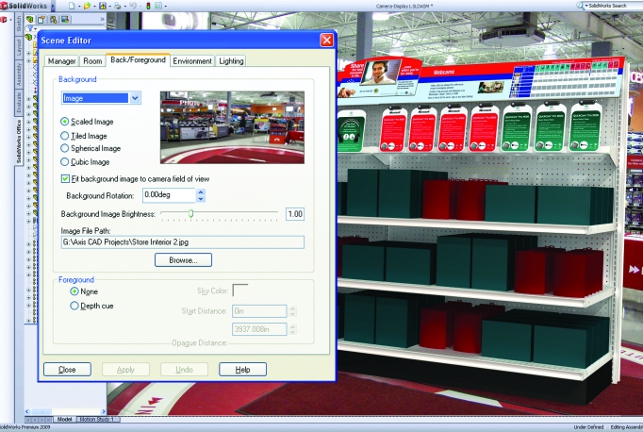
Backgrounds: using pictures for product placement
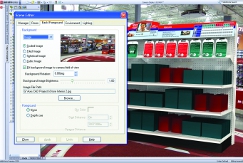
PhotoWorks has an easy way to solve the problem of placing your product in a realistic setting
Placing your product in a realistic setting is an easy way to increase your rendering effectiveness. Problem is, who has time to create solid models of the many different studios you may require?
Luckily PhotoWorks has an easy way to solve this problem. Open the Scene Editor, select the BACK/FOREGROUND tab, choose ‘image’ and browse to your desired background. To be sure the image is viewable in the SolidWorks graphics area, go to TOOLS/OPTIONS/SYSTEM OPTIONS/COLOURS and be sure the ‘background appearance’ setting is set to ‘use document scene background’. Voilà, you have an instant studio for your product placement. To add one more layer of realism to your image, be sure to set your floor to the ‘shadow floor’ appearance and check the ‘visible’ box. This will cast a shadow from your model on the background image.
Alpha channels: merge your rendering Easily
Many times you’re simply providing an image of your model and someone else will be using your image to composite another image. You can make merging your images with others easy by utilising file output formats with alpha channels. The two formats I generally like to use the most which allow for this are .tif and .png.
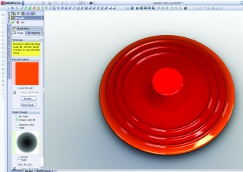
Brightness, contrast, saturation: it’s easy to adjust the levels
You’ve created the perfect image but wish the entire rendering was a just a bit brighter, had a little more contrast or the colour saturation was different. In the past this meant adjusting the levels in an image editing program. In PhotoWorks 2008 this functionality has been added to the main product. Just render your image to the screen, go to PHOTOWORKS OPTIONS/DOCUMENT PROPERTIES ‘image adjustment’ and adjust the sliders to create the desired effect. The best part of this process is that your image will update in real time to the screen while you make adjustments.
PhotoWorks Options: speed up the process
Test rendering is a vital part of the overall process of creating the perfect image. However, it can be very time consuming to be continuously rendering your image to screen while you’re making adjustments. To speed up this process, you can adjust some of the PhotoWorks Options settings. Specifically, set the ‘antialiasing’ setting, found in PHOTOWORKS/OPTIONS/DOCUMENT PROPERTIES to ‘medium’. Also under the ILLUMINATION tab be sure that the ‘indirect illumination’, ‘caustics’ and the ‘global illumination’ settings are all set to ‘draft’ or ‘minimum’. Once you’ve finished test rendering, you should adjust these settings to higher levels to process your final image.
And there you have it: ten tips to better PhotoWorks renderings. Of course, these tips only touch on ways to improve your images. For more in-depth information covering all of the PhotoWorks tools available, you should really check out the 2008 PhotoWorks Step By Step Guide. Consider that tip number 11.
Rob Rodriguez provides CAD services and SolidWorks consulting through his business Axis CAD Solutions LLC (www.axiscadsolutions.com). He is co-author of the 2008 PhotoWorks Step By Step Guide and his website www.robrodriguez.com offers a monthly PhotoWorks rendering contest. 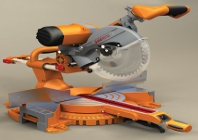
Rob Rodriguez’s top tips for achieving rendering perfection using PhotoWorks within SolidWorks


