

Markforged Mark Two – Following on from last month, we turn our attention to the fibre composite capabilities of the machine, how it works, what end results it’s capable of and the benefits it can bring
Last month, we looked at the basics of the Markforged Mark Two and found a desktop printer that provides a very workable build envelope of 320 x 132 x 160 mm with a nylon and composite filled nylon variant filament material.
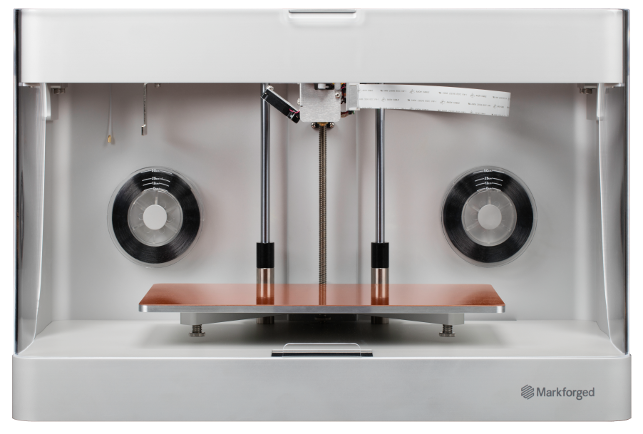
Fig 1 With its aluminium casing, the Markforged Mark Two certainly looks more the part in a design or engineering office than most 3D printers at the desktop level
On that premise alone, the machine impressed us, both in terms of the end result and the consistency that’s a trademark of the system. That said, the real interest in the Markforged machine has grown around its additional ability to add in single strand fibres (of a variety of types) to build composite parts.
This is what we’re going to explore this month in a little more depth.
Let’s start by looking at how the machine enables the deposition of fibres as part of the build process first. The answer is that the Mark Two (as the Mark One before it) is a dual extrusion head machine.
You’ll notice from photos of the machine that behind the build plate are two reels — these are the much smaller fibre reels.
Both are held on with simple but strong magnets. The one to the right is purely for storage and the left is where the fibre feeds from.
As we mentioned last month, the calibration process requires that the user calibrate both print heads during set up.
The fibre nozzle differs from usual filament extrusion heads in that it also includes a cutting mechanism for cutting the fibre once it lays each run of fibre.
So, now the mechanism is out of the way, let’s talk about the really key factor — how to go about designing a composite part in the Markforged Eiger.io system.
Markforged Mark Two – composite design in Eiger
Eiger is Markforged’s software connectivity and pre processing system. Because it’s predominately cloud-based (there is an option to run this off line which we’ll explore later), it provides some pretty serious compute power. And when it comes to pre processing an STL file for a composite build, that power will definitely be needed.
So, let’s start with the basics of how to take a part and prepare it for build in a composite manner.
As we covered last month, the process begins by uploading the geometry to the system. Now in the global ‘part’ view, the user can define the overall parameters, such as the number of boundary layers (on both the walls together with the top and bottom of the part) as well as the overall in-fill (there’s a choice of triangular, hexagonal or concentric ) and the associated density.
There is now the ‘Use Fibre’ toggle with which the system automatically constructs a sandwich panel type arrangement for the build.
It’s at this point, a basic knowledge of composite design is handy. However, if you’ve not worked in this field, then it’s worth getting hold of a good textbook.
To inspect what the system has done, switch to the ‘Internal View’. This pops up the same part, but allows the user to inspect the internals of the part build scheme. The 3D view shows the whole thing, with the various layers, fibre layers (in blue) and any support structures needed.
At the bottom of the screen there’s a horizontal widget that shows the make of the part layer by layer. The graph in that bar also shows how much fibre is being deposited and allows the user to make changes to that “group” of layers in one hit.
That group can be expanded to add fibre to more layers or indeed, to reduce it to where it’s needed most.
If the user would like layer by layer control, a switch to the 2D view allows a step through each layer at a time.
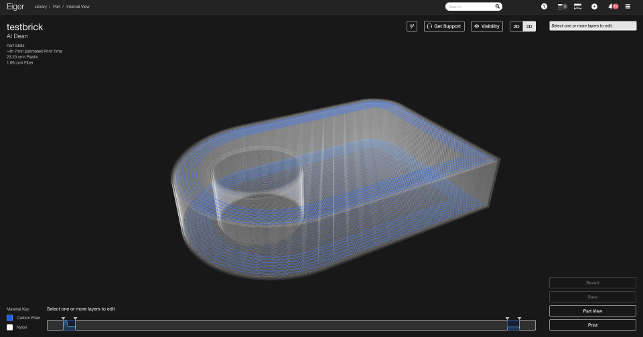
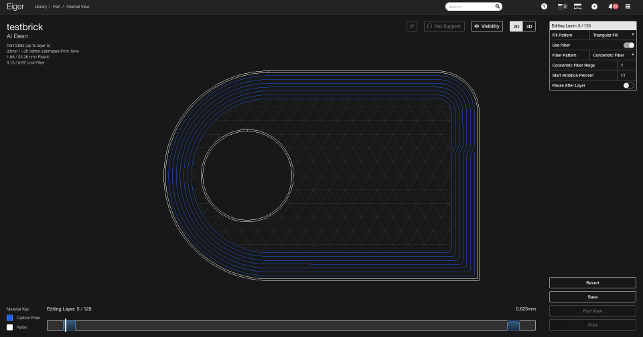
Fig 2 & 3 Markforged Eiger’s 3D internal view then the 2D view, showing concentric rings of fibre. Note the single strand running around the whole part’s periphery
Markforged Mark Two – layer configuration
When it comes to fibre layers, there are two key forms of fibre deposition.
Concentric is just as you would imagine. It follows the outer profile of the part and fits a single strand of fibre inwards in rings from that outer boundary. If you take a good look at Figure 3, you’ll see that the test part is defined with seven concentric rings.
Further inspection shows that this is a single strand (the point where it moves to the next ring is circled in red). Interestingly, the system knows that this point is a potential area of weakness, so if there are multiple layers at the same settings, Eiger will automatically move this transition point around the part, so there’s good overlap.
The other option is isotropic. As you’ll see from Figure 4, this is a more linear approach to fibre layout. What’s interesting here is that, firstly, it fills the complete layer where possible with a single strand, but secondly and more importantly, the user has explicit control over the angle of that deposition.
Just as in more industrial, established composites design, the user has full control over this layer by layer. Of course, global parameters can be defined (to rotate each layer by 45 degrees for example), but if the user wants to dig into it and truly optimise a design, then this can be done layer by layer if needs be.
To further complicate things, it’s also possible to combine the two, as shown in Figure 5. Again, the user has full control over the global and individual layers, rotation, number of rings and so can really go to town.
Once the part is in a fit state, it’s ready to print and this follows the usual process of aligning it on the print bed, preparing the machine and either selecting the part from the print queue (on the machine) or sending it to print directly.
The rest is pretty much the same. The system goes away, does its thing and sends a notification when it’s done. Then it’s a case of removing the parts, cleaning up the print bed for the next job and removing any supports.
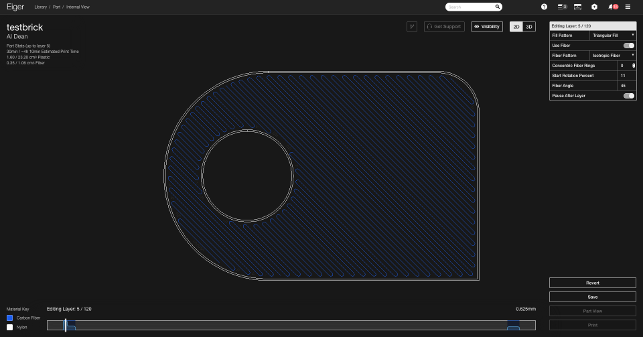
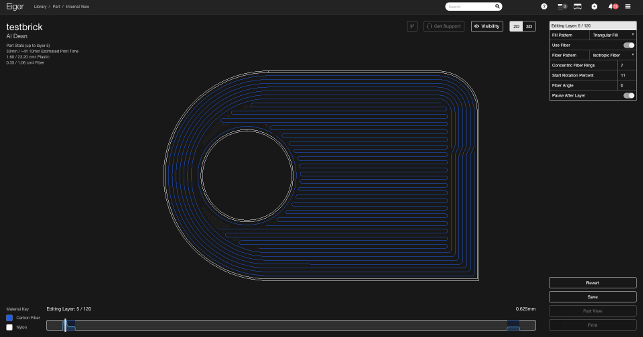
Fig 4 & 5 The same part but with an isotropic fill, then a combination of both concentric and isotropic fill — all controllable, layer by layer
End results with fibre
Composite design is a complex business, whichever way you cut it and whatever method you’re using to build the parts.
When it comes to 3D printing, the complications are there, but your use is also restricted in a couple of ways.
Foremost, there’s the linear nature of the beast. The 3D print process requires that all of the fibre deposition is done in a single plane. We’re not talking about fibre plies laid over a former here. This is strictly 2D in nature. That means that the benefits that will be derived are inherently limited to both the user’s imagination and ingenuity, as well as the form of the part and how it is arranged on the print platform.
That said, there’s huge potential here to be creative and find ways to not only improve a part for prototype’s sake (you can get a much lighter weight, but stiffer part than most 3D printers), but there’s also potential for end use parts.
While many of Markforged customers aren’t talking about their use of the machine yet, the ones that are have a couple of things in common. One is that they’re using the machines to provide end use parts to either go into the field or to support production. It’s found a home in jigs and fixtures, as parts can be made that would typically have a fi nite lifespan or are sacrificial, but require something a little more sturdy than your typical 3D printer is capable of.
Others are building low-volume components that are suited to the mix of a nylon base material with the added mechanical and thermal benefits of fibre reinforcement.
At present, Markforged has two core materials. The standard Nylon is a good core to start with, then the team has just introduced the Onyx material that boosts Nylon’s properties with micro carbon fibre in fill.
Then you get into fibres. Glass fibre is the cheapest (we’ll get onto costs shortly), then there’s Kevlar and Carbon fibre.
There’s also a new high temperature glass fibre for applications over 105°C, with a heat deflection point of 150°C.
The possibilities are expansive with this combination and the selection of material combinations will depend entirely on what the user wants the parts to do, their geometry and how they want them to perform — something which is very hard to quantify in the context of this review.
Markforged Mark Two – cost of ownership
Now. Let’s talk turkey. How much does this bad boy cost? The answer is surprising, considering what it does.
The base price for the Markforged Mark Two is $5,499/£3890. That includes the machine, 1,000cm3 of nylon base material, 50cm3 of glass fibre, one set of nozzles and a single base plate. To my mind, that’s a steal. But then it gets interesting. As you step up the range, the capabilities grow.
The Markforged Mark Two Professional (at $8,799/£5,990) includes the machine, two build plates, three sets of nozzles, 2,000cm3 of nylon base material, 200 cm3 of glass fibre, then 100 cm3 of both carbon fibre and Kevlar.
If you want to go all in, then the Markforged Mark Two Enterprise bundle is $13,499/ £9995. That includes everything in the Professional kit, but the material bundle changes: 1,000cm3 of Nylon, 100 cm3 each of glass fibre,
Kevlar, carbon fibre and the new HSHT glass fibre. It also comes with 800cm3 of the Onyx carbon filled nylon too.
It’s also worth noting that while the Standard kit gives you just the cloudaccessible Eiger platform, both the Professional and Enterprise kits allow you to run this locally, without the cloud-based infrastructure for the more security tight environments.
In terms of consumables, the machine comes with everything needed in terms of your first set of prints and experimentation (which I would imagine will be high as you get a feel for how best to use this machine).
After that, as with every machine, there are parts that need to be replaced and additional materials to be purchased.
In terms of parts that will need to be refreshed, the nozzle sets are priced at £43. With most 3D printers, as soon as you start to work with more aggressive materials the nozzle life reduces. In contrast, the nozzle that Markforged supply is tougher than most, but are still a consumable at the end of the day.
The same is true of the print beds. These are priced at £129 each, but should last a good while with good care and maintenance.
As for the materials, these are pretty straightforward. The base Nylon is £170 for a 1,000cm3 reel. That’s more costly than your typical filament, but this is a specialised material formulated to play well with other materials. The Onyx build material is £130 for 800cm3.
When it comes to fibre, it varies, as you would expect. All are supplied in smaller 50cm3 with glass fibre being the cheapest at £59, Kevlar £79, Carbon fibre £99 while the HSHT fi bre hasn’t yet been priced in the UK.
In our test parts, we found that the costs per part on the test builds were competitive with other professional level machines. Yes, as you add fibre, the price goes up, but with judicious design choices, this can be managed effectively. It’s also worth noting that the build times also increase as soon as you start to factor in fibre, but that is to be expected.
In conclusion
It struck me while writing this part, that we’ve talked as much about the software tools as the actual Markforged Mark Two machine and this perhaps does it a disservice as it’s an incredibly well engineered machine that has given us a 100% success rate with whatever we’ve thrown at it.
The reality is that when you have a reliable machine like the Markforged Mark Two, you’re ultimately left with the hard work to do — and in this case, it’s working with Eiger to make sure that your use of fibre reinforcement is exactly where and in whatever form you need it.
This isn’t a simple case of choosing the best orientation angle for your model so you have the best surface finish, this is about making engineering decisions on the form of your part and a near granular level of control over where key material is placed.
Of course, you can just run with the defaults, choose whether or not to include a couple of layers of fibre where you need them quickly, and hit print but the Mark Two is capable of much more.
The results will depend on what you want your part to do and as such, it’s a proper engineering tool and manufacturing system, one that can do things that no other system can at present.
That potential for experimentation is enabled by the Eiger system that’s core to the whole experience. It’s structured in a way that supports engineering and design decision making and experimentation (with its branching and version management tools). It also enables sharing and collaboration.
But perhaps most importantly, it gives you granular control that is not often seen in 3D printing related software — down to the layer and sub layer level. It’s this simple fact that makes the Markforged Mark Two an impressive solution and one that will find a home in a wide variety of companies and organisations.
As much as we’ve seen the explosion (and subsequent implosion) of hype surrounding 3D printing, we’re only now starting to see truly unique machines and processes come online that give professionals a set of tools that support and benefit design and engineering.
We’re past the cost cutting and ever cheaper machines and into the realms of true innovation.
Those of us that have been around the industry for awhile are tired of ever cheaper machines that do the same job, just slightly less efficiently with questionable build quality and consumer priced, crappy materials.
The Markforged Mark Two shows that the new age of 3D printing can bring something new and robust to the industry and push things forward — without breaking the bank.
So, although the Markforged Mark Two is impressive, when considering the cost of ownership, it becomes even more impressive. Yes, the Professional and Enterprise level bundles push the price up, but remember that for under 10 grand, you’re talking about a machine that can build with advanced and an expanding range of materials. It still represents outstanding value for money.
There’s much to get excited about — the machine is rock solid, performs consistently and has the potential to change how both prototypes and production (at low volume) are built. I couldn’t recommend it more and trust me, your desktop will never be the same without one.
Tech-specs
» MarkForged Mark Two
» Nylon Filament + Single Strand Fibre
» 320 x 132 x 160 mm build volume
» 575 x 322 x 360 mm machine dimensions
» 13kg weight
» 0.1mm layers
» Nylon + Fibre (Carbon, Kevlar, Glass)
» Material spool containment, build plates, model removal + clean up tools
» 1 year return to base warranty
» Price From $5,499/£3890 + VAT
» markforged.com
| Product | Markforged Mark Two |
|---|---|
| Company name | Markforged |
| Price | From $5,499/£3890 + VAT |


