


Fusion’s latest updates have brought photorealistic rendering including Depth of Field and animation support
Unless you’ve been under a blanket all winter (or, more likely, buried with work), you’ll know that Autodesk has been pushing the messaging around its Fusion 360 product pretty hard.
Fusion is Autodesk’s cloud-based design, engineering and manufacturing offering that relies on a cloudbased infrastructure combined with more localised computation where neccessary. It brings together direct editing, parametric and history modelling, 2D drawings and much more.
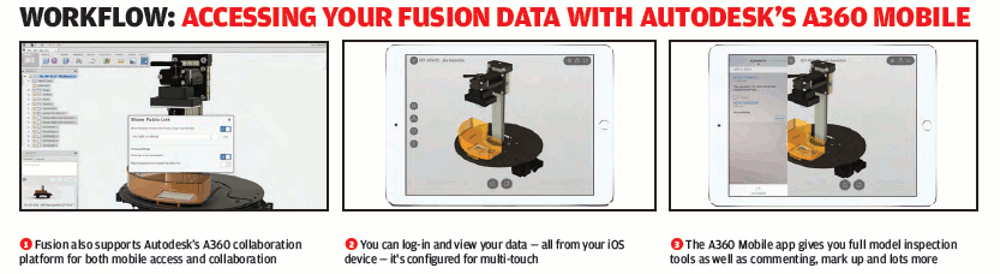
The concept is that while you have a locally streamed application (that keeps you up to date), your data primarily resides in the cloud — and that enables some interesting things to be done. Not least, centralised and accessible data enables sharing of that data with those that need it and more in depth project collaboration where you may have multiple parties working on the same project.
In the last review, we looked at some of the key updates that Autodesk had made to Fusion in the months preceding. To recap, those included the introduction of history tracking, 2D drawings based on your 3D models, 2.5 and 3 axis CAM and a whole lot more work done on both the workflow of existing tools as well as project management and collaboration.
What’s interesting is that the team is sharing its roadmap publicly, so you can dive in and see what’s coming in the next few months. Our goal here is to catch you up, so you have a good appreciation of what’s going on.
User experience changes
The user interface hasn’t changed a great deal.
Perhaps the biggest change is how the user interacts with projects — much of this has been removed from the Fusion interface and moved to the A360 collaboration platform.
While it removes some of the immediate look up and project tools, it does make the workflow easier if you just want to get designing and making parts.
Error handling
This is one of those smart ones — we’re all used to modelling systems not giving us the geometry we want.
It’s often the case that the mathematics behind it can’t work — fillets is a solid example. What’s key is that the system gives you feedback about why the geometry you want can’t be built, so you can learn from it and fix it.
Fusion’s March update brings online some of this type of feedback, particularly when you’re dealing with the likes of holes, chamfers, threads, shells and such.
Standard parts library
If you’re not familiar with McMaster Carr, then its a predominately US focussed organisation that sells all manner of engineering fixtures, fittings, fasteners and components.
It also has a very nice filtering and search front end to its catalog and a good range of 3D CAD models for many of those components.
What Autodesk has done is integrate that exact same front end into Fusion. Found in the Insert pull down, it fires up a browser window inside Fusion, lets you find the part you want and instead of downloading the part file, it’ll insert it directly into your Fusion session. It can then be positioned and reused where needed.
The part entry in the product structure is automatically given the part number from McMaster Carr, so BOMs should be a snap to turn into an order, particularly when you’re building prototypes.
Rendering – local
Perhaps one of the most useful, for those in design and engineering, is the introduction and refinement of the rendering options in Fusion.
While the system got KeyShot integration pretty early on, that wasn’t much use unless you already had the system licenced.
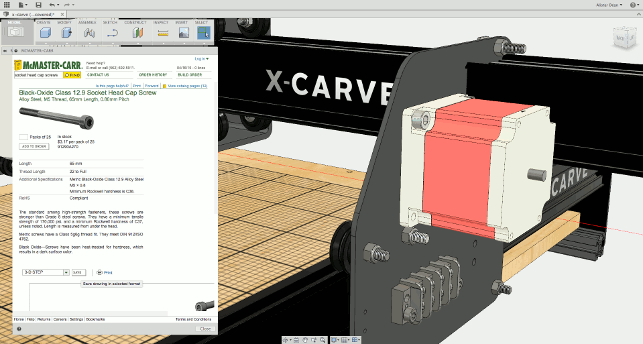
This release brings direct integration of McMaster Carr’s parts library into the Fusion interface
Since earlier this year, Autodesk has brought similar-ish tools directly into Fusion and they’re found under the Render environment.
The workflow follows a pretty standard process — if you’ve not defined materials and textures for your model, you have a library (that can be customised) of materials that can be dragged and dropped onto your parts — these alone are pretty well developed and give you realistic results just with the standard shading options in Fusion.
If you then want to up the ante, you can set-up scenes, which uses a range of prebaked in HDR images to define lighting and background (though you can adapt background to your requirements).
There’s controls for the brightness and contrast of those lights as well as rotate to allow fine tuning of highlights and such.
Now it’s time to try the different rendering methods. The standard view is pretty good and doesn’t require any computation. Fusion has some nifty bells and whistles that make models look realistic while you’re working on them.
You then get into the ray tracing. As is now standard, Fusion uses a progressive renderer that’s built on its own, brand new engine — with the company’s master of rendering in the movie world, this comes as no surprise.
As you soon as you hit the Ray-trace icon (A teapot of course), you’ll hear your workstation’s fan spin up.
There are a couple of settings. Normal gives you a nice result, but without any self shadowing. Switching to advanced gives you those self shadows and your model looks much more realistic.
If you want to really nail things, then you open up the camera controls dialog. This is where you’ll start with using the model view, but you can dial things in further.
Recent updates have introduced controls over perspective view as well as providing depth of field controls — pick the point you want to focus on, vary the controls to adjust focus and you’re done.
Rendering – cloud
The issue with the ray tracing is that it’ll hammer your local processing resources pretty hard and render your workstation pretty much inoperable until it’s settled (there’s no core limiter as yet). To combat this, Autodesk has, in the last update, introduced a cloud rendering option.
The concept is this. Rather than using local computational resources (read: making your workstation run hot enough to melt aluminium), you can off load that load to Autodesk’s servers.
The system gives you a nice clean dialog to define size, resolution and such. Click Start Rendering and the system sends the job to compute.
It’s worth noting that there’s a cost implication for this service. It uses Autodesk’s cloud credits. Each Fusion 360 account gets 100 cloud credits to use across all of its services (that covers rendering as well as simulation solves).
A quick way to think of the costs is that each costs $1 and one credit gets you a megapixel. You’ll see a cost (in terms of credits) before you send it off, so you know what you’re getting yourself into — it also sums up what you’ve used and what you have left.
I’m told that Autodesk is keeping a close eye on usage patterns in the context of Fusion and we might see some adjustment in terms of what you can get and how much additional credits cost.
Alongside the off-loading of computation, the cloud renderer option gives you access to a stored library of images (it gives you small scale, standard views for free — you’ll see this across the bottom of the UI in figure 1) as well as the ability to calculate a turn
table animation.
Beware that the turntables use the same credit system. So, if you bump up the image size and the number of frames, you’ll use more credits — if you render out a 36 frame turntable at 7.9 megapixels (that’s just 1280 x 1024) it’s going to cost you $24 worth of credits.
It’s a discounted rate, and again, this is being looked at by the powers that be, but at present, you could burn through your allowances very quickly indeed.
Pricing aside, once calculated, you can download these turntables either as static frames, as a movie or as a web-embeddable file, without the need to compute them again.
Documentation & drawings
Just at the tail end of 2014, Autodesk began to introduce 2D drawing capabilities into Fusion.
Based on the lessons they’ve learnt with the web-based AutoCAD 360, these tools are laser focussed on the creation of drawings based on Fusion models.
They follow the same protocol as most of today’s 3D design systems — you start with a base view, add in projected views, isometric view then start to add in your annotations, sections, etc.
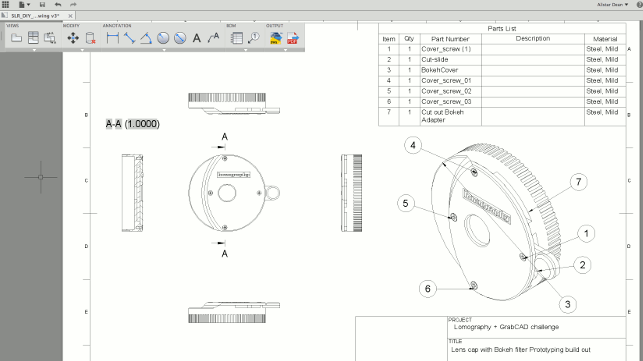
Recent updates have seen drawing tools enhanced. Parity is there across PC and Mac as well as new tools for sectioning, detail views as well as parts lists and balloons
The most recent releases have seen the introduction of sections as well as parts lists and associated balloons that link to that part’s list.
There’s also parity across both the Windows and Mac platform (the initial release was Windows only).
Conclusion
Fusion has been released for a couple of years and that time is showing the maturity of the toolset. The 3D modelling tools, whether you’re using the direct modelling, history based tools or t-splines for organic shape, are maturing nicely.
The new environments for animations (we haven’t touched on), rendering and CAM are also starting to mature.
There’s also an interesting set of tools that see Autodesk take advantage of the cloud in interesting ways, whether that’s cloud-based rendering or the new standard parts focussed tools.
On that subject, the McMaster Carr is another good example of combining local and cloud. It’s shame that’s it’s such a US centric outfit, but there’s plenty of metric options in there for those that need it — even if the fasteners come in with the threads hard modelled (if you’re reusing them a lot throughout your assemblies, I’d suggest a quick remodel after import to simplify them some what).
The drawing creation tools are also coming along nicely. You aren’t likely to get a fully annotated drawing with full GD&T out of it yet, but if you’re documenting a design, perhaps for quotation, perhaps for contract manufacturing based on a 3D model, it could get you there. And let’s face it, Autodesk knows digital drawing inside out.
The coming months are going to be interesting for Fusion: the published roadmap shows that there’s much more to come.
From simulation and better working with electronics data, from simultaneous collaboration with shared sessions to the introduction of 5 axis support to CAM on the horizon.
There are also a few things coming that we’ve seen that aren’t on that public roadmap, but believe us, you’ll like it when you see it.
Keep an eye on Fusion 360. The 3D design world is exploring new places and trying new things, and Autodesk are leading the charge.
Fusion CAM: What’s new for CNC programming & machining
While all of the CAD modelling and rendering tools are nice, what’s got a lot of folks interested in Fusion 360 are the CAM tools.
Whether they’re looking for a lower cost alternative to the 2.5 or 3 axis CAM they’ve already got in-house or indeed, are bringing machining (whether at the production end of the spectrum or in the prototyping/workshop environment) in-house for the first time).
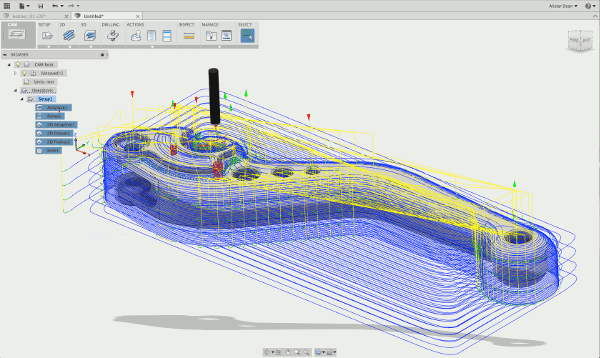
If you’ve not had a chance to try it out, the gist is this. The CAM tools are found in their own Environment. This switches the UI from modelling to the programming of operations. You then work through a clear workflow for part programming.
You start with set-up details — defining the set-up, datum, material stock and the like. You then get into the selection and creation of operations. Fusion 360 has two levels of product — Fusion 360 and Fusion 360 Ultimate.
The difference between the two is that the standard variant gives you 2 and 2.5 axis machining capabilities, allowing you to program simple parts (and if you’re into CNC routing, it’ll handle that perfectly too). The Ultimate version brings you more complex 3 axis tools (with 3+2 and 5 axis machining coming later on in the year).
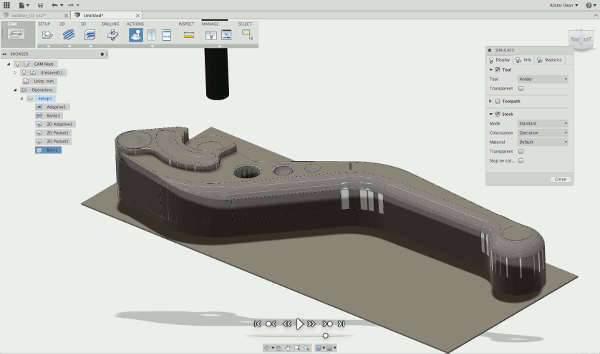
Whichever you’re working on, the workflow is the same — build the operations, using the built in simulation tools to perform simulated stock removal, keep an eye of tool movement and such, then when you’re happy with it, run it through the post processor to generate your G-code.
There’s been a number of key updates for this release.
For those using the system already, the addition of personal libraries, which are transportable between different computers, is a biggie. This lets you keep your tools/cutter, posts and templates with you, rather than having to manual copy (or worst case) recreate them between each computer you ran Fusion on.
Another (and a personal one on my wishlist) is the ability to measure the remaining stock between the simulated stock and the work piece when you’re running a simulation. There’s a whole bunch of other updates, but I’ll let you dig into them if you’re running it already.
The CAM tools in Fusion are perhaps one of its best kept secrets — there are a lot of folks getting back into machining again or perhaps for the first time.
The rise of affordable desktop or small workshop-based CNCs is another factor (we’ve just ordered one for the D3D workshop to run tests on). There’s a desire for professional grade CAM tools, but few are able to justify the high costs of traditional software.
Considering that Fusion includes up to 3 axis for $100 a month, that’s a bargain.
| Product | Fusion 360 |
|---|---|
| Company name | Autodesk |
| Price | FREE to $25 (standard) /$100 (Ultimate) per user per month |


