When it was first unveiled to the public in 1905, the Diplodocus skeleton at London’s Natural History Museum became an overnight sensation. Affectionately known as “Dippy”, for many years it was one of the first specimens that visitors saw on entering the museum, and during its time at the museum it became famous throughout the world appearing in cartoons, news reports, and even playing starring roles in film and television productions.
During its 100 years at the Natural History Museum, Dippy led a busy life. It was re-assembled several times, survived the bombings on London during the War, moved location (to the main entrance Hintze Hall in 1979), and even changed posture as we came to understand more about this iconic animal.
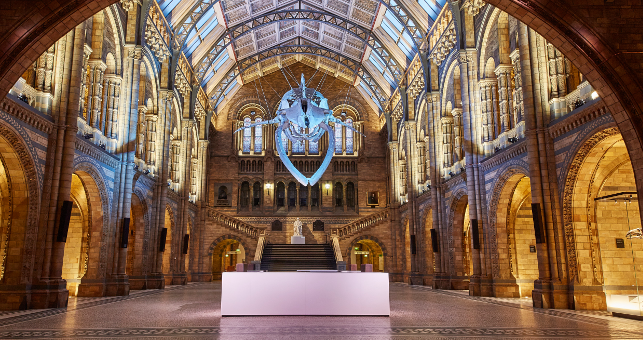
In 2016 it was announced that Dippy would be replaced by a skeleton of the Earth’s largest living mammal, the blue whale, which is to be suspended from the ceiling of Hintze Hall. Meanwhile, Dippy is to embark on a nationwide tour of the UK lasting until late 2020, with over 1.5 million people expected to visit him on his travels.
Measurement Solutions – Industry meets archeology
In preparation for exhibiting the blue whale skeleton, scientists from the Natural History Museum’s Department of Palaeontology called upon Measurement Solutions to assist in 3D scanning the skeleton components, in particular the huge skull.
Although the museum has recently invested in several 3D scanners, including Creaform’s latest hand-held Go!SCAN 20 and Go!SCAN 50, supplied by Measurement Solutions, these are only suitable for items that can ideally be placed on a work-table and make up the majority of the museum’s scanning needs, such as the individual bones of a skeleton, fossils, etc.
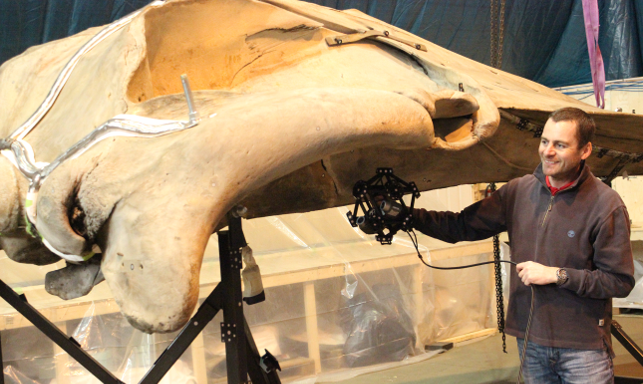
With the blue whale skull measuring in at around six metres in length, the scientists recognised the limitations of the technology they had available, and the need for accurate large scale scanning to deal with the shape and size of the whale’s skull.
To make matters more difficult, the skull was to be scanned suspended in an aircraft hangar, while it was being prepared for display in London, which meant that it was likely to move during the scanning process. There was also a limited time window in which the work could be done due to the tight constraints in getting the blue whale ready for display.
So the details of the scanning job were clear – to scan a large animal skull of which there was only one in existence, in adverse conditions, to a high degree of accuracy, as quickly as possible, and get it right first time!
With that in mind, engineers from Measurement Solutions arrived on-site during a cold week in February to carry out the scanning work on the skull. The work presented an unusual challenge as the equipment used by Measurement Solutions is more likely to be used for scanning such items as aircraft components, Formula 1 cars, clay models of new car designs, vehicle chassis and body assemblies, train carriages, and many other manufactured parts and assemblies.
It is not every day that the engineers are asked to scan an iconic item such as the skeleton of a blue whale. In order to manage and facilitate the work as efficiently as possible, the process was broken down into three stages.

The Measurement Solutions team using high resolution scanning with its MetraScan hardware
Preparation with photogrammetry
The engineers started by laying out a series of small reflective targets on and around the area of the skull.
Using a Creaform MAXshot 3D photogrammetry system, a series of digital photographic images were taken and used to compute the exact locations of every target to within a few microns of accuracy.
This provided the engineers with a reference frame that would remain permanent throughout the whole of the scanning process, which was scheduled to take several days, such that all of the scan data would be automatically aligned. As time went by, it became evident that this simple process served to result in the engineers being able to drastically reduce the time needed to scan the skull.
One of the big advantages of using the MAXshot 3D was the fact that, as the skull was suspended using wires, it was susceptible to movement. As some of the targets had been applied directly to the skull and the associated framework (which was used in places to hold the skull together), if anything was to move during the scanning process the skull and the photogrammetry targets would move in unison, thereby maintaining the reference between all of the scan data sets and removing the need to re-scan areas.
This process, known as Dynamic Tracking, also completely eliminates the complex and time consuming best-fitting of multiple scan areas associated with most scanning devices, maintaining the accuracy and integrity of the scan data at all times.
Measurement Solutions – Scanning and data acquisition
Once the work with the MAXshot 3D was complete, a process that took less than one hour, the skull was ready to be scanned.
However, a further stipulation from the museum’s scientists was that the engineers must not apply any kind of coating or spray to the skull or sub-structure. This created an added complication as the framework holding the large cranium area included shiny and glossy black areas – aesthetically pleasing, but not ideal for scanning.
In order to scan such a large area quickly and accurately, without using spray, and to a resolution that was suitable for the museum’s needs, Measurement Solutions utilised the latest MetraSCAN 3D hand-held laser scanner.
Comprising 14 high definition laser scan-lines, MetraSCAN 750 is able to scan any kind of surface extremely fast, as the lasers automatically adapt to the surface reflectivity and colour, removing the need to apply anything beforehand, much to the relief of scientists (and engineers) involved. The multiple laser lines can also capture scan data typically up to 25 times faster than scanners that only utilise a single laser line. Being completely hand-held and having no limitations imposed by a connected arm, the scanner is “tracked” in space by a tripod mounted digital imaging device known as the C-Track, which provides the user with a scanning volume of over 15m3 from a single setup.
In the case of the blue whale, even the standard scanning volume of the MetraSCAN 750 was not going to be enough to deal with such a complex shape, which is why the engineers performed the MAXshot 3D operation in advance.
By having co-ordinated targets located around the skull, the C-Track can be moved anywhere in the area. As long as it can “see” some of the targets it automatically calculates its location and orientation relative to the previous scanned data using a triangulation method, maintaining accuracy at all times and enabling the engineers to carry on scanning regardless of where they are on the skull, and even if the skull was moved during scanning.

The resultant scan data will be invaluable for the Museum’s staff
Data processing to final scan
Throughout the scanning process, the engineers fully utilised the Creaform VXelements scanning software, an easy-to-use software package that manages the complete scanning process.
By providing a “live” 3D scan on the computer screen, the engineers were able to quickly see the quality of the scan data and in particular areas in need of more data or that had been missed completely.
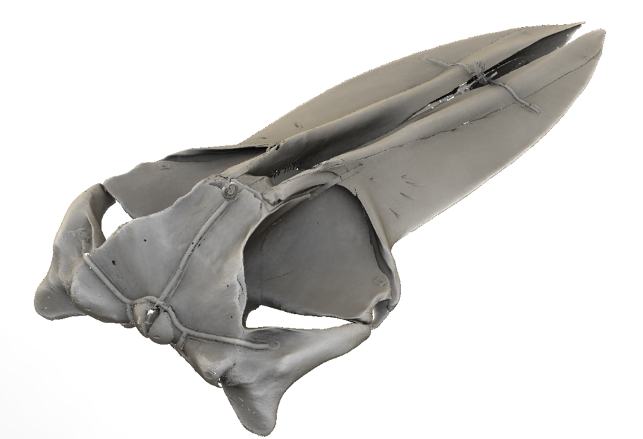
VXelements also provides an immediate high quality and optimised STL triangulated surface, so the scientists from the museum could directly see the quality of the scan data they were going to receive, without having to carry out post-processing activities such as cleaning, filtering, best-fit, and surface creation of the point cloud, all of which are extremely time-consuming and labour intensive.
Although the engineers had originally allocated several days to perform the scanning of the blue whale skull, it came as no surprise that the whole of the skull was scanned and the surface data created in less than two days. This was clearly due to a combination of the use of the MAXshot 3D system to prepare the area prior to starting scanning, the speed of the MetraSCAN 750 to rapidly scan large areas of surface, the ability to move the C-Track without any loss in accuracy or positioning, and the functionality of VXelements to efficiently generate high quality surface data without the need for hours of post-processing of point cloud data.
Upon completion of the scanning work, Measurement Solutions provided the museum’s scientists with optimised scan data files. This data will be fundamental in providing the Natural History Museum with a highly accurate digital representation of the skeleton that can be used for 3D visualisation and can also be transferred to other museums around the world for their own research purposes. The data also serves as 3D documentation should anything unforeseen happen to the blue whale during its long life on display in London. But, of most importance, the data will serve to assist scientists and conservators both now and in the future in their understanding of the development of such large animals.
The blue whale exhibit, affectionately christened “Hope”, is now located in Hintze Hall at the main entrance to the Natural History Museum in London, and is certain to be just as popular as Dippy was with visitors from all over the world in the years to come.


