EinScan HX – With a solid reputation for affordable 3D scanners, Shining 3D is now bringing blue light-based scanning to its range for the first time, as Al Dean reports. He finds a device that’s as capable as it is versatile
Regular readers will know that at DEVELOP3D, we’ve been fans of Shining 3D’s scanners some time now. You’ll also be aware of how the market for physicalform capture technology has blown up in recent years, with the increasing popularity of photogrammetry, which ranges from white light scanners sold for a couple of grand to the LiDAR sensor on the iPad in your bag or the iPhone in your pocket.
Shining 3D’s approach has been to take what was considered cutting edge technology in the 3D world a few years ago and reinvent it at a lower pricepoint, effectively using economies of scale to make specialist equipment more readily available to the mass market.
The company has already achieved this with white light scanners – and it’s now applying the same principle to blue lightbased scanning devices.
Blue light scanners have pretty much become the de facto standard for noncontact form capture in recent years. Whether in the form of structured light or laser scan stripes, the use of this light wavelength delivers real benefits over more common and lower cost white light scanners, and these merit a quick backgrounder.
Basically, blue light’s narrow wavelength is typically used in two ways: first, as a structured light form, where a known pattern is projected onto a surface and details are extrapolated via the capture of that pattern; or second, in laser form. Either way, with blue light, sensors/cameras are tuned to find a much narrower spectrum of light and filter out far more ambient light than white light-based counterparts. And less ambient light equals a crisper, less noisy scan. Blue light technology can also be used in a far brighter environment, meaning more real-world use and faster workflows.
So, with that in mind, shall we dive in and see what Shining 3D’s newest scanner, the EinScan HX, can do?
EinScan HX – The basics
The EinScan HX shares form conventions with almost every handheld laser scanning device available. You have a handle, a series of buttons, and then a cluster of projection devices at one end and cameras and sensors at the other. The configuration of these two sets of outputs and inputs are known, enabling a 3D point in space to be captured.
The set-up process for the EinScan HX is just about as plug-and-play as you could wish. The scanner is taken out of the Pelicase-like packaging and connected to both a power source and a high-speed USB slot on your workstation. The software and drivers are provided on a USB stick and are up and running in a matter of minutes – but before you start experimenting with your new device, you need to run through the calibration process.
Here, the software will guide you through the process, also using the calibration plate provided with the device. This handily combines a template for your work surface and a hinged plate bearing a known series of registration targets.
You begin with calibration of the structured light portion, then move on to calibration of the laser and the white balance (required for accurate texture capture). You’ll need to follow the on-screen prompts and spend a little time over the required tasks.
Though it’s painful to admit, I got stuck on the white light calibration portion for about an hour. The calibration process just wouldn’t complete properly – the compound effect, as it turns out, of two issues.
The first issue was that I was running the scanner connected to a 5K2K display, which the EinScan software really did not like, responding by effectively cutting off half of the interface. To resolve this, you can either plug in a more standard aspect ratio display or reset your resolution temporarily while using the scanner.
Once that was done and the full UI visible to me, I was able to solve the second issue quickly when I discovered a little note that told me to flip over the registration plate to show the white surface on the rear. With that task performed, the calibration was soon complete. A useful reminder to always read the bloody instructions first.
From that point onwards, you’re golden. The software records when you last calibrated the device, with the official guidance being that you should do this whenever you move the scanner to a new location or whenever there’s been a temperature change (although blue light devices are typically less sensitive to this.)
EinScan HX – Scan modes: Rapid vs Laser
The EinScan HX has two scan modes: Rapid Scan and Laser Scan. I’d like to deal with each separately.
First up, Rapid Scan is the structured light mode that uses image projection. You are effectively projecting a known image (similar to a QR code, but at a much finer resolution) onto your target’s surface.
Thanks to a combination of knowledge about the position of the light source and the capture (and distortion) of an image by a camera in a known position means that a point in 3D space can be triangulated and stored.
The benefit of this approach is that you can capture data very quickly and, if your object has a textured surface, you don’t really need to use registration targets.
What’s interesting is that you can combine the self-registering nature of this approach with target dots when needed, taking a hybrid approach that’s useful for scanning less textured parts and in big projects where several scans need to be linked together.
Rapid Scan works at a variety of resolutions, right down to 0.05mm with a volumetric accuracy of +0.1mm/m. The data capture rate is a little insane at 1,200,000 points per second at 20 frames per second and it works in the range of around 470mm from your object with a depth of field between 200mm and 700mm.
While the system can use the texture of the object to track either the movement of the object and/or the scanner, it can also capture that texture and provide it to you if you need it.
While in most reverse engineering workflows, where it’s the geometry that’s of most interest, this might be safely discarded. But then again, there are some workflows, such as asset capture for visualisation, where it might well prove useful, so it’s good to have both options in a single device.
Laser Scan mode differs in a couple of ways. First, rather than using projected images, the device emits a series of intersecting laser stripes. Again, the corresponding position of those stripes is captured and the coordinates of the various points recorded in 3D space.
Resolution is higher (down to 0.04mm), with a volumetric accuracy of 0.06mm/m, capturing 480,000 points per second.
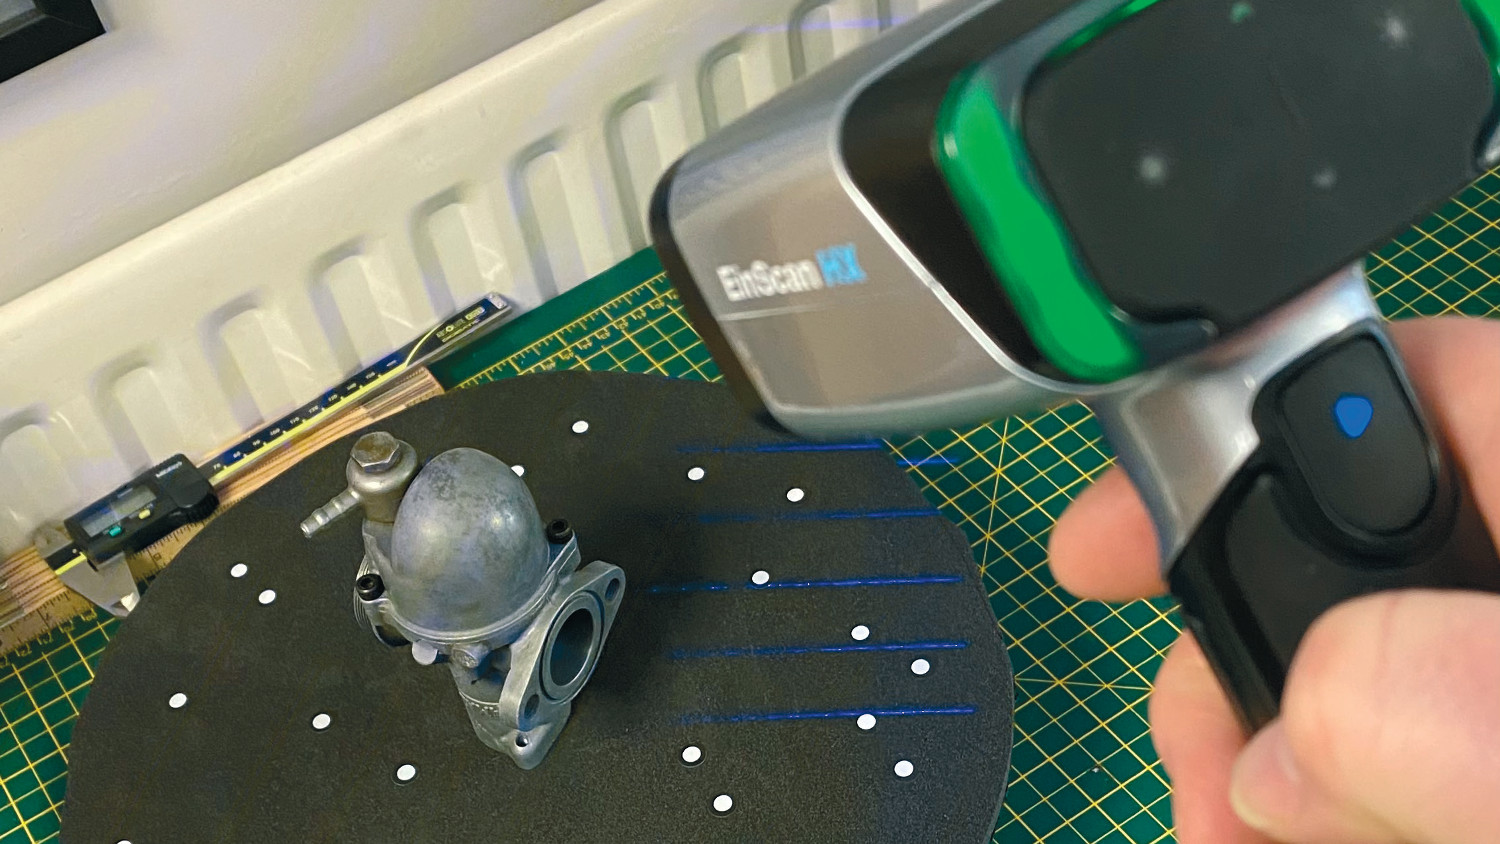
What’s also different is that, rather than using texture, laser scanning relies on registration targets to track the movement of the scanner and object. In our tests, we use a combination of registration targets on a black turntable or across the surface of the object. Both work equally well, assuming you have enough targets in view at any one time. (Here, more is most definitely better.)
Scanning workflow
It might be slightly over simplifying matters, but the workflow once you’ve selected the method most suitable for your task at hand, is much the same.
The software works on a job-by-job basis. You create a storage point and within that job, you store each of your individual scan datasets (which are rather misleadingly named ‘projects’).
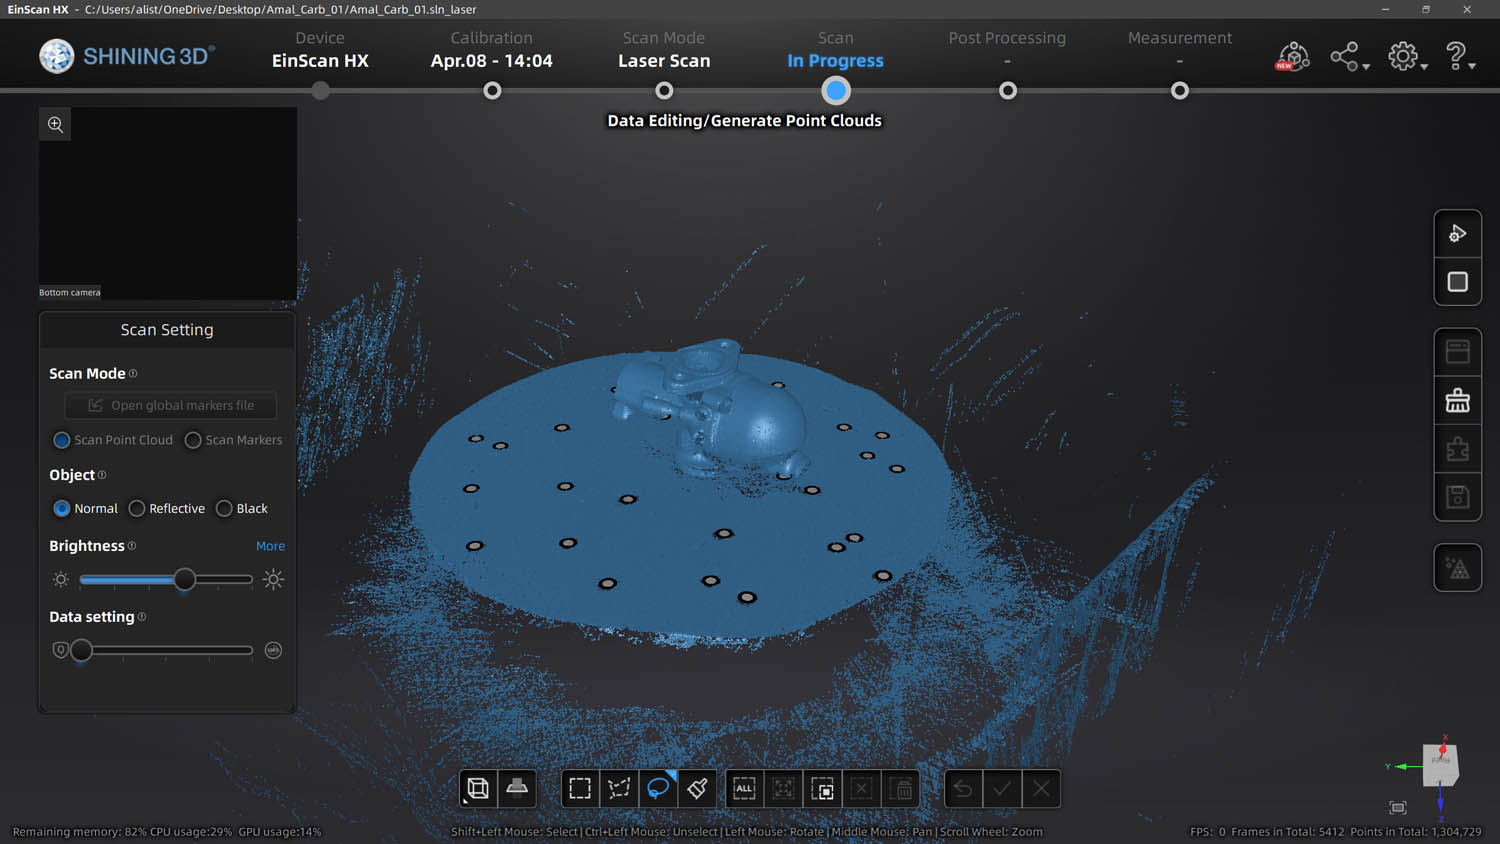
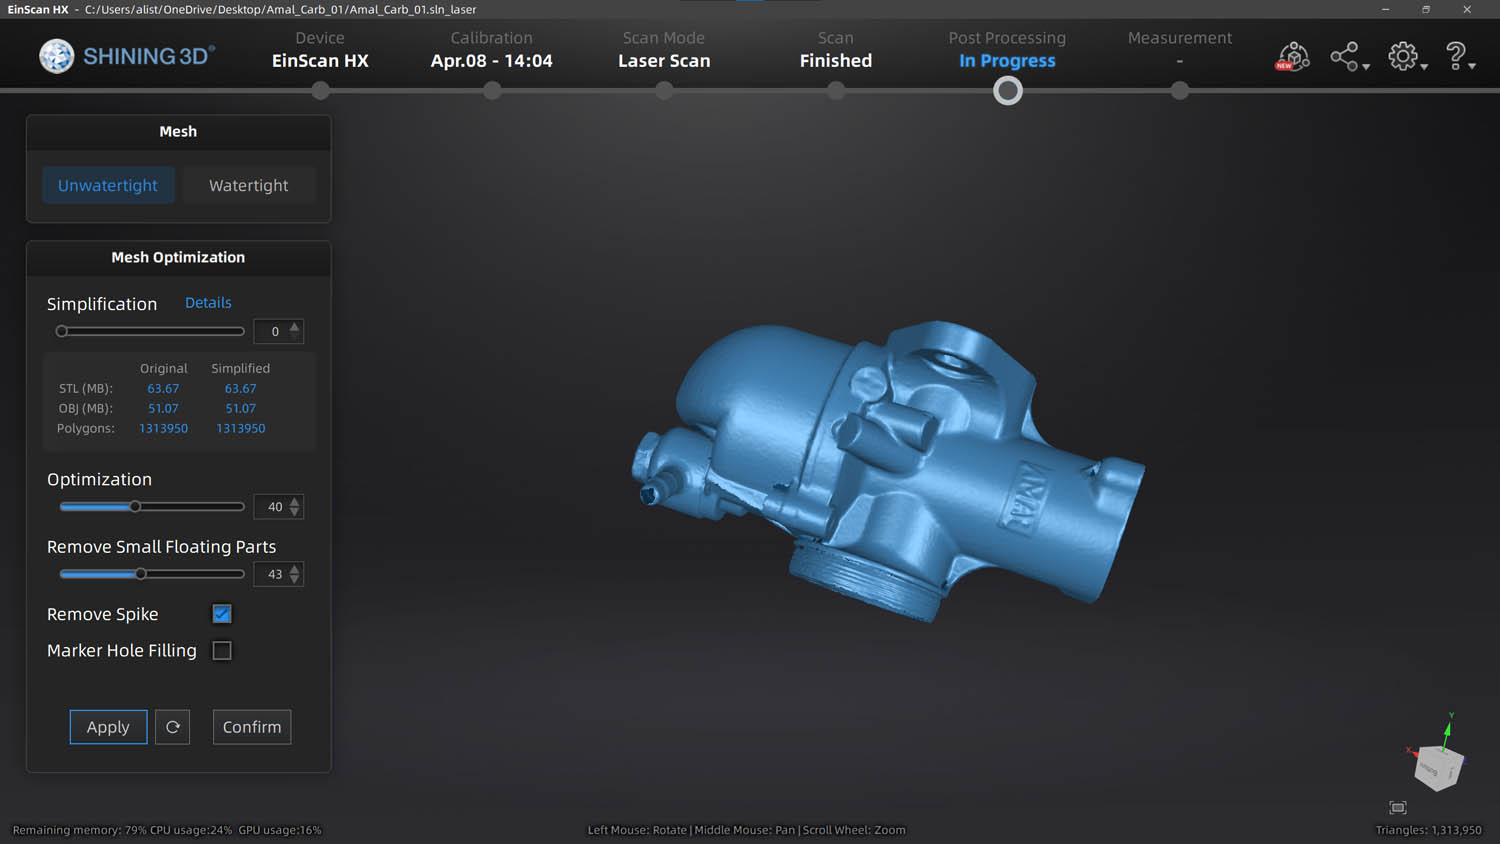
Taking the example of the carburettor scan shown below, we began with a single laser scan around the part on a turntable.
This allowed us to manipulate the part without a huge amount of space around it. Because the registration targets remain in consistent position, it’s as if they were on the part itself.
In terms of usability, the EinScan HX has some nice features. Obviously, the display on your workstation is your key source of information about what’s being scanned and captured, along with visual feedback on whether your distance from your object is working well and whether tracking is working or not.
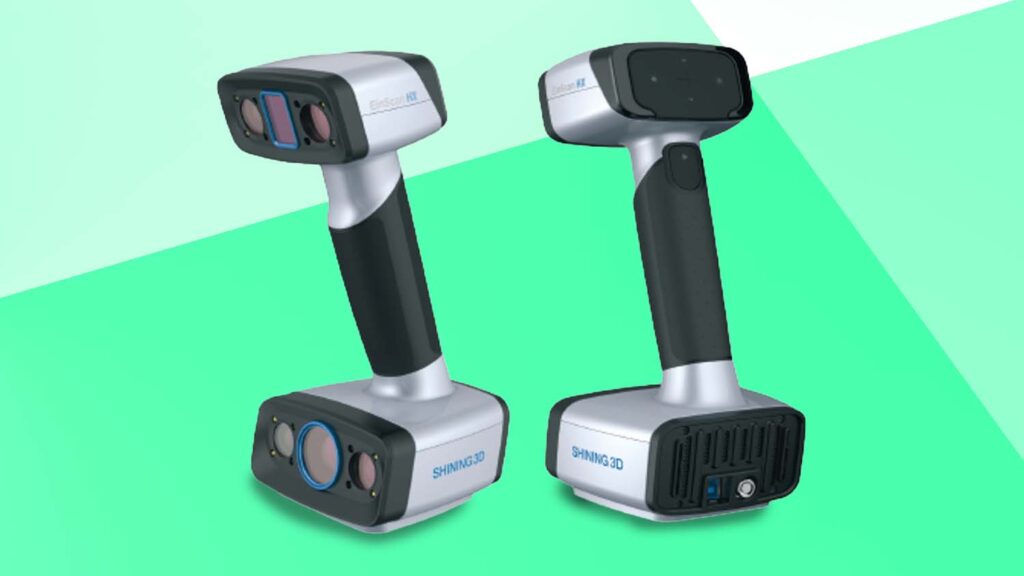
You also get some really nice on-device feedback. As you’ll see in figure 2, lights on the rear of the unit indicate how things are looking. Green means in range and tracking, yellow means too close, blue means too far, and red means tracking has been lost). This makes the process very intuitive.
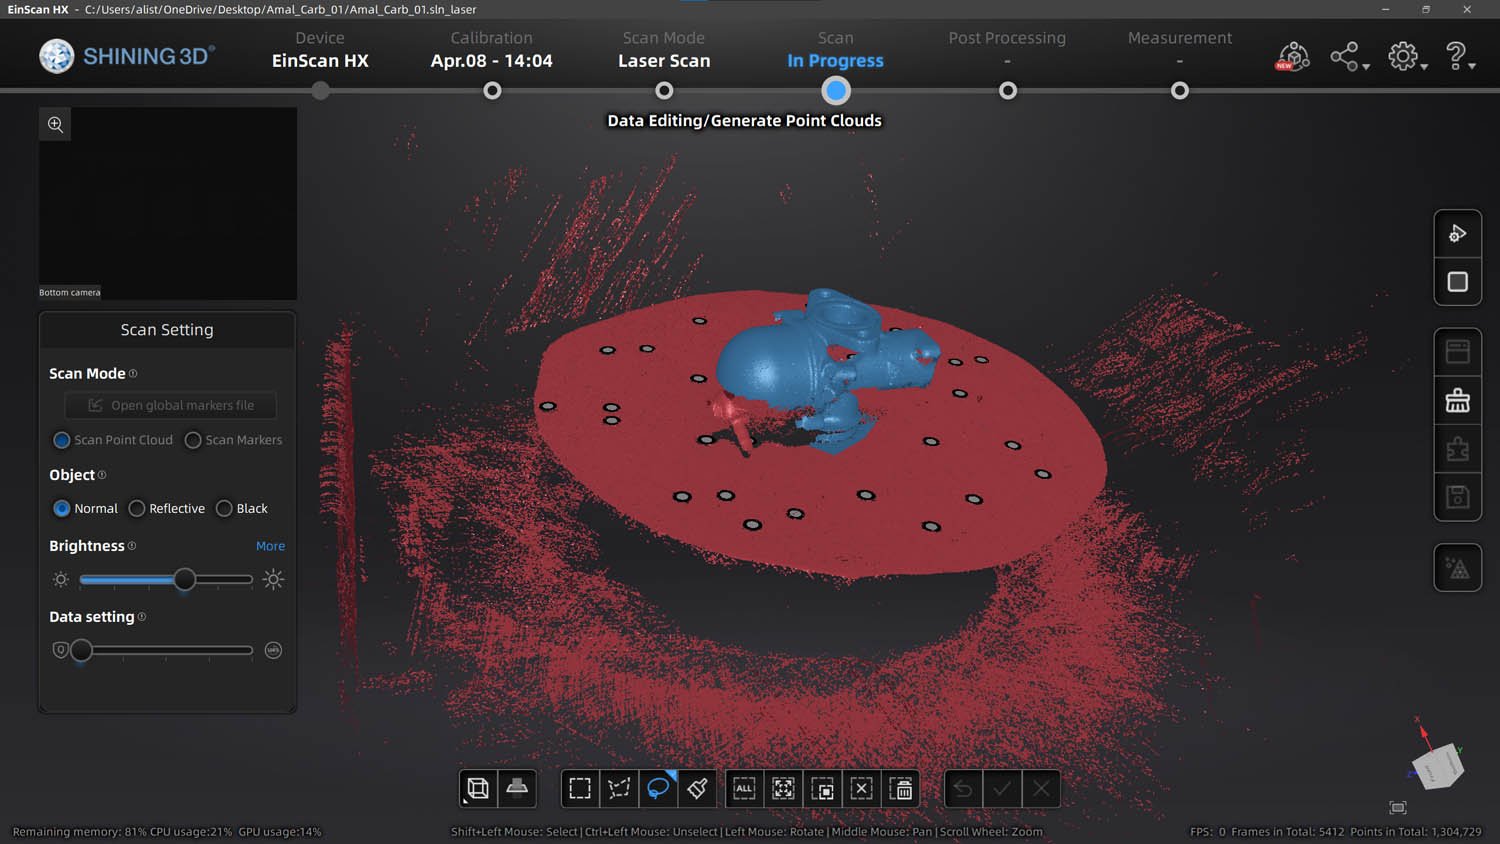
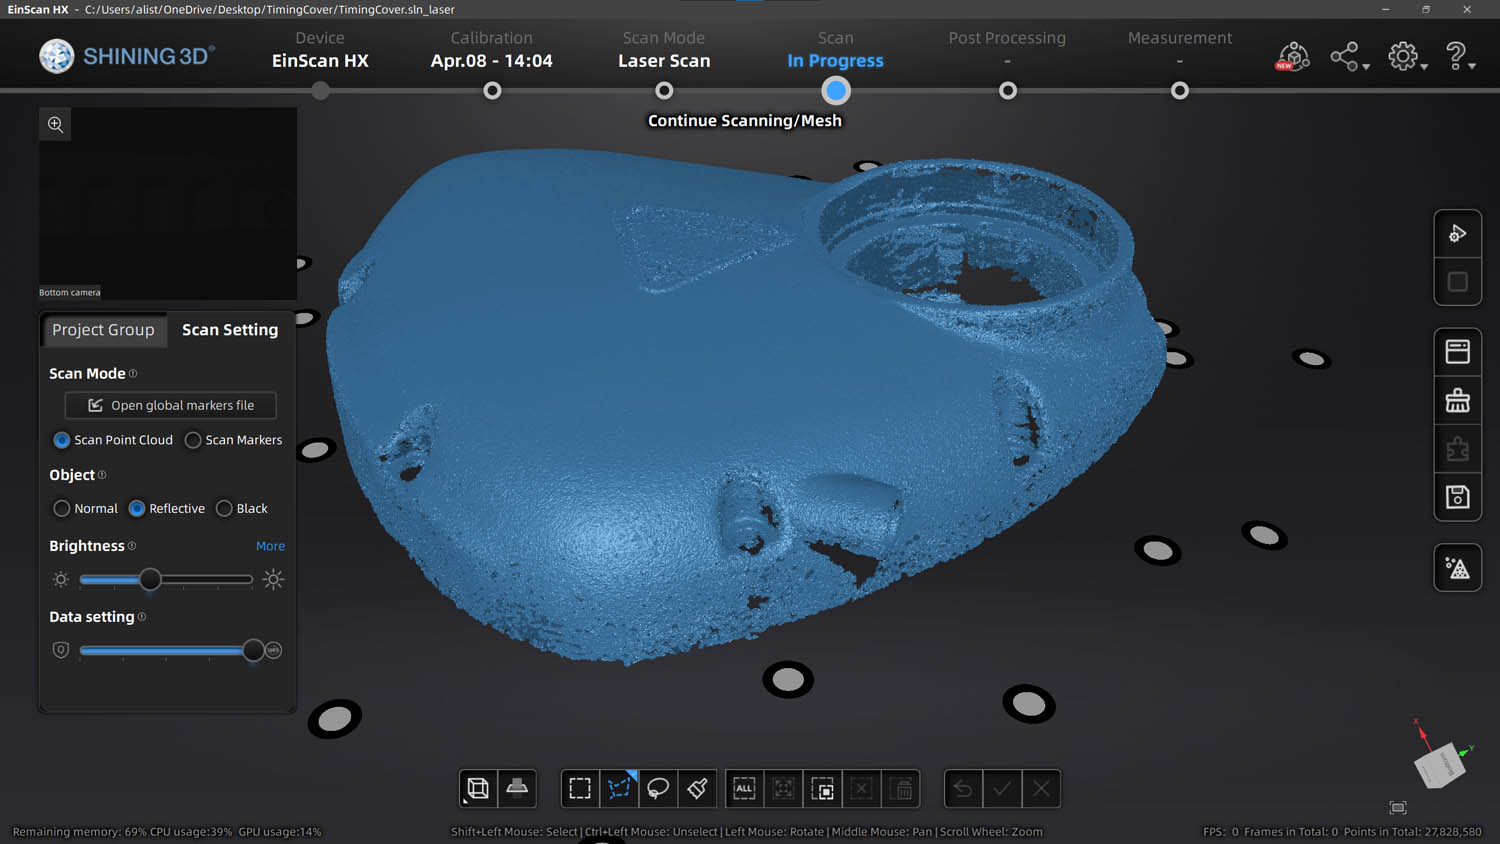
A single scan pass gave us a lot of unneeded data, which we removed using the built-in selection tools. Once scan data is in a good state, you can then create the point clouds and store this in your job.
Obviously, you’re never going to capture a whole object in one pass, so the workflow is to create a new ‘project’ and carry out another scan.
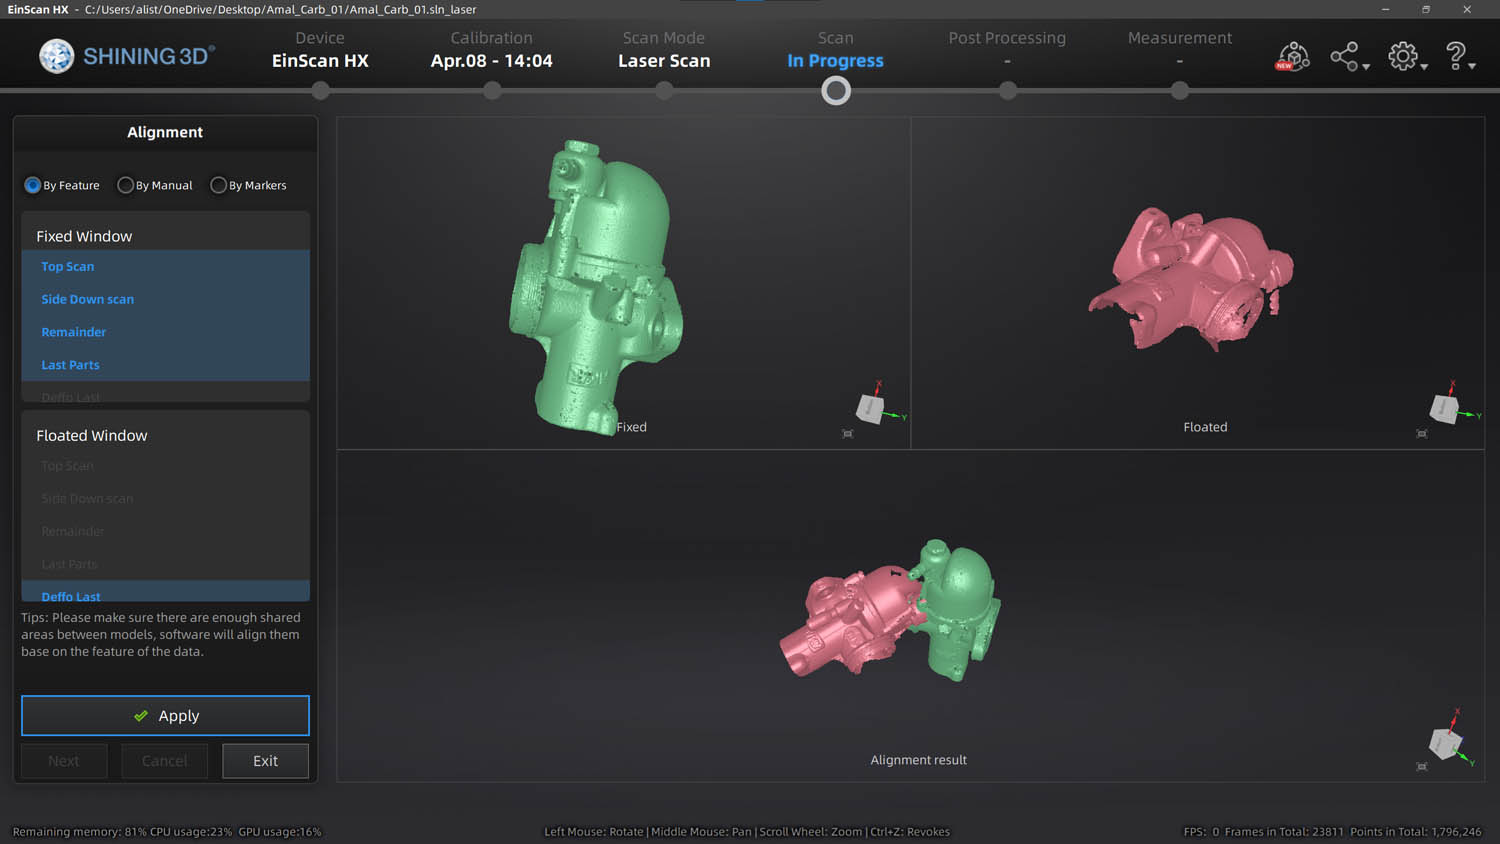
In our case, this meant repositioning the part on the turntable and scanning again. After clean-up was performed, we essentially had two scans, unaligned to one another.
If we had placed targets on the part, they might have lined up properly (although the chances are against it.)
That’s why the align operation in the software will quickly become your new best friend. This allows you to select one or more scan sets as the fixed data and then align others accordingly.
There are several methods for doing this. For a part like the one shown (and most mechanical parts), you can use the feature alignment. This will find common features and use them as the basis for alignment of data. In our tests, this was pretty robust in most cases.
However, if feature alignment fails, you can use textures or common registration targets, or revert to the old favourite of three-point alignment. Here, you indicate three (or more) common points on the two scans to align them.
As you work around your object, you can very quickly build up a series of scans, align them, inspect the results, then work out where you need to scan next to capture missing data. The workflow is pretty intuitive and fast, depending of course on the size of your object.
We only tested it with desktop-sized parts, but I’m told by users that the EinScan HX is pretty useful for larger projects too, from large components to full vehicle scans – it just takes a little advanced planning to accomplish these.

EinScan HX – Points to polys
Whether you’re grabbing a quick-and-dirty scan in a single pass for a space envelope, or engaged in a more rigorous attempt to capture the entire form of a part, the end goal is the same: namely, a set of points that represent the thing you’re scanning in the form that you need.
Once done, you then have more decisions to make. Some systems will accept raw point data in ASC form. This would be your route, for example, if you are using the EinScan HX for inspection and metrology purposes.
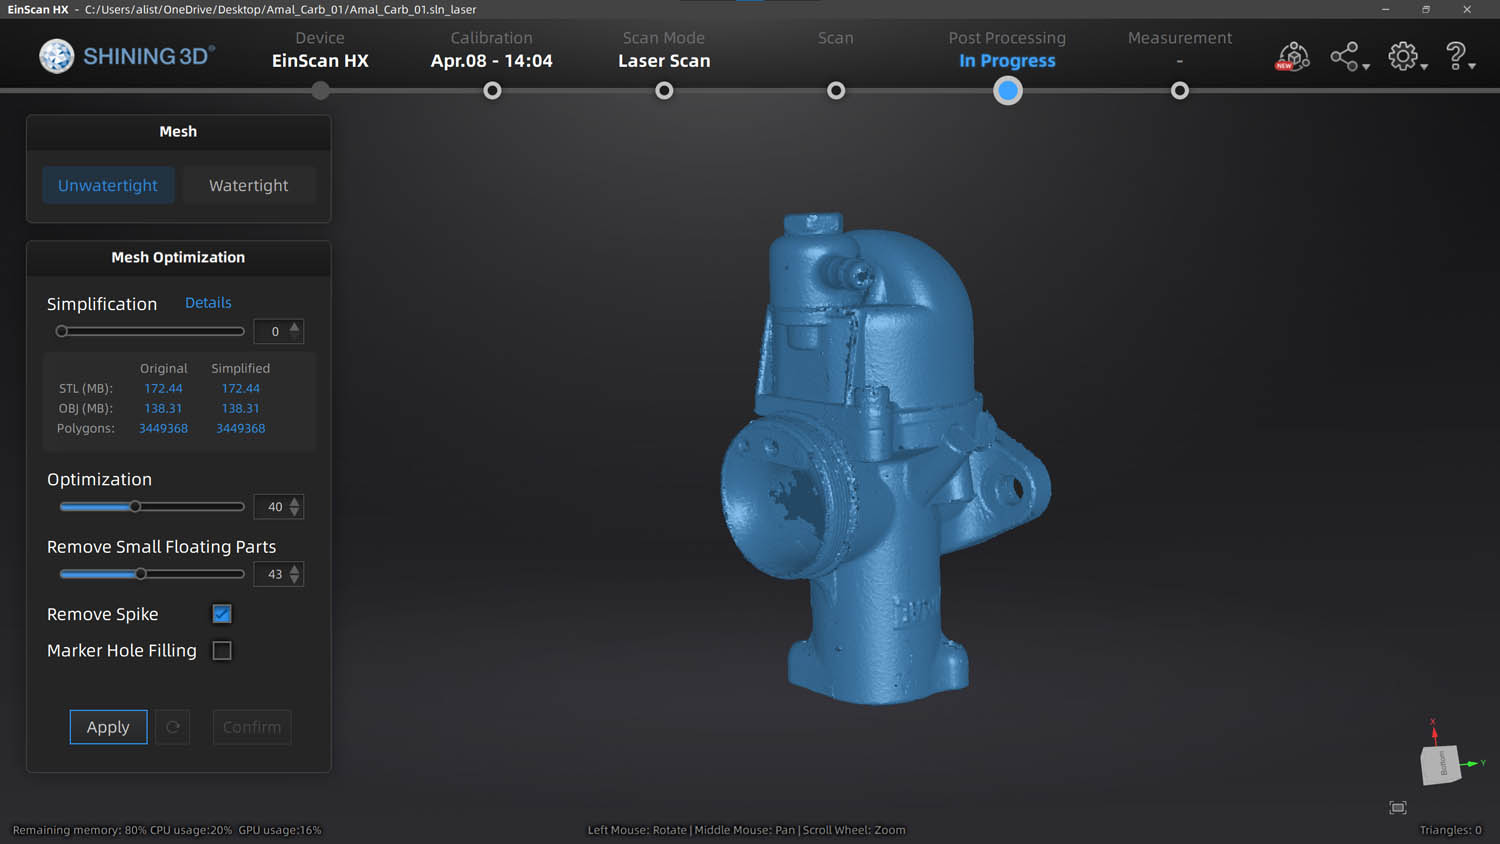
For the majority of applications, however, you’ll need to go through a tessellation process to turn points in polygons.
Clearly, when you’re capturing data at a rate of a million or so points per second, turning all that into a polygon mesh would be insane.
Thankfully, the EinScan software gives you a host of tools not only to reduce the complexity of your point cloud and derived mesh without reducing the quality of surface capture, but also to improve it.
That typically takes the form of filling in holes, either manually or automatically; smoothing; and pure polygon count reduction.
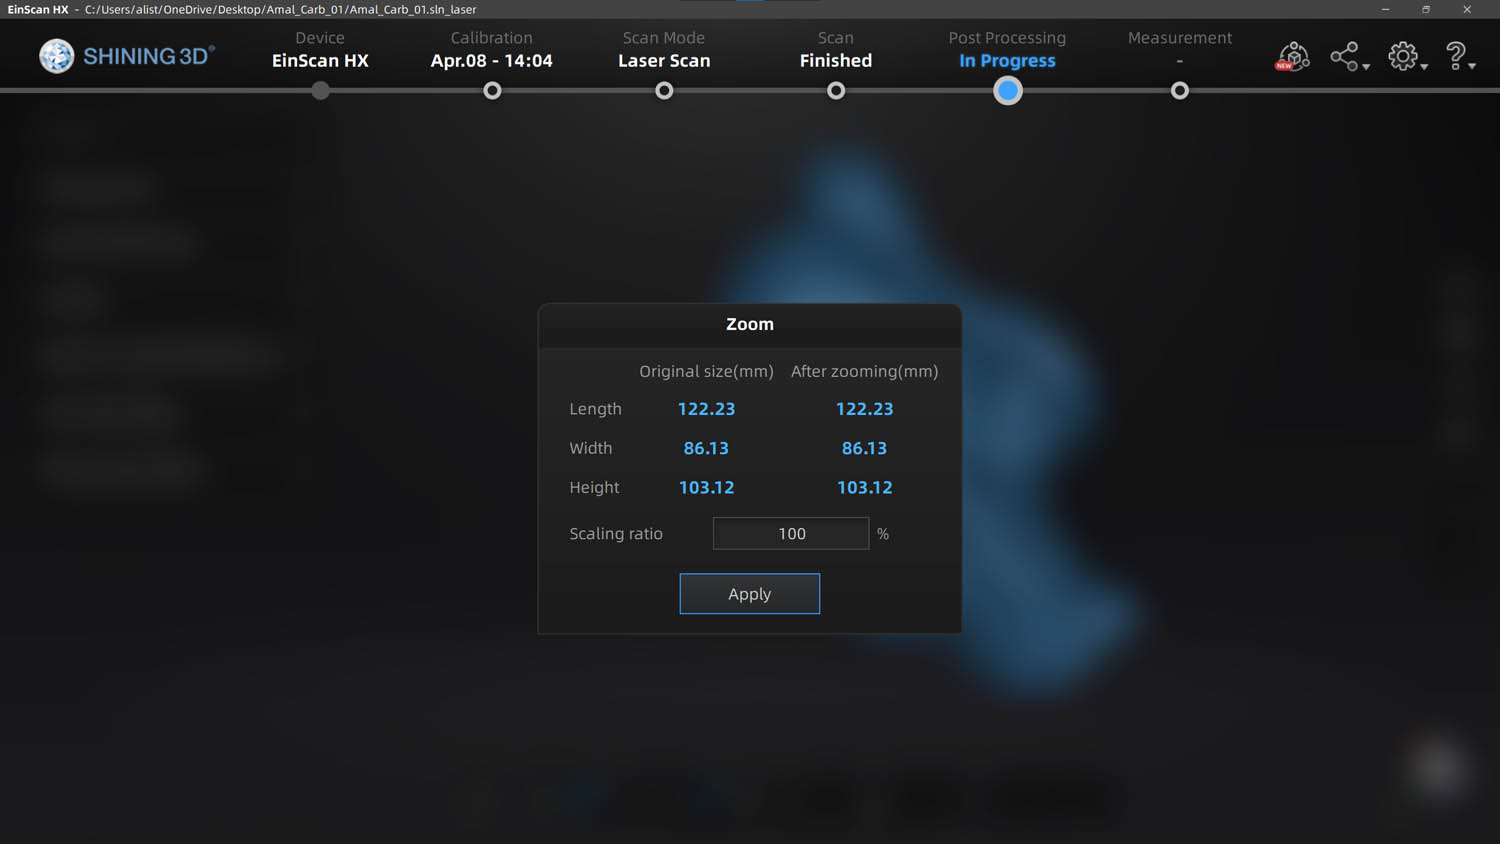
You can then export your data to the format you need, be that STL, OBJ (which can include texture information mapped to your polygon mesh), or 3MF.
Conclusion
The EinScan HX is available in a couple of different configurations, so it’s worth talking about those before we get onto price.
The standalone scanner (which also includes a copy of Solid Edge Shining 3D Edition) comes in at £9,258.34. You can then add on additional software options, depending on your needs and workflow.
These cover further post processing, conversion to CAD geometry (with Geomagic Essentials) and inspection (with Geomagic Control X or Verisurf CAD). At the base level, the product is pretty appealing, particularly if you’re looking for a system that you can pick up and use for a variety of tasks in the design and engineering realm.
From a user perspective, the EinScan HX showcases how Shining 3D is maturing. The software is improving, as is the interface, particularly the colour-based feedback.
If you’re in the market for a 3D scanning device, we recommend EinScan HX goes on your shortlist. It’s versatile enough to cover quite a few bases, while the results speak for themselves.
Workflow: Laser scan of a carburettor using EinScan HX