
Raise3D has built its reputation on high-quality, larger capacity desktop filament machines. With two independent extruders supporting some interesting workflows, the new E2 looks set to extend the company’s solid track record, as Al Dean reports
A decade or so on from its initial explosion, the desktop filament-based 3D printer market is still going strong.
While unit sales may have slowed since that early peak, there’s been no slacking in the number of new manufacturers or machines entering the market.
For buyers, the upshot is that, regardless of budget, they can find a machine that will let them build parts from spools of plastic filament, right there on the desktop. And that’s true whether they spend £100 on an open-frame machine, or thousands on a fully enclosed, fully automated device.
Based in China, with marketing activities based in the US, Raise3D has built a reputation on offering larger capacity machines with an enclosed build environment and smart sensors to help with tasks such as bed levelling and filament control.
On loan to us from the folks at 3DGBire, its latest E2 machine continues the trend, but comes with some fancy new tricks up its sleeve.
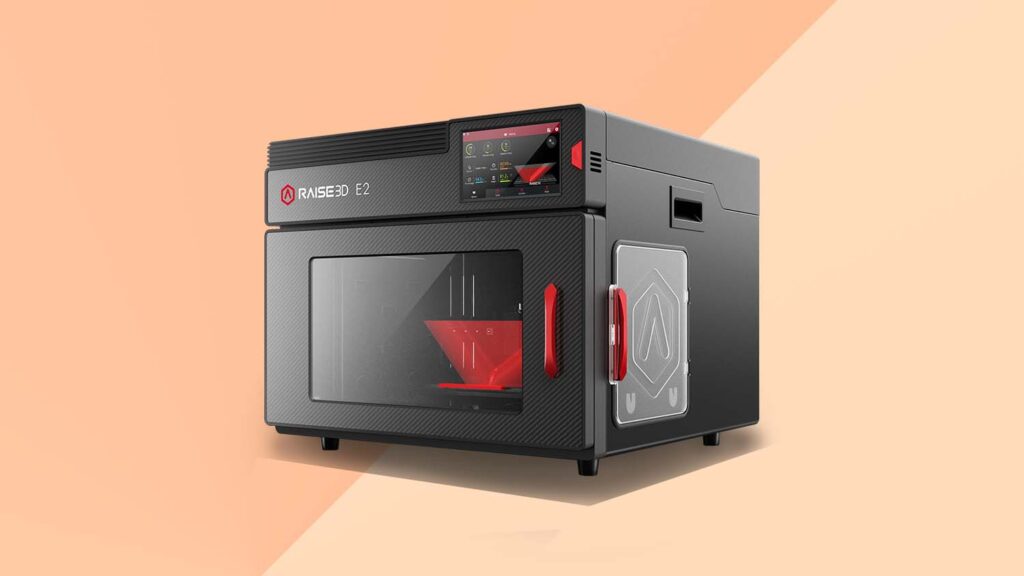
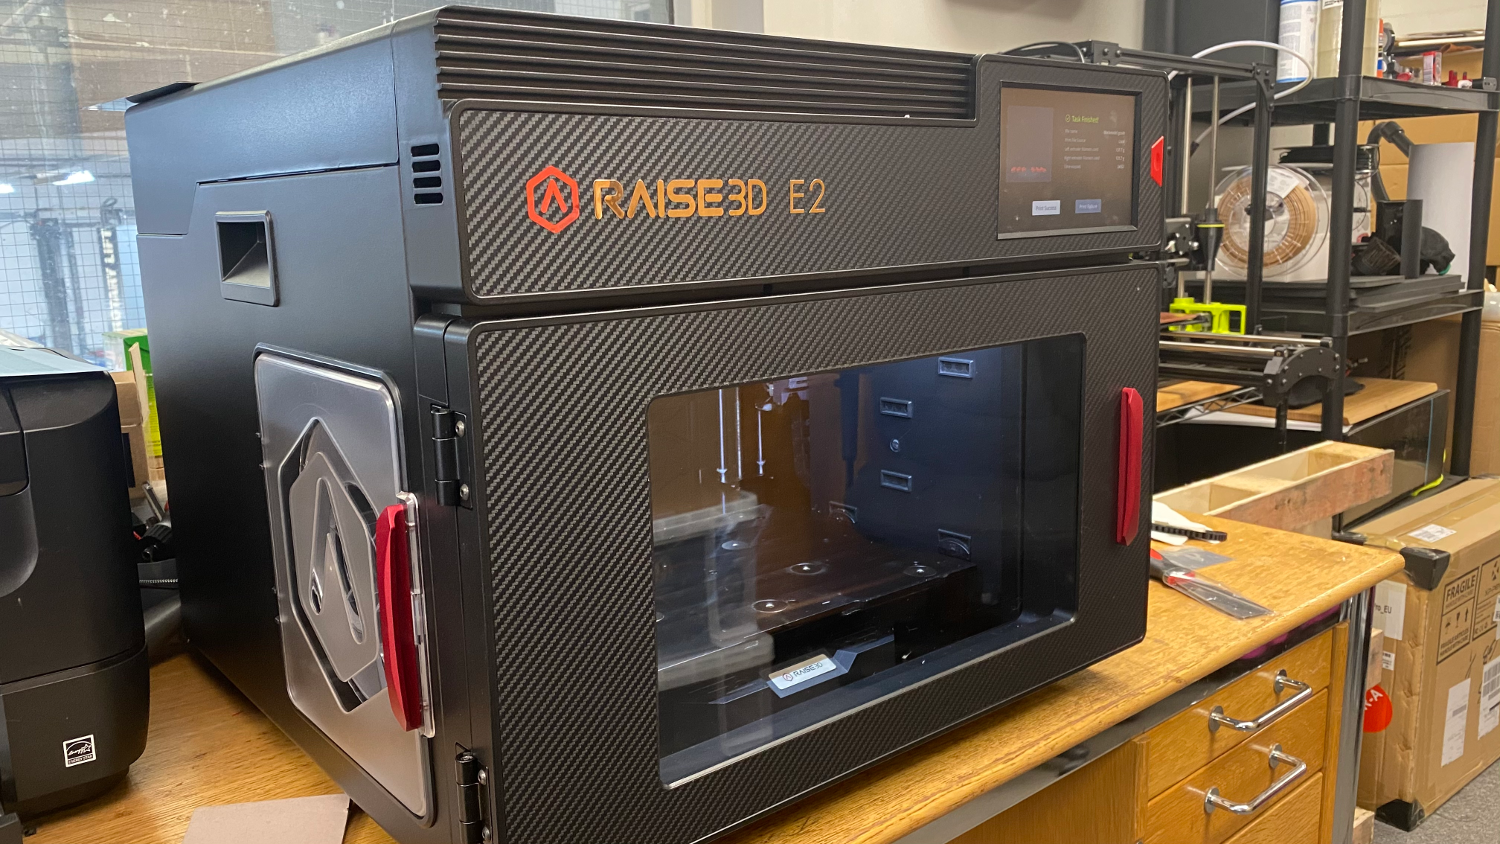
Raise3D E2 – Getting ready to print
The E2 is an impressively robust unit. It weighs in at 35kg, so while one person may be able to lift it, two might be better.
Once out of the box, it’s time to set it up and get ready to print. As you can see from the images, a vertical hinge-front door gives access to the build plate, but there’s also a top-hinged lid, too. To the left and right, you’ll see the filament bays and two extruders.
Set-up is pretty easy: unpack the unit, plug it in, then follow the instructions shown on the built-in LCD touchscreen on the front of the machine. Connectivity is via WiFi, Ethernet or USB and there’s an on-board camera for monitoring your build.
You can also opt to connect the machine to Raise3D’s RaiseCloud service. This provides access to machine monitoring without access to the physical network.
In terms of calibration, the E2’s marketing materials make a fair bit of noise about what they describe as the “world’s first videoassisted calibration”. The reality is that the touchscreen displays explanatory videos to guide you through the process.

It’s a nice use of the display, certainly, but it may be a bit of a stretch to call it “video-assisted”. That said, the vital step of calibration on this machine is performed easily enough.
Before we get on to the ins and outs of actually building parts, we need first to discuss the configuration of the mechanism inside the machine, and specifically, its extruders.
The E2 uses a technology that Raise3D calls IDEX, or independent extruders.
Dual-extruder machines are commonplace enough, but whereas most typically offer a single carriage featuring two extruders, the E2’s two build nozzles are able to move independently on the X-axis – but only the X axis. So what does this mean in reality?
The answer is, it depends on what you’re building. If you’re running with a singlebuild material and a support or, indeed, two build materials, then the difference is negligible. The machine builds with one extruder, then switches to the other, just as other dual extruder machines do.
It’s when you activate duplicate or mirror mode that things start to get interesting.
Since the extruders are two separate units on the same X axis, if you want to build with both at the same time, then you need to have toolpaths that can drive all of the axes in the same motion, at same time, hence duplicate and mirror modes.
Duplicate mode forces the right extruder to replicate the movement of the left, but offset on the right-hand side of the build plate. If you’re familiar with a pantograph, it’s the same principle.
In terms of usefulness, if you’re looking to build duplicates of the same part, then you can effectively split the job across the central line and have both extruders working in unison, effectively halving production time.
This is pretty easy to set up. Switching the set-up software into duplicate mode splits the virtual build platform and anything you do on the left side gets copied across the centre plane.
It allows you to work with different coloured materials, too. Note that while you can vary colour, you need to have matching build parameters between the two materials.
Mirror mode works in much the same way, but it mirrors the part across the central plane automatically. This mode may not be as useful as duplicate mode, but if you’re building handed prototypes, or indeed, enduse parts, it could save you a bunch of time in set-up and build.
Imagine a set of jigs for a production run being built at the same time, with no pre-processing needed in your CAD system. You just model up one set, export, and then let the system build you the other set automatically.
Now that we’ve got our heads around the different build capabilities, let’s dig down into what it’s like to work with the E2.

Raise3D E2 – Build process
The set-up software for the E2 is pretty nice, particularly when compared to some lower-end machines we’ve looked at recently. It’s clear what you’re doing.
The software gives you access to presets initially, but if you want to dig in, tweak settings, or bring in more complex materials (the E2 supports materials that build up to 300C so there are plenty of options), you can do those things, too.
If you want to activate the build modes (duplicate and mirror), the system guides you through the steps required to make the most of these capabilities.
Materials, meanwhile, are held in two closed-off bays on either side of the unit. That means you’ll need a bit of space around the machine in order to open them.
Material loading is pretty simple: open the door and feed the filament (the unit uses widely available 1.75mm filament) into the Bowden tube till it reaches the extruder. Then, choose your material from presets or define a melt temp and start the loading process.
Again, you’re guided through the whole process using on-screen videos. Once done, you’re ready to begin calibration.
It’s worth noting that if you’re using both extruders extensively, then we found that you really need to pay close attention to calibration and bed measurement.
The E2’s build plate is removable, which in turn makes removal of parts simple, but it also means that every time you replace the build plate, you run the risk of knocking it out of calibration. As a result, you need to take care positioning the build plate and running the auto-level routine each time.
If you’re simply re-running a previous job, then you can probably get away with a quick and simple calibration, but if you’re using the right nozzle extensively, perhaps building a part with multiple materials or using the duplicate/mirror modes, we found it best to run the full levelling and left-nozzle calibration routines. That extra ten minutes you spend make the odds of a successful print much higher.
The system is then left to work. The E2 has some useful features that will give you more confidence when running jobs overnight or otherwise leaving the machine unattended. First, an on-board camera is available for monitoring while on the same network, but also further afield if you take advantage of the RaiseCloud platform for monitoring.
In addition, there are filament detection sensors that will pause your print if it runs into trouble, as well as a poweroutage resuming capability. So should you experience a power cut, the machine should get back to work on the job without too many problems once power is restored.
Once your build is complete, it’s time to remove the part from the build plate. As we’ve already said, the build plate is magnetically attached in place. It’s also made of flexible spring steel with a Buildtak surface applied. This means that, with a quick bend, most parts will pop right off. If they’re a little more resistant, a gentle tickle with the supplied spatula usually suffices.
Give the build plate a quick clean-up and pop it back into place and it’s ready to go again, while you post-process your parts.
In conclusion
This was my first hands-on experience of a Raise3D machine, and I really like the E2. Having subsequently detailed some of my findings on social media, I’ve discovered that the company has a very loyal set of followers, using its technology in lots of interesting ways.
As ever, the best results come from combining familiar materials with solidly proven build parameters. The unit lends itself to consistent part quality, because the fully enclosed build environment limits internal variances and protects from the negative impact of external factors.
There are a couple of other advantages to mention here. The first is that the E2 is a very well-built unit that builds at speed, but is also very quiet, particularly compared to the Method X device we benchmarked at the same time. The other is that while there are no interlocks on the access doors, there are sensors and it’s a pretty trivial matter to have the system pause build when they’re opened.
All of this makes the E2 ideal for use in an open environment, perhaps in sharedaccess spaces or in education.
The material range this machine supports is pretty wide, too. As long as your material builds under 300C, then you should be OK.
That said, known materials such as PLA, ABS, ASA, Nylon and some of the more exotic filled materials should all be fine, too.
There are many instances where speed of production will be a benefit, whether that’s for prototypes, assistive parts (jigs, fixtures and so on) or for end-use parts.
The final question, of course, is how much will this machine cost? The answer may surprise you. It’s £2,749. I know, right? With the E2, it’s fair to say that the buyer gets an awful lot of machine for their money – and a machine that comes with some advanced capabilities thrown into the bargain, too.
 Enjoying this? Read our other Pro Desktop 3D Printer reviews here:
- Formlabs Form 3
- MakerBot Method X
- Raise3D E2
- 3D Systems FabPro 1000
- Ultimaker S5
- Stratasys F123 Series
- Rize Inc. Rize One
Raise3D E2 – Tech-specs
» Raise E2
» 1.75mm filament
» 330x240x240 mm build volume
» 607x596x465mm machine dimensions
» 35kg weight
» 0.02 to 0.25 mm layers
» Independent extruders with heated build plate
» WiFi, LAN, USB port & live camera
» HEPA filter with activated charcoal
» Active levelling & filament fault sensing
» 1-year return to base warranty
» Price £2,749
3D print benchmarks: Putting the Raise3D E2 to the test
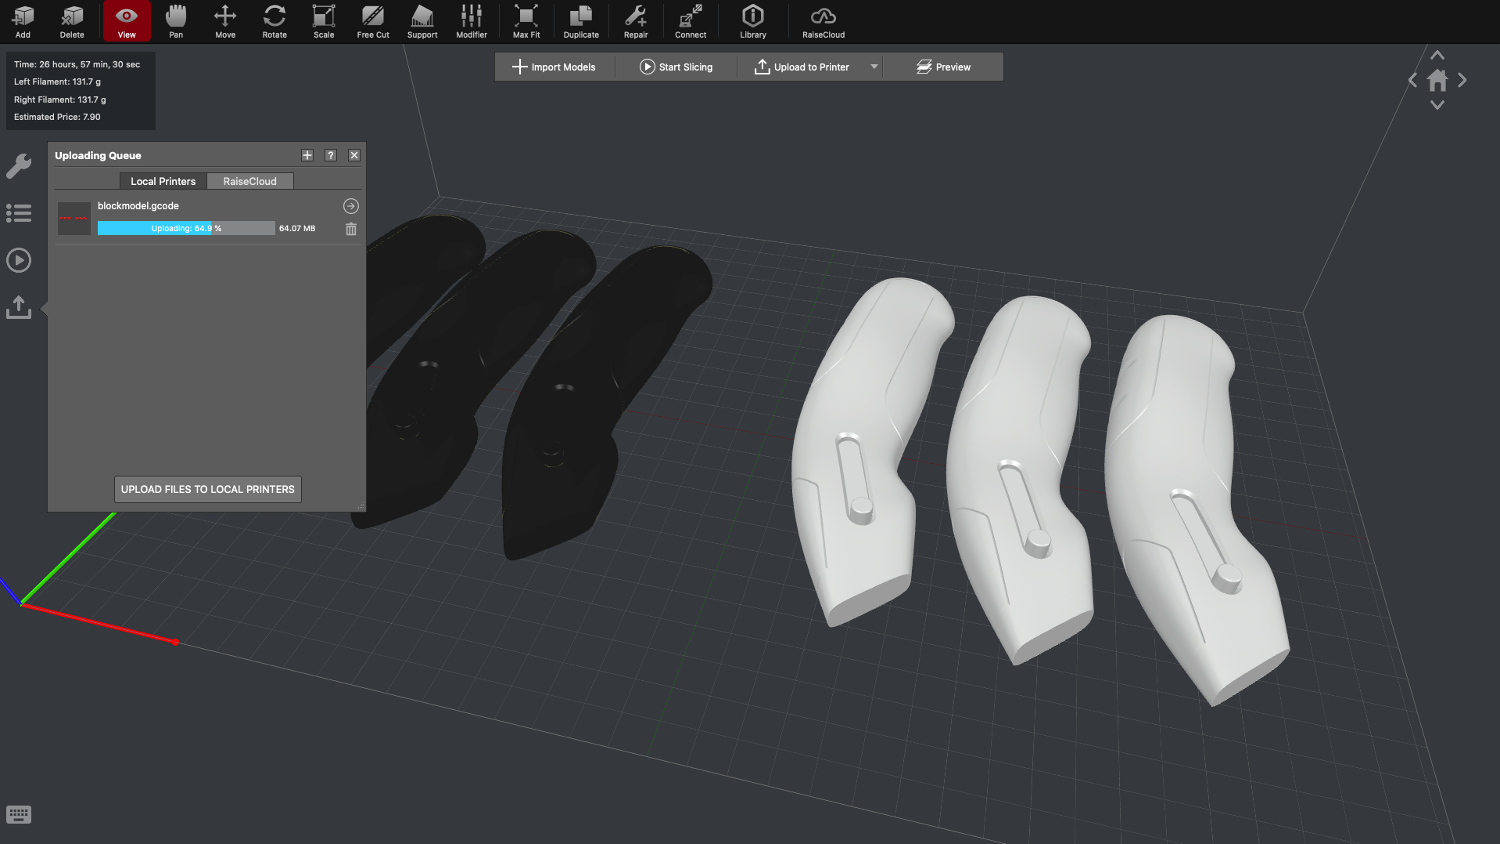
Small batch components
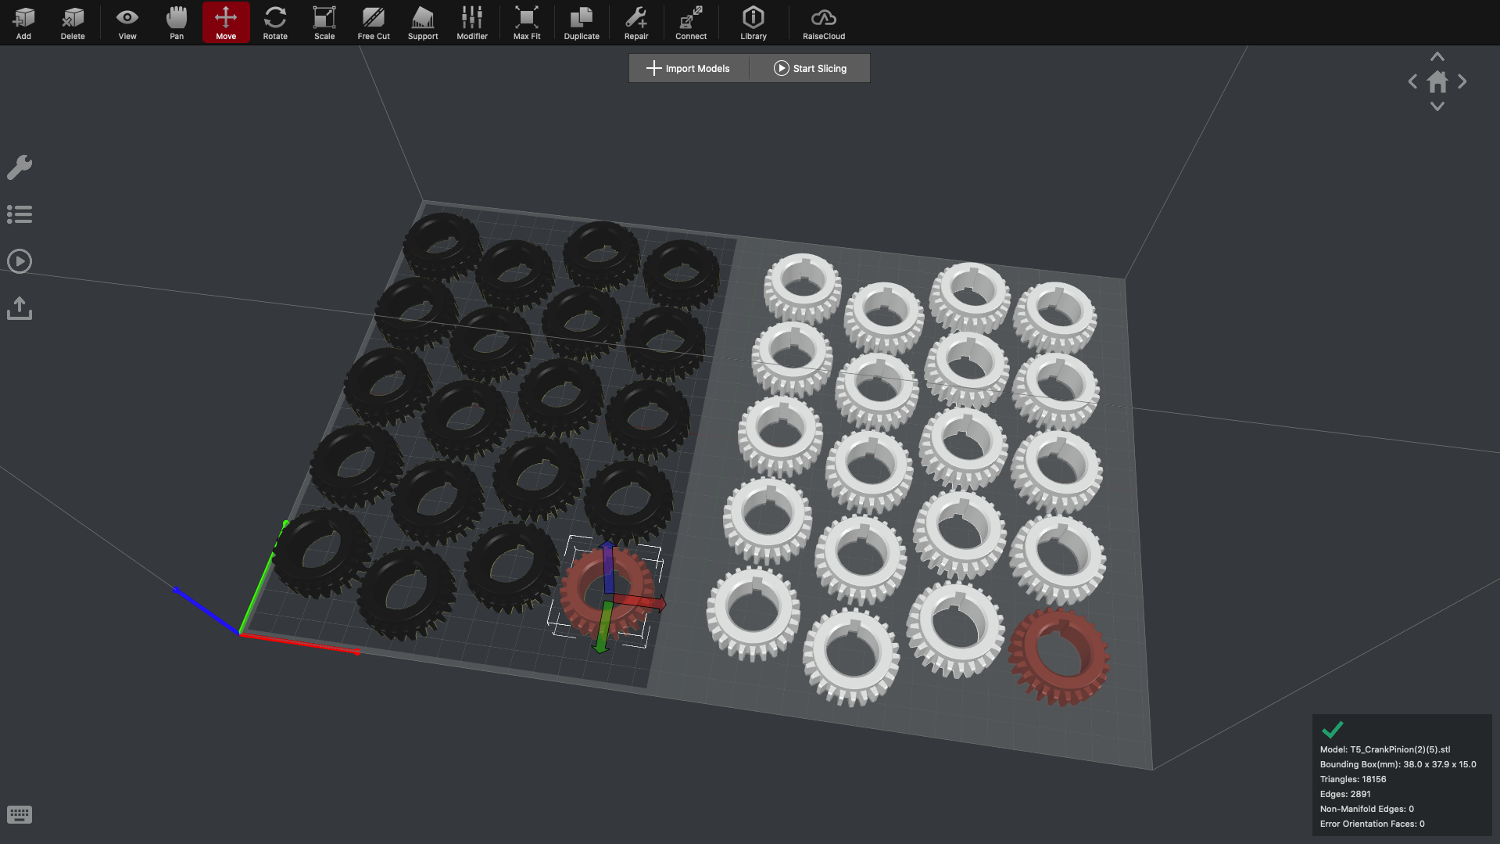

Test part & challenge: This is a small, basic pinion gear, the type of thing that might be required in large volumes, making it ideal for initial testing of 3D print machines. The E2 Bed could fit 40 of these in both normal and duplication mode
Material usage & Cost: 6g of filament per part Build time: 40 units (0.2mm layers + 10% infill) in normal mode is 40 hours 8 minutes. In duplication mode, it’s 21 hours 6 minutes
Results: This is a real USP for the E2. The dual independent extruders allow production of series of single material parts in roughly 50% of the time by splitting the build chamber. It’s like having two machines working concurrently
Form & block models

Test part & challenge: This test part is pretty self explanatory. It’s a block model to test both surface quality on more contoured forms, as well as b-side build quality when using both build material supports and dissolvable filaments (such as PVA)
Material usage & Cost: 30.9 grams of PLA build filament with 6.3g of support PVA filament per part Build time: Single part (0.2mm layers + 10% infill) in normal mode is 9 hours 37 minutes
Results: This worked out really nicely with the combination of PVA supports and PLA build material. A-surfaces were as you’d expect, but B-surfaces came out nicely, too. Using just build material for supports also worked OK
Large & chunky builds
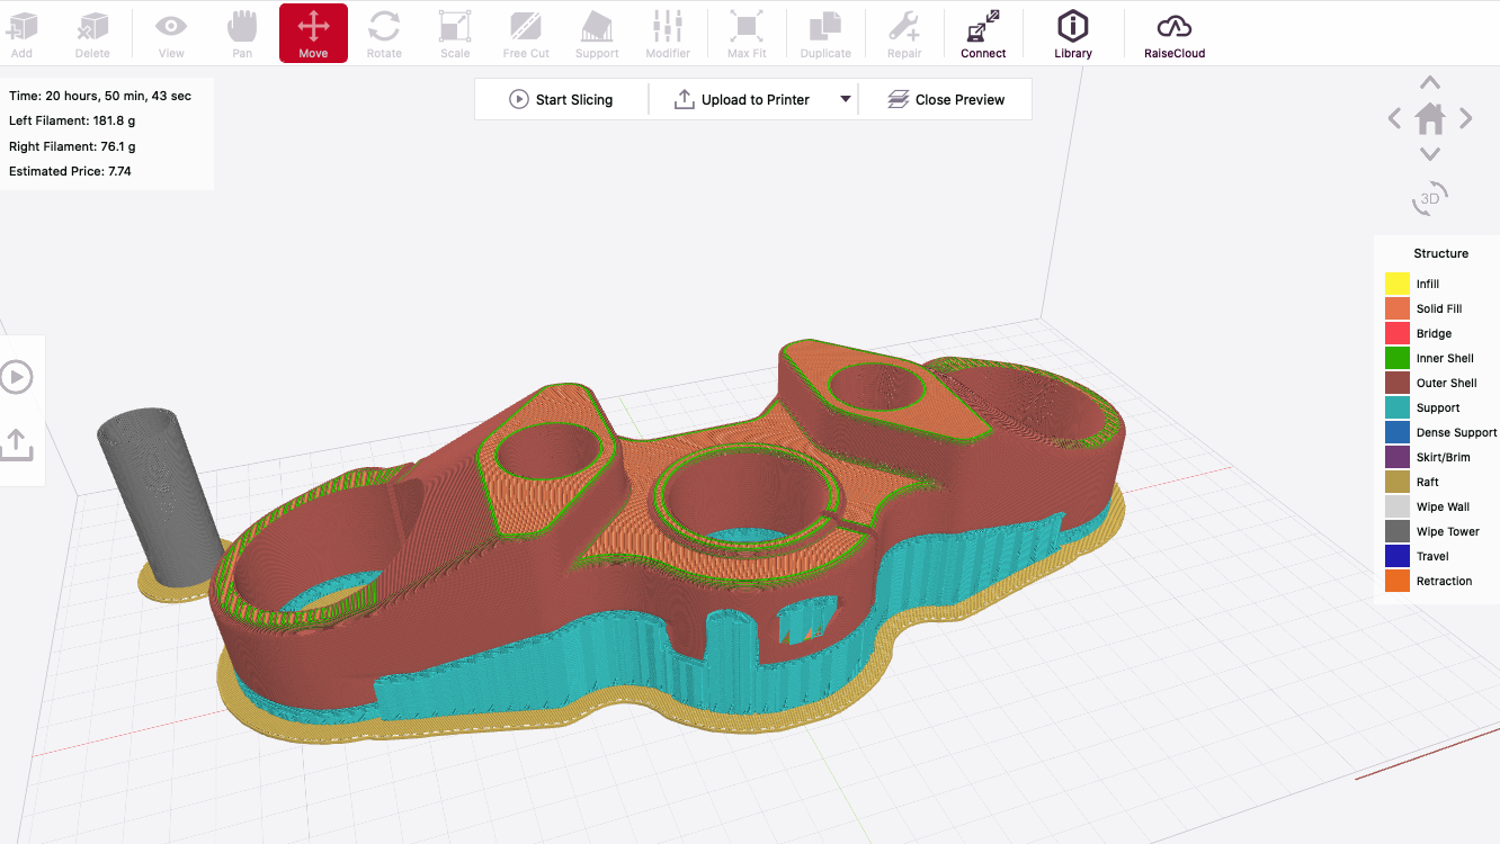
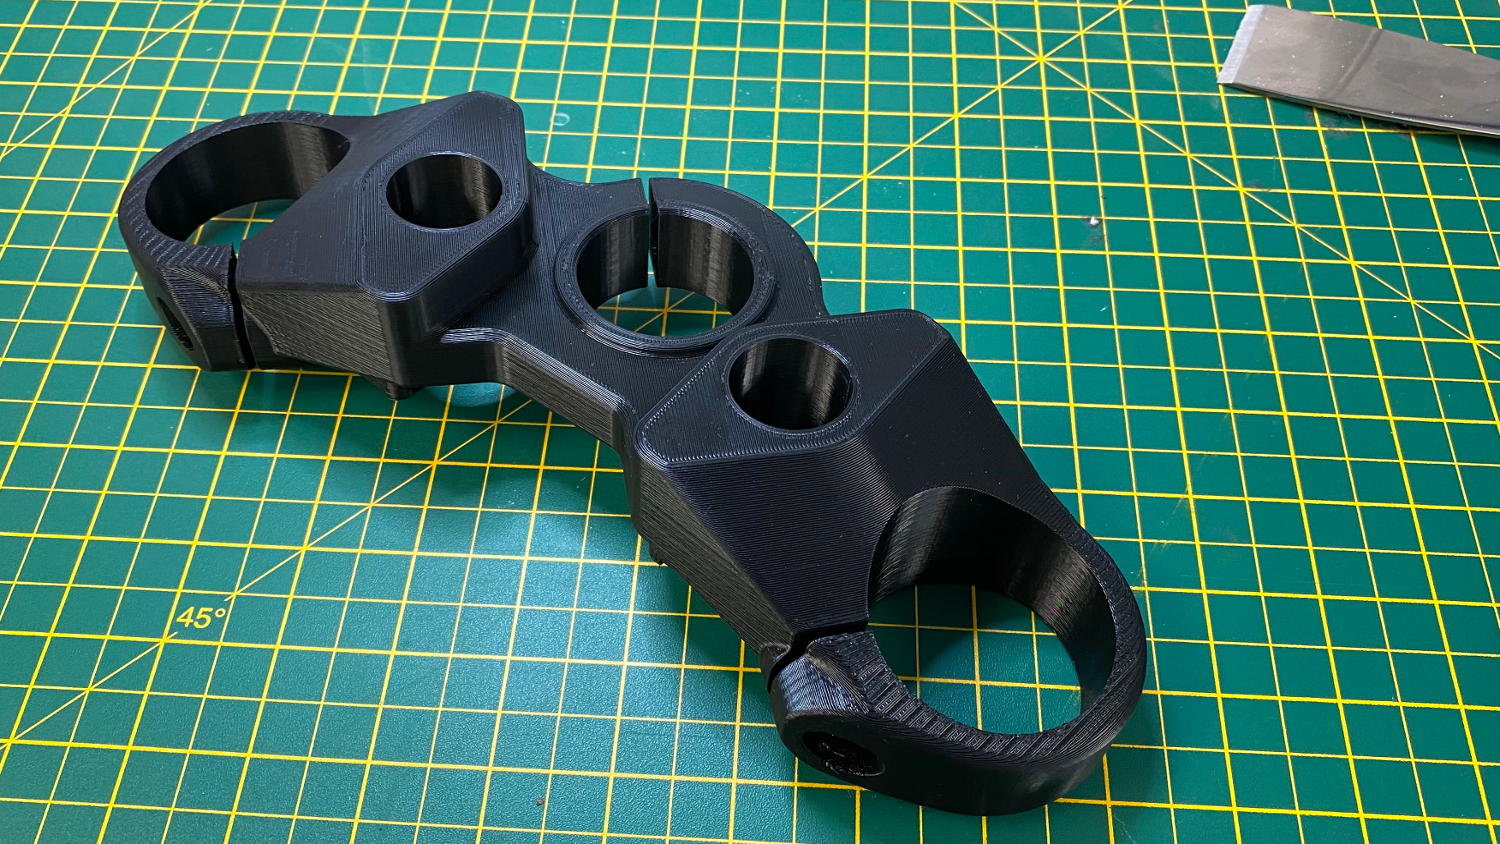
Test part & challenge: We like to use this full-scale, triple tree component, since it tends to push the build envelope of most 3D printers in the desktop arena. The part is large, it’s clunky and it’s also super-easy when it comes to measuring up
Material usage & Cost: 251g of PLA filament per part (including supports) Build time: Single part (0.25 mm layers + 10% infill) in speed mode is 19 hours 34 minutes. Using PVA supports adds 1 hour 20 minutes
Results: Big parts always take longer, it’s a question of how long you have to wait. This part took under 20 hours, but add time for support removal. Adding in PVA supports (which adds cost and 90 minutes to the build) saves you that time, with better results


