

For those that aren’t familiar with Siemens PLM’s flagship product, NX, it’s perhaps worth a quick recap. Born from the merging of the Unigraphics and I-deas products, it has been on the market for 10 years now. It’s currently used by a wide spread of industry sectors, from product design to automotive to aerospace.

The new Teamcenter integration gives you full PLM interaction directly inside NX. Here, HD-PLM reports are run to show the progress of the assembly by release status
Its strengths are the definition and documentation of complex products, whether that complexity is driven by the size of an assembly (think, aerospace and automotive) or shape description (product design and mould and die design).
It covers the full gamut, from conceptualisation (in terms of both class A surface models and more recently, sub-division modelling as well as large scale assemblies), through engineering and into manufacture. The last of these, in particular, has long been a strong hold for NX, providing a raft of mould and die development and CNC programming capability.
While the system is technologically and functionality rich, the last few years have also seen a lot of work done on the user experience. The introduction of rolesbased UI control is something that gave users (and organisations) the ability to customise the system to their individual working practices. By stripping back commands to those you use the most, users can get into the job at hand more quickly and easily.
The issue with this type of optimisation is that those less commonly used operations are hidden away, often in menus and pull-downs.
To solve this issue, NX 10 introduces a new temporary toolbar to the left of the modelling UI. Using the search tools (to find the commands), the user can quickly grab the tools needed and drag the icons to it for quick access.
Teamcenter integration
Another focus for NX 10 is greater integration with Siemens’ PLM solution, Teamcenter.
While previous releases provided access to Teamcenter data at a basic level, allowing users to search, view folder structure and data etc. Now it is a much more comprehensive and better integrated tool that provides access to almost everything that Teamcenter does.
This uses the Active Workspace client, introduced to Teamcenter in the last few years, and it gives a full client that’s embedded directly inside of NX. Whether the user accesses PLM workspaces through Active Workspaces or through the NX embedded tools, the experience is the same with a common look and feel.
As well as the full index and search tools you’d expect, it also enables access to those higher level tools, such as workflow management, revision management, issue creation, sign off etc.
Considering that 40% of NX customers already run Teamcenter and that Siemens is giving away the base level of the product with any NX Mach bundles (we cover how NX is bundled a little later on), this will prove useful for many.
It’s also worth noting that this window into Teamcenter can also be pulled out of the main application and placed on another screen — super handy for those running multiple monitors (and that’s most people these days).
This integration also gives access to all of the Visual Reporting tools that allows users to interogate the PLM resource to report on all manner of information in a graphical manner.
If you’ve not come across Visual Reporting before, essentially, it allows you to combine your 3D model with metadata (either extracted from the model’s metadata or from the PLM database) and present information in a rich manner.
One example is to colour code an assembly by weight distribution, sign off stage or anything else. Another might be to extract the percentage that a product is signed off, where things are delayed or behind schedule. It’s really down to pulling together the information needed to make decisions more quickly and in the context of a rich 3D model.
On the subject of Visual Reporting, it’s also worth noting that Siemens is now giving away the standard set of Visual Reports with all NX licences. This means that whether you run with Teamcenter or not, you can still use those predefined reports when needed. You can define custom reports on the fly, but you can’t formalise them into reusable reports — for that you need a cost option licence, but still, the supplied tools are useful for many, particularly as they avoid having to delve into tables and such, which is no fun for anyone. .
NX layout for top down design & Conceptualisation
When you consider NX’s mastery when it comes to 3D modelling and shape description, it seems a little incongruous to discuss 2D sketch layouts first before getting onto the meaty, fun stuff.
That said, there is a wealth of experience and best practice associated with top down assembly design and more often than not, this begins with a 2D layout, rather than diving into a 3D model straight away.
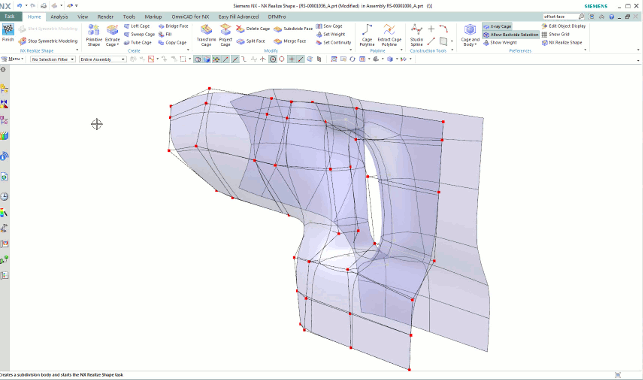
NX 10 gets more powerful sub-division surface modelling tools. New seed faces can be built from lofts or extrudes between splines and arcs, in addition to the primitives in the first release (NX 9)
To better support this workflow, NX sees the introduction of NX Layout. Fully integrated into NX’s drafting environment, it allows you to scheme out a product’s form and structure long before you get anywhere near building a 3D feature. It gives you tools to pull together a high level assembly structure, then tools to allow you to create that layout.
Whether that’s pulling in pre-existing 2D profiles (from the Reuse Library) or sketching them on the fly, the goal is to allow you to do all the conceptualisation and proof of concept in a simple environment.
NX 9 introduced the idea of using synchronous technology found in the 3D environment to allow you to edit geometry in the same manner (using live rules to find and maintain geometric relations) but with sketch geometry. It also will maintain any inter-part relationships where possible, so both gross and fine edits can be made in quick time.
Interestingly, this is also backed up with some tools to assist with reusing legacy 2D documents and to solve the problems typically associated with that process — such as fixing poor geometry, end points that don’t match up.
NX Layout also includes assembly dynamics so you can flex an assembly and see how it operates, adjust and retest.
Once the layout is ready, the assembly structure is in place and you’re ready to proceed, the Create Assembly operation will wrap up everything that you’ve defined and transfer it to the 3D modelling environment, so that you can push it into the engineering process and start to flesh out the 3D model you need.
Complex form design with NX realize shape
Now, let’s take a look at some 3D modelling updates. If you follow the development of NX, you’ll be aware that NX 9 saw the introduction of sub-division modelling (subD) techniques.
SubDs are now much more commonly known (though perhaps not as well understood) thanks to their introduction into a raft of other systems out there.
The Sub D implementation in NX is interesting. The system has, for many years, included a wealth of surface modelling tools and the SubD implementation in NX extends and enhances these.
The first release, a year ago, saw the system gain the ability to start with a small selection of geometry types (a sphere, a box or a plane) and start to manipulate it using a surrounding cage (as opposed to direct edge editing as found in other systems).
The goal of SubD modelling is to enable the creation of smooth, continuous shapes without the need to understand the ins and outs of curve networks, surface creation and editing. Essentially, you push, pull and form the shape you want.
NX 10’s tools builds on the ground work done in the previous release. It adds a wider selection of seed geometry. Specifically, you can now construct that starting surface from lofts or extrudes from splines. This means you can get a much closer match to your intended shape before beginning.
It also adds greater control over more advanced functions, where you’re editing multiple segments or faces of the model in one go. In fact, there’s a new selection mode that allows you to select a ‘matrix’ of faces in one go — pick the upper right hand, then the lower left hand and it’ll grab all those faces in between.
These tools, integrated into the more traditional solid and surface modelling tools, make for quite a powerful combination — all in the same environment.
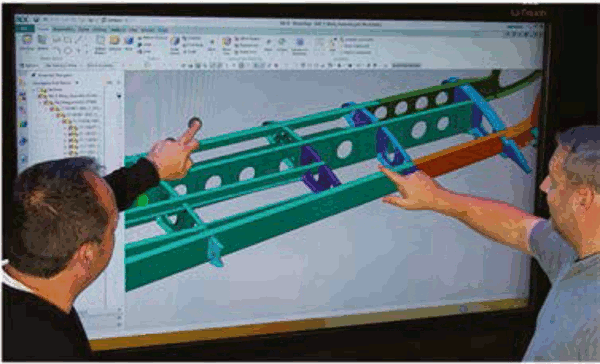
Airframe design tools
Alongside the general applicable updates, NX 10 also introduces a set of aerospace design tools, specifically for air frame design.
NX 10 introduced tools to make common airframe design tasks more efficient using a combination of automated feature creation and industry specific terminology
NX has been used in the aerospace industry for many years and proven capable. What these tools do is to take a set of standard and often repeated workflows and give those users a set of very specific functionality that reduces the number of steps to achieve a particular feature or function in the model.
Alongside this, they also use industry specific naming conventions (spars, ribs, stringers are order of the day) for particular part configurations and functions.
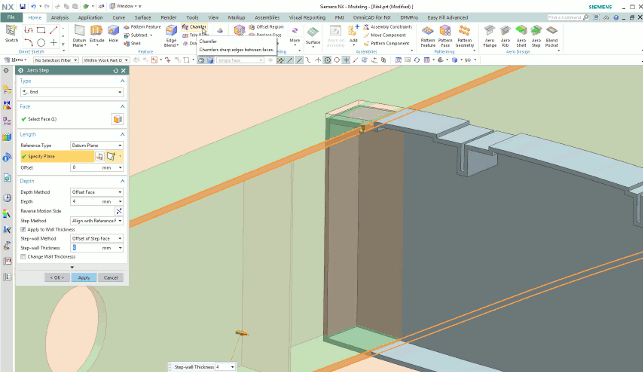
These are perhaps best discussed through example. So, if we take the example of Aerospace Flange, you begin the operation with your model in the correct state, usually with the control skin in place as well as planes defined for where each flange lies.
You select the skin, then guide (the mid-plane for the feature) then give it the build parameters, such as direction, width, symmetry controls and skin offsets. Then the system uses these and a little bit of synchronous technology magic to build the part.
The others follow similar suit, giving you tools to quickly build both parts and features using references from the model and input to get to a final component.
The blend pocket tool differs in that it rationalises the need to be able to machine pockets in an airframe spar with the simple fact that actual manufacturing processes typically differ from the geometry you define in CAD. This allows you to add blends to internal pockets that give you a realistic representation of how that part will be post machining – which of course, gives you a much quicker manufacturing process (using NX’s CAM tools), but also more accurate physical properties (such as mass and CofG).
Conclusion
NX is a beast of a system and we’ve barely scratched the surface — we’ll be taking a look at the simulation as well as manufacturing/machining related updates in a future issue.
What should, however, be clear, is that the development team is continuing to look at how the existing tools can be rationalised as well as made more efficient to solve customers pain points, whether that’s at a generally applicable level (such as the need for more complex shape design or top down conceptualisation of assemblies) or at the industry specific level, with the airframe design tools.
The work done to bring Teamcenter into NX is also impressive and brings you all of those vital interactions closer to where you do your work.
This release shows that despite NX (and it’s predecessors) multi decade long heritage, it’s possible to find new room for innovation and to make life for users easier — whether that’s defining a product or a set of geometry or whether it’s interacting with the business processes that surround that process.
On the go: How Siemens has adapted NX’s UI for touch
The use of touch driven devices is something that Siemens PLM has a history of exploring with its software products.
The company demonstrated NX driven by the Leap Motion device at a user conference last year. This year, the company has been exploring the potential to drive NX using touch-based devices. These are split into two basic camps.

There is the rise of the tablet computer. While other vendors are going all guns blazing for iPad variants or add-ons for their tools, Siemens PLM has focussed on adapting the NX user interface for use on the Microsoft Surface platform.
If you’re not familiar with these, they’re Windows PCs built into tablets of a variety of sizes and specifications. It’s not a cut down laptop, it’s a full spec windows box that can be driven by touch as well as the usual array of connected devices (keyboard, mouse, SpaceMouse etc.). It is worth noting that you’ll need a decent specification Surface Pro.
The team has developed a role that switches NX into a touch enabled and optimised mode, so command operations are found using larger icons (you wouldn’t want to try and select a small icon using your finger on a 12” 2160 x 1440 display) as well as providing guidance on interacting with the model. It’s the usual two fingers to rotate, two finger drag to pan and two finger pinch to zoom in and out on your model.
Interestingly, alongside the personal tablet work, it has also done some work on using NX as a collaboration tool on some of the larger format displays that now also include touch. This means that instead of adapting the user interface for small screens, it does almost the opposite, adapting it for group work around a 40”+ plus display.
When it comes to visualisation and design review, the combination of the two is interesting, especially if you’re in the market for something to make you more mobile, and which also enables a team to work around a larger format display.
When you consider the ease with which Visual Reports can be built up and show complex information in a rich, clear manner, it’s pretty compelling.
| Product | NX 10 |
|---|---|
| Company name | Siemens PLM Software |
| Price | on application |


