I doubt that there’s anyone that really needs an introduction to Roland and its range of hardware that supports design and engineering.
If you’ve been through the UK’s design and engineering education system, then the chances are that you’ll have come across its machines at some point.
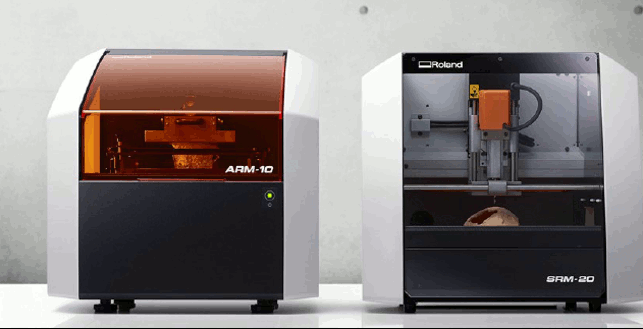
The Roland MonoFab machines-two manufacturing or prototyping methods in a matched pair of devices
Roland’s history is, of course, in the wide format printing game, which led the company to start to experiment with using the same technology to cut material, rather than just to print on sheets.
Since then, the company has been, albeit quietly, providing 100,000s of units that cover a range of capabilities. From CNC mills of varying sizes to laser scanning devices, and sometimes both combined into a single unit.
With this success, it was perhaps perplexing that the company had, until recently, avoided the 3D printing game.
After all, if you have that amount of customers, that amount of knowledge in numerically controlled machines and that reputation, then it would make sense.
Enter the MonoFab
Despite this, it came as a surprise in the middle of 2014 when Roland finally launched its first 3D printing device.
What was interesting was that it didn’t just release a 3D printer, but rather a brace of devices — the MonoFab products. This is comprised of two machines. The first, the ARM-10, is a Digital Light Processing (DLP) stereolithography 3D printer.
For those that are unfamiliar with this technology, it uses a small DLP chip from Texas Instruments. These are commonly found in today’s projectors and are compromised of a matrix of very small scale reflectors (up to 8 million of them) and a light source. These mirrors work to represent pixels on a screen.
In consumer units, visible light is used to display whatever you’re trying to project on a surface. In this case, the light source is UV light and this cures layers of resin held between a print tray and a build platform.
Interestingly, while the term UV curable resin is commonplace, the pedants out there will know that most machines of this class use violet light (rather than ultra violet) in the 405nm wavelength band. But we’ll get onto the specifics of how it works shortly.
Alongside the ARM-10, the MonoFab range also includes a matched CNC machine. This takes Roland’s mastery of the desktop CNC game and packages it up into a nice little unit that matches the 3D printer in terms of both size and styling.
So, in this review we’ll look at the two machines separately, then wrap things up at the end to see what you get for your money and where it can fit into your workflow.
The ARM-10 3D printer
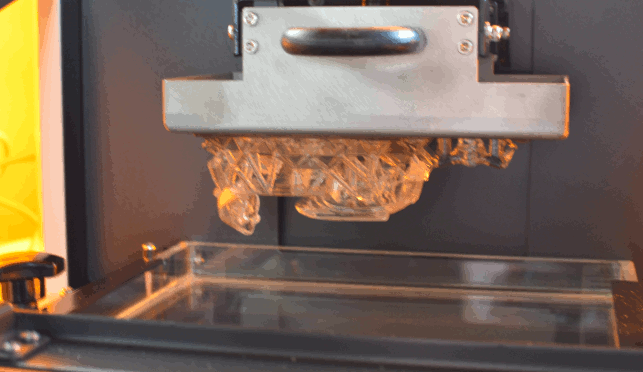
The Roland ARM-10’s build method. UV light is projected from beneath, through the build tray to solidify the model onto the platform above
As we’ve discussed, the ARM-10 uses DLP driven stereolithography.
Similarly to many other machines in its class, this builds from the bottom up. The projection unit is in the base of the unit and projects the light up, through a transparent build tray to solidify a layer of material onto the build platform, which gradually increments up in the Z axis.
As a unit, it’s clear that you’re dealing with the build quality that you’d expect from Roland. Getting the thing out of the box is painless and it’s about ready to go as soon as you’ve done it.
About the size of an office desktop laser printer, it looks pretty slick. The orange is, of course, predominant as it’s required to block out any stray light that would otherwise cure the resin in the tray before you’ve even printed anything.
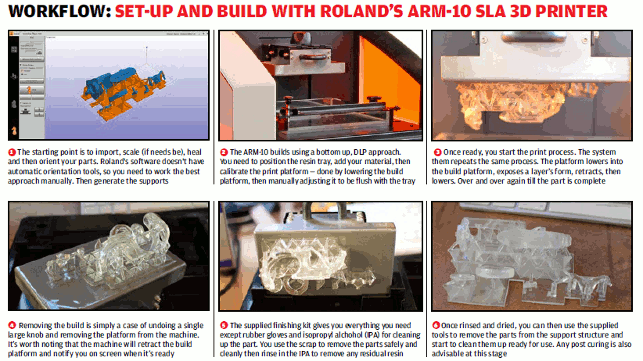
In terms of initial set-up, Roland has an interesting set of software and online support tools. All of the drivers can be downloaded by logging into its support tool. This lets you then download the software needed to set-up your print jobs.
While we had a few glitches, these were quickly resolved and we were up and running in about 20 minutes.
The machine connects using a standard USB cable and the usual power adapter. It’s worth noting at this point that before you start printing, you need to ensure that the workstation you have it plugged into has the correct power settings.
Essentially, the ARM-10 runs as a secondary monitor. Because of this, you need to ensure that any power savings or monitor shut off settings are turned off in your power settings. It’ll also only run on a Windows box.
Once done, you’re about ready to get set-up for your first print.
There are three key things to do before you start printing. The first is to install the build tray. You’ll notice that despite the build envelope of 130x70x70mm, the resin tray is in fact 130x130mm. We’ll get onto why that’s interesting later.
You loosen off the finger clamps, slide in the resin tray then lock it down again.
Interestingly, the machine includes a protective shutter that only disengages when you’ve installed the resin tray.
This will save that resin getting into the projection gubbins and save you a lot of grief (other machine manufacturers should take note of this). You then add in the resin from the supplied bottles. There are handy marks on the side of the build tray to make sure you don’t over fill it.
The final step is to calibrate the build platform. You do this by loosening four bolts with an Allen key, hit Calibrate in the software and it’ll move into position. You then need to push the print head down into tray so that it’s flush with the bottom of the tray.
Now tighten up those bolts. Once done, you’re ready to rock and roll and get your first print underway and, as ever, you need to jump into the supplied software to do it.
Set-up software
Roland has always had interesting software and the supplied software with the ARM-10 is equally as interesting.
It steps through the workflow, beginning with import and healing of the STL data. It’ll place your parts into the build platform on screen and you can then adjust and position them, add supports and define the print parameters.
Now, it’s here that there are some curiousities. The software doesn’t give you any automated tools to assist with the correct orientation of your parts. In some respects, this is good for those looking to experiment and that have a working knowledge of how these machines work.
However, if you don’t, or you just want to get it working, you’re probably stumped.
The reason for this is that these machines have some peculiarities centred on how you need to orient the parts. Typically, you need to have them at 45 degrees to the horizontal to avoid building heavy cross sections. It’s pretty trivial to do this manually, but some automation would be useful right at this point.
Once your parts are arranged, you then add in the supports for the parts. Roland’s support structures (compared to other SLA system software) appear heavy. And yes, they do use more materials, but the results that we got with the machine indicated that heavier supports mean that you’re less likely to have a failed build — and in the professional space, that’s essential.
You then define the build parameters for the print job. The ARM-10 is supplied with just a single material. It’s a standard clear resin as you can see in the above image.
What’s interesting is that Roland has exposed all of the settings for the process so while you can dive in and build parts, you can also experiment with other resins from the burgeoning market for such materials.
When it’s ready, you hit go. The machine then sends the layer data to the machine and starts to build. It runs very quietly as the whole unit is pretty solid. There’s very little in the way of sheet metal (a problem with the cheaper end of the spectrum machines in this class) and because of the build process, there are very few moving parts, apart from the Z axis control for the build platform.
Results
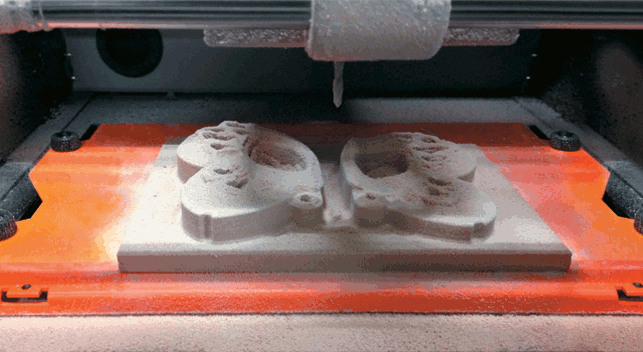
The SRM-20’s build plate is usefully large and lets you rip through softer materials. It won’t do metals, but almost anything else is possible. It’s just a shame it doesn’t come with t-slots for better workpiece holding
Once the build has completed, you’ll find a message on your workstation and see your build platform up in the air inside the machine.
To remove, it’s simply a case of flipping up the lid, undoing the large thumb wheel and removing the build platform (don’t forget to remove the lid when that’s done).
The ARM-10 is supplied with a nice finishing set-up. There’s an injection moulded breakout tray with a pocket to fit the build platform into. You then lever the part off with the supplied scraper, and pop into a tub of isopropyl alcohol.
Give it a swirl around, then move the part to the second tub for a further rinse. It’s tempting to remove the supports, but let the part rinse and get all the excess resin off before you start clean up.
Next steps are that you can dive in and break out your part (Roland’s supports break away nicely, even if they are a little heavy). You’re supplied with a pair of flat bladed snips, but I’m sure you’ve all got your own personal set of tools for cleaning up 3D prints.
Once done, the parts need a bit more curing. We discussed the use of a UV sterliser in our FormLabs Form 1+review back in October 2014 and the same stands here. If you don’t want to go that route, then a period in the sun will do the trick, just more slowly.
The resultant parts from the ARM-10 are just as you’d expect. The models are clean, crisp and precise. You have full control over your layer thickness, but it’s quoted as running as fine as 0.01mm. Build times will, of course, increase at that level, but a balance can be struck between build time and resolution as you see fit.
One thing we briefly mentioned was the double size build tray. This is a curiousity in this machine. While the build platform (in terms of horizontal size) is 130×70, the resin tray is in fact 130x130mm.
Why is that the case? I’m not entirely sure, but what it does mean is that when the PDMS layer on the resin tray starts to cloud through exposure to the UV light, which is inevitable on all similar machines, you can take it out and rotate it 180 degrees and get another set of builds out of the same tray.
As I mentioned, I’m not too sure why Roland has done it. A full build platform might have been more useful and would give similar build capability as the Form 1+. It certainly gives you a little extra bang for the buck on consumable items.
The Roland SRM-20 CNC mill
Alongside the 3D printer, the other half of this rather impressive duo is the SRM-20.
This, as you’d expect from Roland, is a smaller scale 3 axis CNC machine.
The unit is a lot heavier than the 3D printer, but packed into a similarly sized package. Again, the device is set-up and installed using Roland’s support software.
Whereas the ARM-10 uses a single application for set-up, with the SRM-20, you have a number of different options.
The majority of work will be done through Roland’s ever present Modela Player application. This gives a backed in set of tools that allows you to import part geometry, arrange it and then program the tool-paths you need to cut the material.
The whole thing is geared up for the prototyping process, supports the use of tabs (to retain components) and even steps into double sided cutting.
Alongside this, there are also a few other applications, that range from tools for designing engraved forms from scratch to ClickMill, which lets you quickly define a toolpath and have it cut on the machine — ideal for facing off or trimming blank material.
Another key component in the software stack is the Controller application. This works just like your Siemens or Heidenhain hardware controllers and is the point where you load the G-code, set-up datums and origins as well as have full real time manual control over spindle and feed rates.
The latter is essential when you’re fine tuning the best parameters for your cutters, the material and the machine. Ease the feed-rate off as you start, then ramp things up once confident you’re not going to rip the machine apart at its, albeit well constructed, seams.
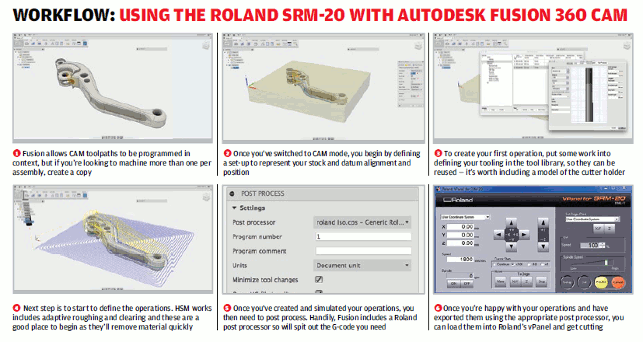
What’s also interesting is that while the Roland software tends to use its own proprietary RML-1 language, it’s also perfectly capable of running ‘standard’ G-code. This means that, given an appropriate post processor, you can use pretty much any CAM software you want or have access to.
We did some trials with Autodesk’s Fusion 360 CAM tools (see workflow below).
To enlarge image click here
After a little bit of tinkering with origins and ensuring they matched up in both the CAM system and in the controller software, it worked a treat. The benefit we found was that you end up with much more intelligence and efficiency in your toolpaths (meaning quicker cycles), and have more control over collision checking (assuming you have put the work into the tooling libraries).
Stock set-up
Once you have your tool-paths ready, you then need to set-up the machine. This, of course, is a two step process — the material on the table and the cutter in the chuck.
The SRM-20 features a pretty good sized table and you have a number of options for fixing your material to it. The machine comes with double sided adhesive tape and this works for most materials, assuming that you’re not running it too hard.
I’m sure someone will adapt the steel table (which fixes in place with four thumbscrews) to have a low-profile vice — and if they don’t, they should.
If you’re looking to get into double or multi-sided cutting, then the device is also supplied with small pins that, with some tricks detailed in the manual (in fact, the subject has its own PDF manual), allow you to locate and subsequently flip the workpiece into the same position.
Next up, it’s cutter time. The SRM-20 uses a 6mm collet chuck that’s removable with a supplied spanner.
If you want to run smaller cutters, then there are also 3, 4, 5 and 3.175mm collets available for £40 a piece. Into this collet, you insert the cutter, set the depth and tighten up with a small grub screw (and yes, they supply a couple of spares thankfully). You then screw that into the spindle and nip up tight with a spanner.
Here, it’s worth noting that there are two possible positions for the spindle. One gives you full height, but the other lets you drop the spindle (and hence the cutter) if you want to run things more tightly.
It would be nice if you could acquire spare collets to hold your eventual range of cutters, to save on removing the whole shebang, setting the length and such.
First cut is the deepest When that’s all done, you need to set the datum/origins for the toolpaths you want to run. This is done in the controller software and by moving the spindle to the correct X and Y positions, then also setting the Z origin separately.
You then load in the G-code (you can batch load these, assuming you’re running multiples with the same cutter) and set the machine running. Again, just as with the ARM-10, you need to ensure that your workstation is running without those pesky power saving options — as it’s streaming in the G-code as it cuts.
The cutting speeds and feeds are completely dependent on the material you’re working with and your cutter.
You’ll also need to bear in mind step down when you’re working with hard materials. With foam and softer materials, you can really let this thing rip and you can see your part emerging from the swarf and dust as it removes material.
Once your first set of tool-paths is complete, it’s then time to switch your cutter. You need to go through the same set-up process. Assuming that you’re running with the same origins, it’s essential that you get the cutter lengths correct.
Conclusion
It’s hard to find fault with this pair of Roland machines.
They’re built like tanks, they’re reliable and they work perfectly once you’ve, as with all machines, learned the ins and outs of the process.
With the ARM-10 3D printer, this is always down to ensuring that you’ve got adequate support for your parts – the rest is pretty reliable. With the SRM-20 CNC, it’s down to good tool-paths and matching your cutting settings with the material.
Once done, both will give you good results. If I had criticisms of both, it would be the simple fact that they need to be attached to a computer that’s permanently on while the machines are running.
In the case of the SRM-20 CNC this is understandable – as you’d need to have control over the machine while it’s running at first. That said, once you’ve got the hang of things, it’d be nice to be able to disconnect and have it running on its own.
On the 3D printing front, it really is odd that this isn’t possible, particularly when you consider that the system is essentially flashing a series of PNG or similar files through a projector. That said, the computing requirements aren’t too heavy, so an older standard PC should do the trick for both.
In terms of costs, we’re looking at around £7,998 for both. As you’d expect, that’s comparable to buying similar devices separately.
In terms of costs, on the 3D print side, you’re looking at resins and built trays. They come in at £64.99 for 350g of the resin and £99 for the resin trays (remember, you get two bites at that particular cherry by flipping it around).
On the CNC side, you’re looking at materials (which can vary) and, of course, cutters. The machine is supplied with a 3mm ball nose, but you’ll soon find your collection growing.
The spindle unit, while rated for 1,000 hours, will eventually need replacing. The Spindle motor is rated for 2,000 hours, so you’ll need to plan on one spindle unit and one spindle motor (which includes the spindle unit) every 2,000 hour of cutting and they come in at around £270 for the lot.
We’ve also included a handy shopping list (see below) to give you an idea of costs and ancillaries that might be useful.
Ultimately, it seems strange to look at two very different production methods in one review – after all, you wouldn’t want the machines running alongside each other. Seriously, the dust, while contained in the SRM-20, is a pain to clean out and you don’t want that anywhere near the 3D printer.
But when you consider the nature of many design offi ces’ prototyping requirements, it makes perfect sense. Many are currently debating 3D print vs. CNC.
What if you could have both, running off one machine in the corner of your office. Considering that you’re looking at two key prototype production methods, which vary greatly, but cover all those bases, for just a shade under £8,000, they represent a solid investment.
Roland ARM-10 3D printer tech-specs
» Stereolithography (SL) build process using DLP projection
» 130 x 70 x 70 mm build envelope
» 430 x 365 x 450mm machine dimensions
» 10mm per hour build speed
» 17kg
» 0.01mm+ layers
» UV curable resins
» Post processing and finishing kit included » 1 year on site (guaranteed telephone response time and engineer visit times) — extensions available at £734 per year
» 8kg
» Price €4,999 + VAT (inc. machine, finishing kit, resin tray + 350g of resin)
Roland SRM-20 CNC mill tech-specs
» 3 axis CNC machine
» 6mm cutter collect
» 203 x 152 x 60.5mm build volume
» 451 x 426 x 426mm machine dimensions
» 2kg workpiece weight
» Cutting speed 6 to 1,800mm/min stepper motor
» Resolution — 0.01mm (using RML-1) or 0.001mm (using NC code)
» 1 year return to base warranty with £349 per year extension option
» 19.6kg
» Price £2,799 + VAT
MonoFab shopping list
UV tool steriliser (~£40): As we discovered in previous tests, a UV tool steriliser, as used in beauty salons, is an excellent option for post curing your models quickly.
Ultrasonic Parts Washer (~£80): We discovered this one recently. A small scale ultrasonic parts washer, filled with 70/30 IPA/Water gives your parts a good clean and helps with curing.
405nm laser pointer(~£6): Whether you’re joining larger builds or fixing parts in place, a decent method is to use a UV laser pointer to cure a little resin to solidify facts from support break away.
Isoprophyl Alcohol (~£5 per litre):Used to dissolve any excess resin. Get hold of 5 litres as a start. Keep it clean and you’ll get nice clean prints as a result.
Microfibre cloths: These are essential for cleaning the base of the resin tray to keep your builds nice and crisp.
Non-powdered gloves: Get them, wear them.
Henry the Vacuum Cleaner (~ £99):He’s cheerful, he’s reliable and he’s got a face on him. He’ll also work unlike the dust buster type product we initially used.


