
KeyShot 9 – In a startling turnaround, the once adamantly CPU-centric Luxion KeyShot now supports GPU rendering, as well as featuring some really interesting material updates and additions
When Luxion launched KeyShot, the company took the idea of a progressive rendering system, built on top of a physically based rendering engine, and applied it to the needs of the design and engineering world.
KeyShot 9 brings GPU computational support to KeyShot for the first time
Previously, we could use either a CAD-integrated rendering system, or a standalone, general-purpose system.
Other vendors had tried it before, but KeyShot arguably represented the first time that a system of this kind was developed specifically to focus on the needs of the design industry.
At its core was the principle that anyone should be able to use it. It didn’t require a massive workstation and you certainly didn’t need the specialist set of skills demanded by standalone renderers. And, since that time, the system has stuck to that principle, while simultaneously growing in capability to include animation, advanced material definition and more. So with that in mind, let’s take a look at what’s been added to KeyShot 9.0.
Let’s start with the big-ticket item: GPU rendering. Since it began, KeyShot has been a CPU-based rendering system – in fact, the company has made rather a lot of noise about this fact over the years.
The benefits were that users didn’t have to invest in new, often specialist hardware in order to be able to render out their assets.
Instead, KeyShot would run on pretty much any machine available. While it’s certainly possible to gain speed by adding extra cores to those machines, many companies also invested in building a network rendering capability, bringing together machines for a collective effort when needed.
But, at the same time, many in the design visualisation technology world have recently begun to take advantage of GPUs (or ‘graphics cards’ to you and I) as a means to achieve more efficient computation.
A GPU typically has thousands of cores that are very well suited to the highly parallel calculations required for ray trace rendering. This is nothing new, but the thing that changed Luxion’s mind was the introduction of ray tracing-specific cores (RT cores) in Nvidia’s new RTX GPUs. In fact, Luxion’s CEO recently wrote about this decision in a blog post, stating, “The short answer: Nvidia RTX technology provides the real-time rendering capability needed to deliver speed, quality, and accuracy.”
He continued: “The longer answer: With the Nvidia RTX GPUs that bring together both software and hardware-accelerated real-time ray tracing, it’s the first time GPU technology has been able to offer the results that provide the quality and performance to meet or exceed that of the CPU in calculating the advanced algorithms needed for greater realism with real-time rendering. Simply put, the power is there.”
What’s interesting here is that Luxion’s team of technologists resisted jumping on the GPU bandwagon for some time, because GPUs hadn’t been able to keep up with the technology that they were developing in-house. (Luxion, unlike most rendering system providers, develops its own core technology, rather than licensing a third party rendering engine.) But this has now changed, and the company has decided to bring GPU support to KeyShot.
How is that shaping up for the first release? The answer: nice and simply. There aren’t a whole lot of controls or options.
You’ll simply notice a new icon in your toolbar, with the label ‘GPU’. KeyShot users will be used to their CPU fans spinning up as soon as they load a decent-sized model – the progressive nature of the KeyShot render process means that it begins to start resolving (unless you’re in performance mode) as soon as you leave your model view to settle. If you hit that GPU button, the system moves your material designations to a GPU mode (unlike other systems, all of the materials are transportable) and starts to use your GPU to do the real-time computation.
We’ve tested this using a number of different models, some simple (in terms of light interaction), but some that use more complex materials and others with more complex lighting conditions (including interior models, for example). We tested using two different cards, an Nvidia Quadro P4000 (8GB) and an Nvidia Quadro RTX 5000 (16GB). Both are snappy compared to the 12-core CPU in our test machine, but you really notice the difference with the more up-to-date Quadro RTX 5000.
What’s really interesting is how Luxion has added support into the system – it isn’t a binary choice of CPU versus GPU. It’s rather more sophisticated than that. A good example is how to differentiate between the real-time display in the KeyShot window, then using either the queue or backgrounder rendering process.
It’s entirely possible to use your GPU to compute your real-time display, while the CPU does the crunching work in the background, or indeed, vice versa. We also discovered that it’s a nice way to take advantage of older GPUs (assuming they’re more recent Quadro cards) if you’ve recently upgraded to an RTX board. By running both, KeyShot allows you to separate real-time and background computation per GPU, so you can share out resources as needed.
In terms of which GPUs KeyShot supports, they include the Nvidia Maxwell microarchitecture found in GTX 980 GPUs and above.
Denoiser
Alongside the GPU computation capability, one of the big-ticket items for KeyShot 9 is the addition of a denoiser. If you’ve been keeping abreast of the latest in design visualisation technology, there’s a lot of talk about denoisers. Essentially, these use machine learning to remove steps from the ray tracing process by guessing what the image will look like where possible, saving you cycles of computation.
Thankfully, Luxion hasn’t simply integrated the Nvidia Denoiser as most vendors have so far. This, as you’d expect, requires an Nvidia GPU.
Instead, it has also sought out a CPU-based alternative, Intel Open Image Denoise, so those using a CPU workflow can gain benefits, too.
What’s interesting is how the denoiser is built into the workflow. In other systems, it’s either on or off and you can take the results. In KeyShot, however, the Denoiser is found in the Image Styles dialogue, where all of your post-processing effects and adjustments on colour, bloom, vignetting and so on are to be found.
KeyShot 9 provides one-click denoise that delivers the reduction of noise in the Real-time View and render output to achieve smooth results in less time. Denoise is available for both CPU and GPU, with KeyShot using Intel Open Image Denoise for CPU mode and Nvidia Tensor cores for GPU mode. With a single click, the user can apply denoiser as an image effect option for any image style in their project and adjust the blend with the base render.
Luxion’s RealCloth technology offers unprecedented levels of control over the appearance of fabrics, right down to how it is woven
KeyShot 9 – RealCloth & fuzz
The next two updates we’ll consider are related, and one builds on the functionality of the other. For KeyShot 9, Luxion is introducing a brand-new technology, called RealCloth, that allows you to define and render realistic woven materials.
While there have always been idealised fabrics based on texture, bump and opacity map wrangling, even some based on procedural shader techniques, this is the first time that Luxion has given you very granular level of control over how material is constructed. By that, I mean it’s possible to define, from scratch, the weave of the fabric from first weft-and-weave principles.
As ever, a good way to experiment with new materials like this is to apply one of the pre-existing materials to a model and see what it can do. You’ll find a selection of RealCloth materials already there for you in the system, so dragging one onto a model means it pops up in place – and double clicking that part will bring up the material definition dialogue. You’ll immediately see a host of options available, so it’s worth breaking these down. You’ll see, for example, that you’re defining materials separately for the warp and weft of the fabric. These are the two basic components in most woven fabric, describing its vertical and horizontal yarns.
At present, you’re defining separate materials (in terms of size of yarn, colour and so on) for these two (and only these two) options. (Note: some fabrics use multiple colours in these positions to create more complex fabric patterns, such as tartans or plaids).
You’ll immediately see this update on your model as you experiment with colour to achieve the look you want. Most systems would leave it at this, but Luxion has gone one further and given you control over how your weave is constructed.
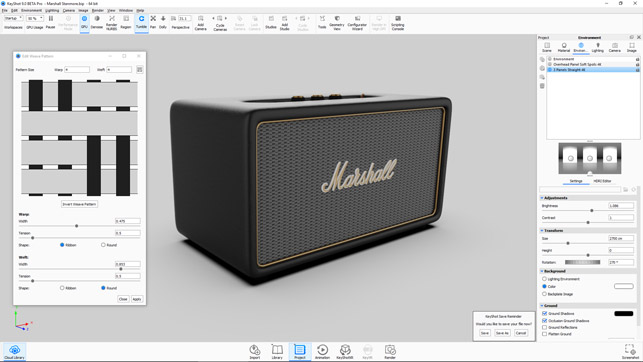
Clicking the Weave Editor brings up a separate dialogue that allows you to really dive into how the weave is constructed. If you’re experienced with this type of thing, you’ll know what’s happening straight away and will be able to adapt your weave requirements, whether it’s a twill, a weave, or a satin that you’re looking to create. If you’re not, then a little time spent reading up on the subject will give you enough information to dive in (and there are a lot of resources out there).
Alongside the RealCloth materials and editing process, this release also introduces a new geometry shader called Fuzz. For those who haven’t used this type of shader before, the term ‘shader’ usually refers to a rendering material type (such as wood, metal and so on). However, a geometry shader doesn’t control the aesthetics of a surface, but instead creates additional geometry off the basis of the geometry to which the geometry shader is applied.
In previous releases, we’ve seen the ability to generate flakes as well as foams and bubbles. (Take a look at our review of KeyShot 8 for more details.)
Fuzz is a new addition and allows you to add randomised hair-like growth to the surface of your part/material. There are a bunch of controls over length, length variation, density, which allow you to finetune your material’s appearance.
The uses for this are as wide as you can imagine, but a couple of instances already baked into KeyShot are adding fly-away fibres to RealCloth materials (which adds an incredible level of realism), and creating lifelike grass, but the possibilities are endless once you get into using this as a node in the Material Graph.
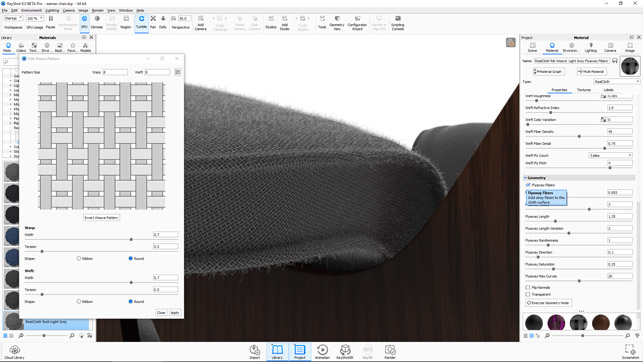
The new Fuzz geometry shader allows you to quickly build in hair, grass or flyaway fibres onto the surface of your geometry
KeyShot 9 – model library
Let’s now move onto some of the smaller, but just as useful, updates for KeyShot 9. One of these has to be the new Model Library.
While existing KeyShot users will be more than familiar with the existing libraries for materials, textures, environment maps, backplates and so on, this new model library gives you a place to store and quickly reuse models.
These might be items used to quickly build up a scene (there are baked-in items such as ramped screens), but could equally be more complex, but regularly used items such as decorative lamps and artwork in an interior scene, or human figures in architectural visualisations.
The system is supplied with a number of basics, but it’s also worth exploring the KeyShot Cloud library as well, as there are some nice assets there to download and repurpose. What’s interesting is that some of these show off the potential here. We’re not simply talking about sharing a model or set of geometry, but rather allowing users to share intelligent models that come along with their material assignments (the multimaterial options are used to great effect) as well as their own cameras and so on.
To create your own assets and add to your library, you simply pull up your model and hit the Add Model to Library icon – this will transfer your geometry and allow you to include associated data from that model, such as cameras. If you’re working in a team, you’ll also be aware that the file structure/folders for these can be shared among your team, so everyone has access to them.
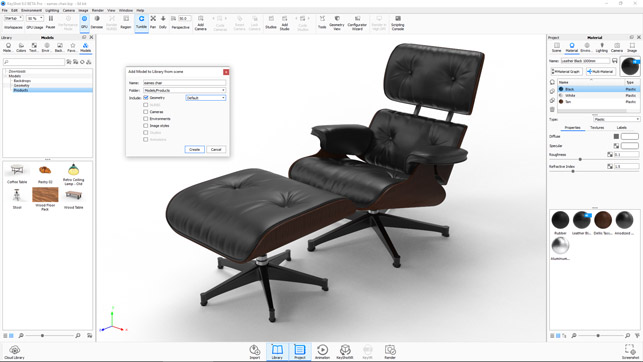
The new Model Library allows you to quickly drag, drop and reuse geometry models, along with their materials, lighting and environment details
KeyShot 9 – animation controls
Next up are a couple of small tweaks to the animation controls within KeyShot. For a while now, the system has included an automated motion-easing option. Rather than direct movement between camera or part positions at a constant speed, the system allows you to ease in and out of movements, creating a more pleasing animation that is less jarring for the viewer.
What KeyShot 9 brings is the ability to control that ‘easing’ process with a curve, so you have more control over how it speeds up and slows down into and out of the movement.
Alongside this, the same principles of greater curve-based control have also been applied to the fade controls on material animations – often used to fade in or out software interfaces or lighting in your scenes. The UI is much the same for this as for the animation controls.
Web configurator
The last major update for KeyShot 9 is the ability to create fully rendered product configurators. You’ll have seen these in all manner of industries and for all manner of products. KeyShot takes the variants you can define inside the system, using tools like model, material and studio variants, and builds these into a single set of assets that can be used online. You work through the wizard and choose which variant sets you want to include, provide details for how the configurator works, and set the system running to generate not only the imagery you need, but also the HTML code you need to adapt it for your web developers.
In conclusion
It’s quite a turnaround, seeing Luxion integrate GPU support into KeyShot, particularly considering that, for the last decade or so, the company has made a great deal of noise about how it is CPU-based.
The reality is that this is a smart move and a change that has been made to take full advantage of today’s rather incredible GPU technology. While other systems have gone ‘full GPU’, Luxion has managed to make this transition sensibly.
If you still have a CPU-centric workflow (perhaps using AMD graphics boards as well), then you can continue to use KeyShot just as you have previously. If, however, you have more modern Nvidia cards in your workstations, then you’ll very quickly discover how quickly they can render.
Elsewhere in this release, there are some really interesting material updates and additions. Considering the wealth of soft goods and fabrics being introduced into more traditional forms of product and industrial design these days, then these updates are going to be really useful for a lot of users.
Greg’s thoughts: What DEVELOP3D’s GPU guru recommends
Before KeyShot 9, you never really needed to invest that much in a workstation GPU. A mid-range graphics card costing a few hundred pounds would be more than adequate, with money better spent on a CPU with more cores.
But if you want to take advantage of the new GPU-accelerated Nvidia OptiX ray tracing engine, you’ll likely need to re-evaluate how you allocate your budget. Mid-range pro graphics cards like the Nvidia Quadro P2000 (5GB) might be fine for 3D CAD, but won’t really deliver when it comes to GPU rendering.
So how do you choose which GPU is best for you? First of all, it needs to be an Nvidia GPU (Maxwell generation or above). AMD GPUs will not work with the new GPU rendering engine.
Second, if you want to take full advantage of the engine, you’ll need an Nvidia RTX GPU, which features RT cores dedicated to ray tracing and Tensor cores for AI denoising, as well the standard CUDA cores.
In short, the more cores your GPU has, the faster the render. But cores aren’t everything. GPU memory is also very important. Memory demands increase as models, HDR images and textures grow, and all of these assets have to fit into GPU memory. Output resolution also has an impact on the capacity you’ll need.
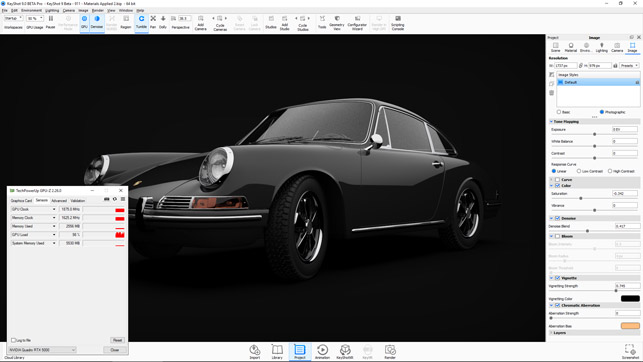
8GB should be considered as a bare minimum. To give some context, rendering our Porsche 911 scene at HD resolution used up 9GB of memory on our Nvidia Quadro RTX 5000 GPU. More complex models will use considerably more.
KeyShot works with Nvidia Quadro or Nvidia GeForce GPUs. It’s worth noting here that the high-end Quadros, such as the RTX 5000 (16GB) and RTX 6000 (24GB), offer far more memory than a high-end GeForce like the RTX 2080 (8GB) or RTX 2080 Ti (11GB). At the same time, they do cost considerably more.
With GPU rendering, you can also use multiple GPUs, so long as your workstation has enough PCIe slots and a PSU to power them. With two Quadro RTX 5000s, 6000s or 8000s, you can also double your GPU memory through Nvidia NVlink.
GPU rendering in KeyShot 9 is an exciting development, but ultimately, you’ll have to make up your own mind as to whether CPU or GPU makes most sense for your organisation — and where to invest moving forward.
Greg Corke
| Product | KeyShot 9.0 |
|---|---|
| Company name | Luxion |
| Price | from $1,995 |


