
MakerBot Method X – With the Method 3D line of 3D printers, Stratasys has finally started to make clear its ownership of the MakerBot brand. From its heated build chamber to its bullet-proof accuracy, this is not the MakerBot of old, writes Al Dean
The MakerBot brand has, in the modern parlance, been on something of a journey. Born out of the New York-based makerspace community back in 2009, it quickly became a poster child for the 3D printing revolution. (That said, it should be noted that the technology was actually based on research conducted by a team led by Adrian Bowyer at Bath University in the UK.)
With the emergence of Makerbot, out went the old guard of expensive machines from long-established companies that protected their patents as fiercely as they did their profit margins; and in came a new breed of machine manufacturer, eager to take advantage of expiring patents and the ability to access the components required to build their own machines. A new, more democratic 3D printing industry was born.
But just a few years down the line, things went awry at MakerBot. There were bitter battles between its founders, claims of ‘selling out’ and some questionable product launches. This culminated in the company’s 2013 sale to Stratasys for $604 million.
The poster child had been adopted by the pioneer of fused deposition modelling (FDM); in other words, its new parent was the same company that Makerbot had originally set out to disrupt.
The story hasn’t been any less complex since then, either. MakerBot’s Replicator 2 machines performed well, but advances in FDM technology have meant that open gantry machines with single extruders have become commodity items. It’s possible these days to source all manner of variants, often at very low cost. When you can buy an FDM machine at Aldi, you know the market has changed irreversibly.
So the launch of the Makerbot Method series last year grabbed our attention. It was clear from the off that these machines owed more to Stratasys’ technical knowhow than predecessors. An opportunity to try out the MakerBot Method X model came along, and we grabbed it, keen to see how it opens up new materials options for users and to explore the other improvements it brings.
MakerBot Method X – Set up and build
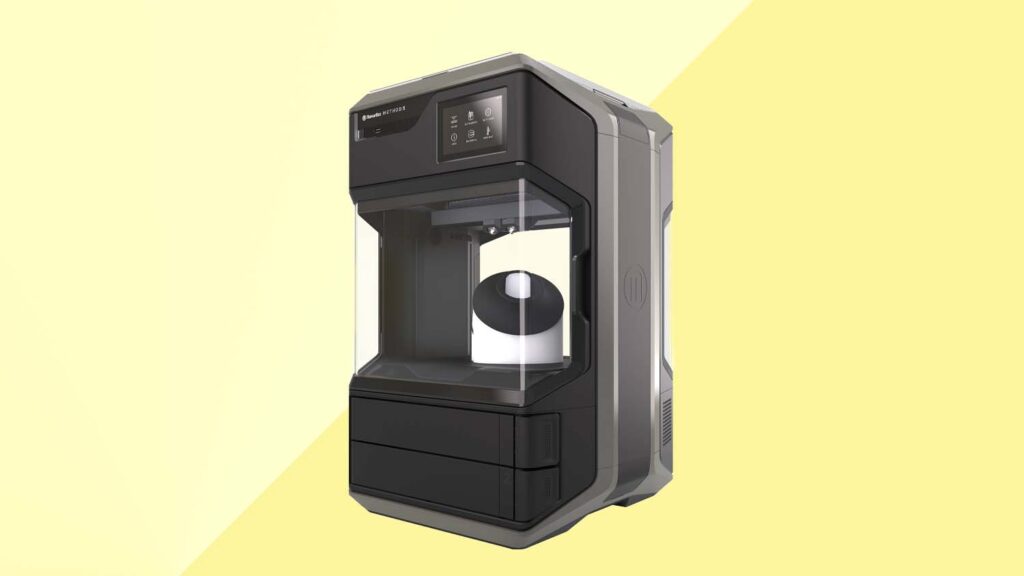
The MakerBot Method X is a compact machine. That said, if you’re accustomed to smaller, open frame machines, you need to be aware that while the footprint is broadly similar to that of competitors, the Method X is also tall and heavy. In fact, it’s just under 1m tall and weighs in at 30kg or so.
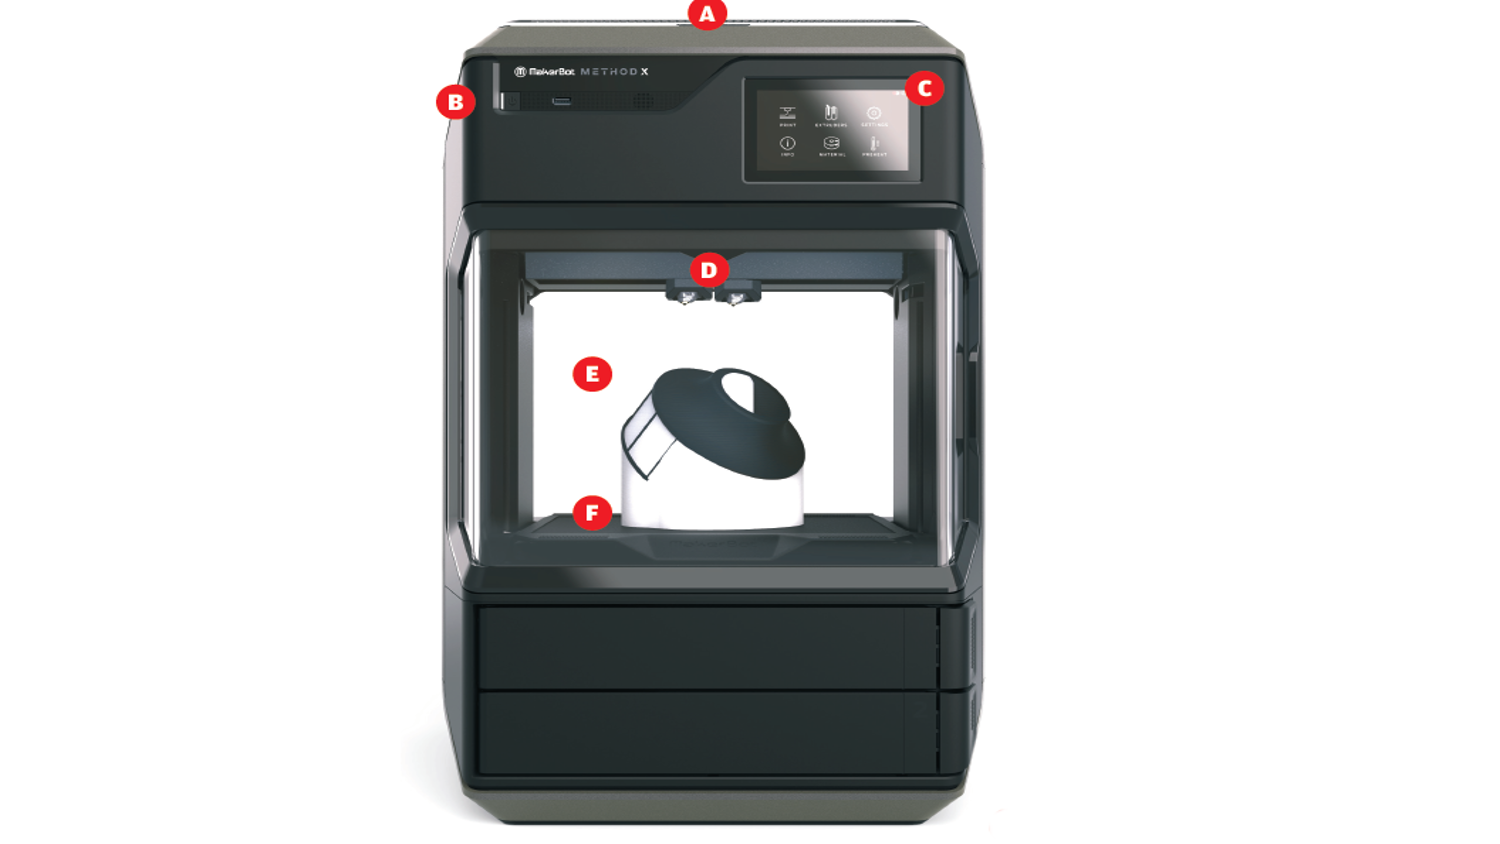
Within that frame, it has two sealed material bays at the base of the unit, with a fully enclosed and heated build chamber above. Above the build chamber, you’ll find two extruders that lay down the layers of build and support filament.
Set-up guidance is provided via the touchscreen on the top of the unit. Connect to WiFi or Ethernet, set up the MakerBot machine on your workstation (OSX or Windows) and connect the two.
The set-up process shows you how to install the extruders in the top of the unit, your materials into the material bay and, finally, the build platform. All three tasks are simple and you are guided by the machine, step by step.
Take, for example, loading materials: you tell the machine you want to load a new spool and it walks you through opening the material bay, and loading the filament spool into the machine. It’s a simple matter of pushing the filament into the correct hold and letting the machine do the rest.
There’s no need to bring extruders up to temperature, purge old material or manually feed the machine. It handles all these tasks for you, by way of a nifty loading mechanism that feeds the filament to the extruders and via instructions from RFID tags in the centre of each spool, along with the ever-present sachet of silica gel.

MakerBot Method X- Materials options
At this point, it’s a good time to talk about the range of materials available for the MakerBot Method X. After all, that ‘X’ refers specifically to the machine’s ability to work with a wider range of materials than the standard Method. This will work with the likes of PLA, PETG and Nylon, and the Method X builds on this, extending into ABS, ASA and PC ABS (including a fireretardant variant of this last one).
How does it achieve this? The trick lies in the heated build chamber, where heat rises to 110C (compared to 60C in the standard MakerBot Method), as well as a more robust set of extruders.
Plus, for the first time, the MakerBot Method X introduces the ability to print supports using Stratasys’ SR-30 support material, which has been developed to work with the more complex polymers that the Method X can handle. It’s a replacement, in effect, for Soluble PVA or similar, but offers faster dissolvability. We’ve tested out both ABS and ASA filaments combined with SR-30 supports and the results have been topnotch.
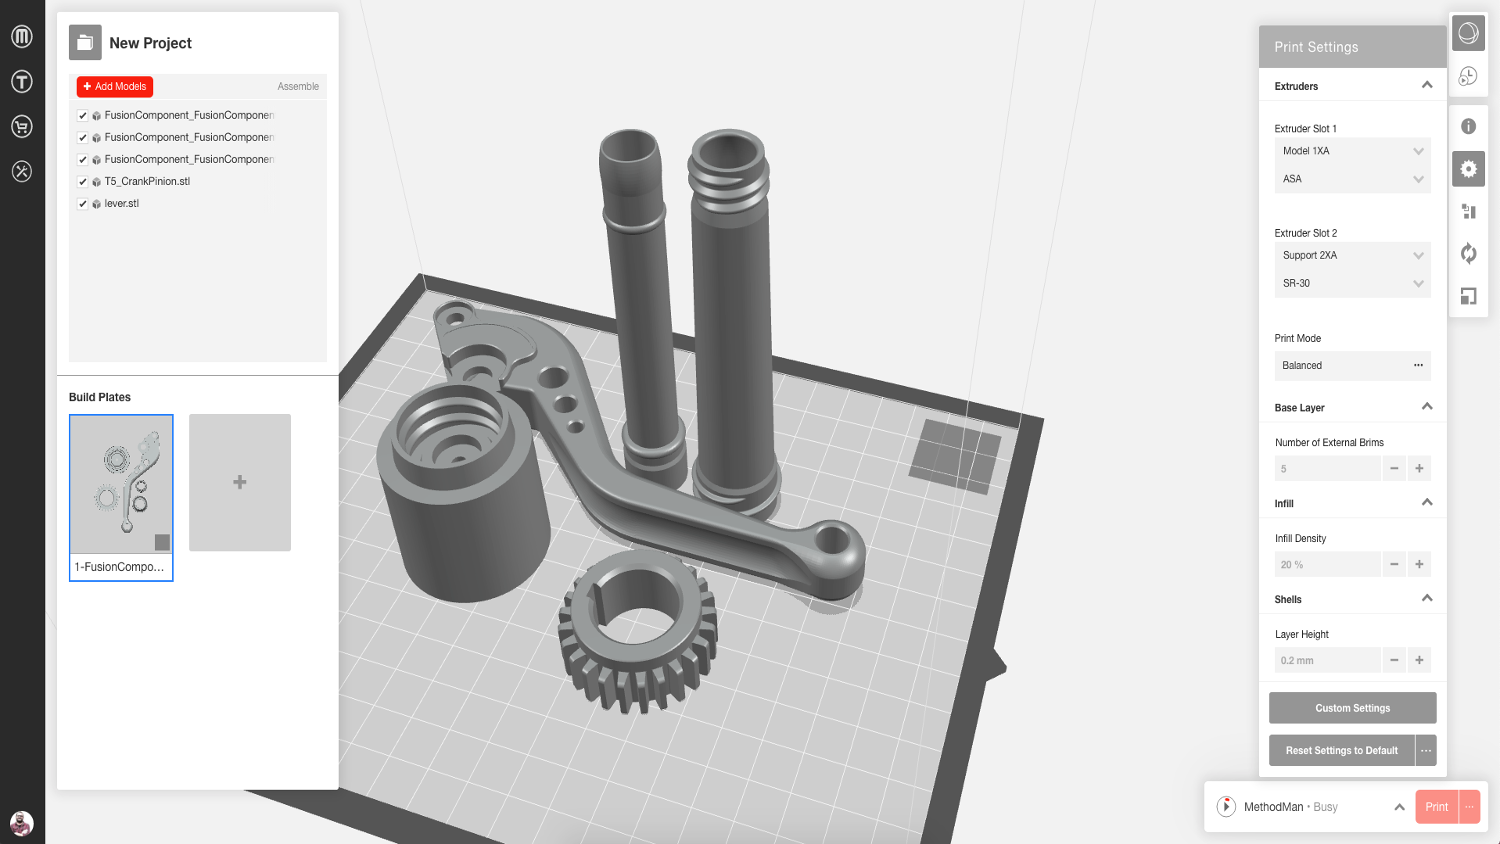
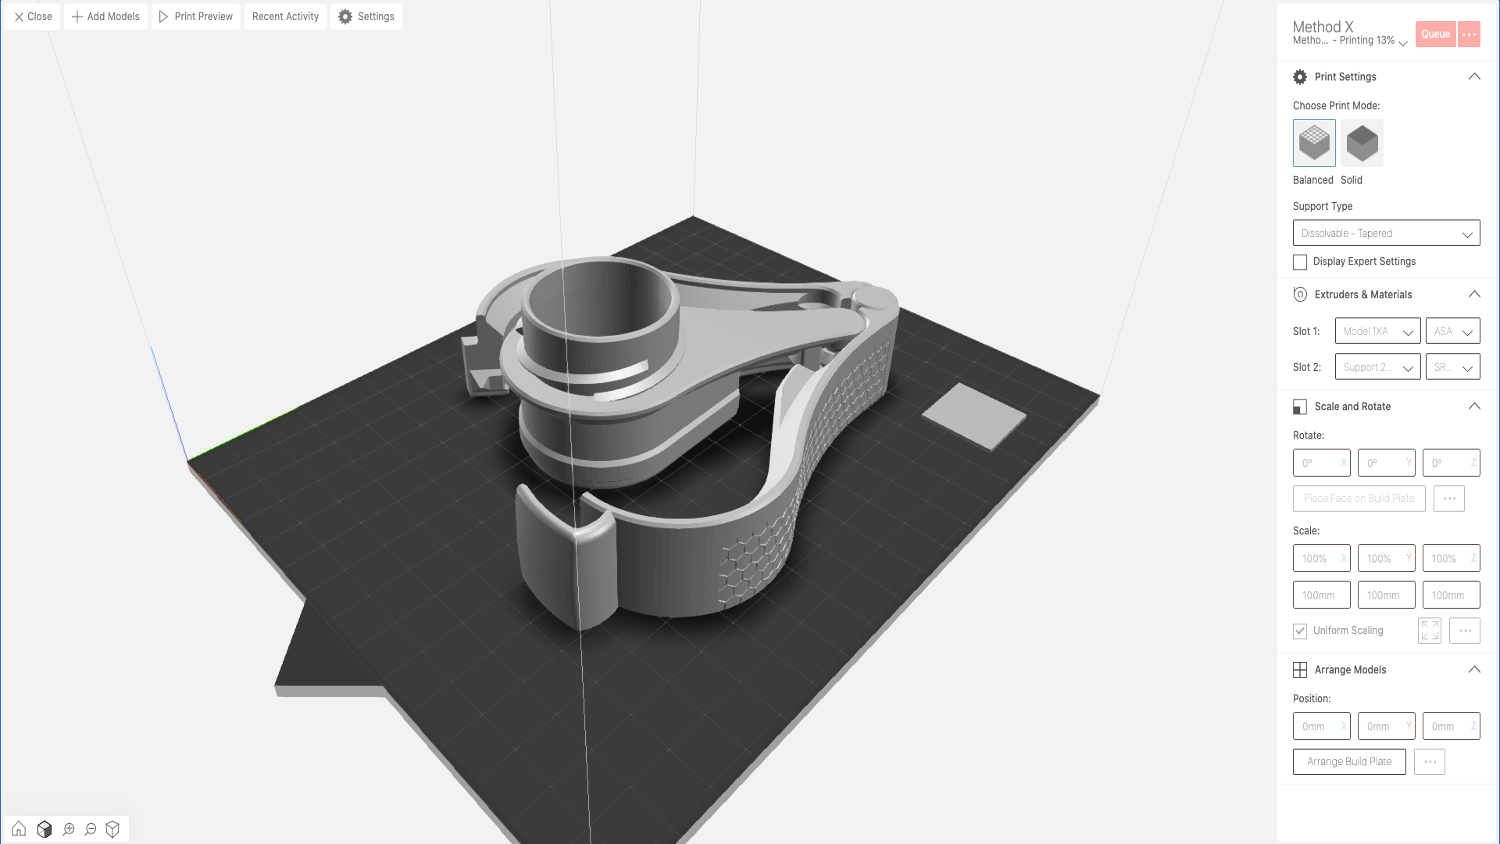
Once your machine is up and running, materials loaded and your copy of Makerbot Print installed, you’re ready to go. The software enables you to read in STLs and OBJs, a good range of native and standard CAD formats and offers a wide range of tools to help you optimise your build trays, in terms of part positioning and orientation.
When it comes to selecting your build parameters, the system has (for both ABS and ASA) two presets ready to go: Balanced, which gives you a quick build, with more sparse infill; and Solid, for creating much tougher parts, but which doesn’t extend the build time as much as you might imagine. (Our brake lever benchmark model, for example, took 5.5 hours in Solid mode, versus 4 hours in Balanced.)
You can also dive in and tinker with the settings, but I’m a fan of running with presets, particularly if you’re looking to take advantage of the closed-loop nature of a single vendor for both machine and materials.
Once done, send your job to the machine and wait. At present, there is no job queuing infrastructure. I’d love to see this added to the MakerBot ecosystem at some point; however, the company has just launched a new CloudPrint service, which comes with some nifty ‘in-browser’ pre-processing and build set-up tools, as well as job queueing.
Post-processing
Once your part is complete, it’s a case of removing the build plate and giving it a little flex. The part and its supports should pop right off, perhaps with the encouragement of that ever-present scraper to lift the first raft off the build plate. Once done, pop the build plate back into the machine and it’s ready to again, with no need for manual recalibration.
In terms of post-processing, if you’re using breakaway supports (where build and supports are made from the same material), it’s a case of working on the part to shuck those supports away.
However, if you’re using the SR-30 support material specifically developed for materials like ABS (as Stratasys no doubt hopes you will), the supports can’t simply be broken away. Instead, you’ll need to circulate your part in an alkaline solution, heated to between 70C and 75C. You can’t just dump it in a bucket and leave it for a while, as you can with PVA.
You have a few options here. The first is to invest in a post-processing unit. There are rumours that MakerBot is working on its own branded version, but for now, Stratasys already has various units available. Its entry-level model is the WaveWash 55, which was originally released with the Stratasys Mojo, some ten years ago now.
The WaveWash 55 is a small unit, which features a heated carafe and magnetically driven agitation unit in its base. You fill the carafe with water, add an Ecoworks tablet and switch it on. Hey presto, a couple of hours later, your supports have dissolved and you’re left with a nice clean part.
That unit costs £650, if you can find one. There’s also larger unit out there that does much the same, but costs a couple of grand. But here’s the thing: We went searching for information on how to achieve this on a shoestring budget and our results were surprising.
In short, we managed to achieve the same results using a heated ultrasonic parts washer and a chemical lab stirring device (with a 3D-printed agitator) for a grand total of £150.
The Ecoworks tablets come in at around £4 per tablet, but they’re essentially just a sodium hydroxide cleaning agent. We had good success, for example, with OxiClean household cleaner.
In conclusion
The MakerBot Method X is a far more expensive variant of the Method machine. The standard, PLA- and PVA-focused Method comes in at $4999/€4999; while the MakerBot Method X variant with full material capabilities, comes in at around $6499/€6499.
For that extra grand and a half, you get the ability to work with some far more robust materials. This may well be useful not only for prototyping work, but also for the production of jigs, fixtures and other ancillary parts that 3D printers are often called upon to produce.
Makerbot makes a lot of noise about the dimensional accuracy of this machine. In fairness, I have to agree that every part that’s come out of its heated build chamber has been well within the claimed 0.2mm tolerance and by a decent margin too – even in that troublesome Z build direction.
 Enjoying this? Read our other Pro Desktop 3D Printer reviews here:
- Formlabs Form 3
- MakerBot Method X
- Raise3D E2
- 3D Systems FabPro 1000
- Ultimaker S5
- Stratasys F123 Series
- Rize Inc. Rize One
MakerBot Method X – Tech-specs
» Makerbot Method X
» 1.75mm proprietary filament
» 152x190x196 mm (dual extrusion) or 190x190x190mm (using single extruder via Cloud Print) build volume
» 437x413x649mm machine dimensions
» 29.5 kg weight
» 0.02 to 0.4 mm layers Dimensional accuracy stated at +/- 0.2mm
» Flexible spring steel build plate
» Heated build chamber
» WiFi, LAN, USB port & live camera
» Automatic material loading & filament sensing
» Active levelling & filament fault sensing
» 1 year return to base warranty
» Price $6,499 / €6,499
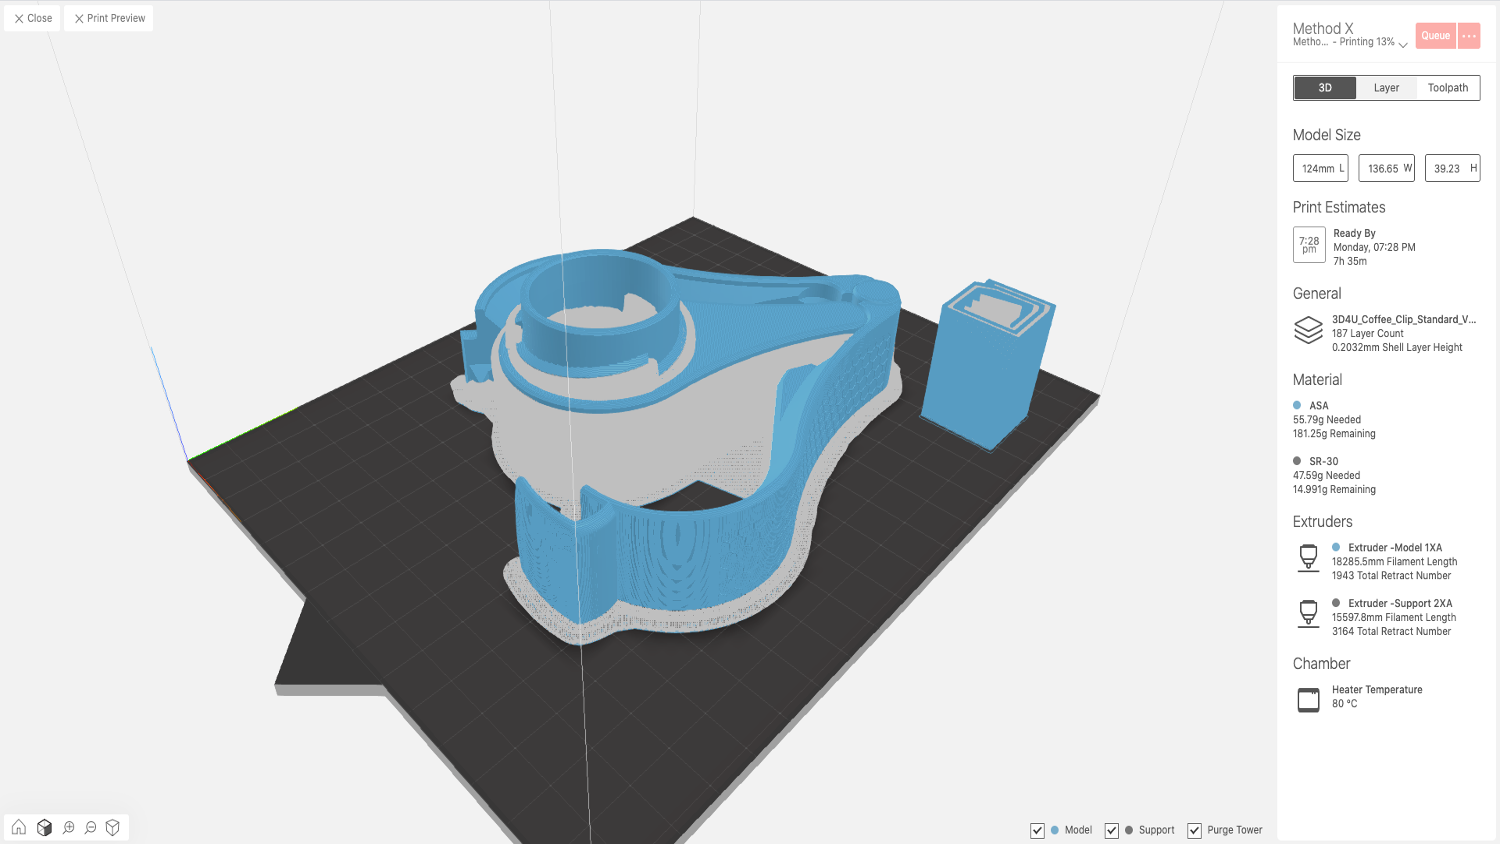
3D print benchmarks: Testing the MakerBot Method X
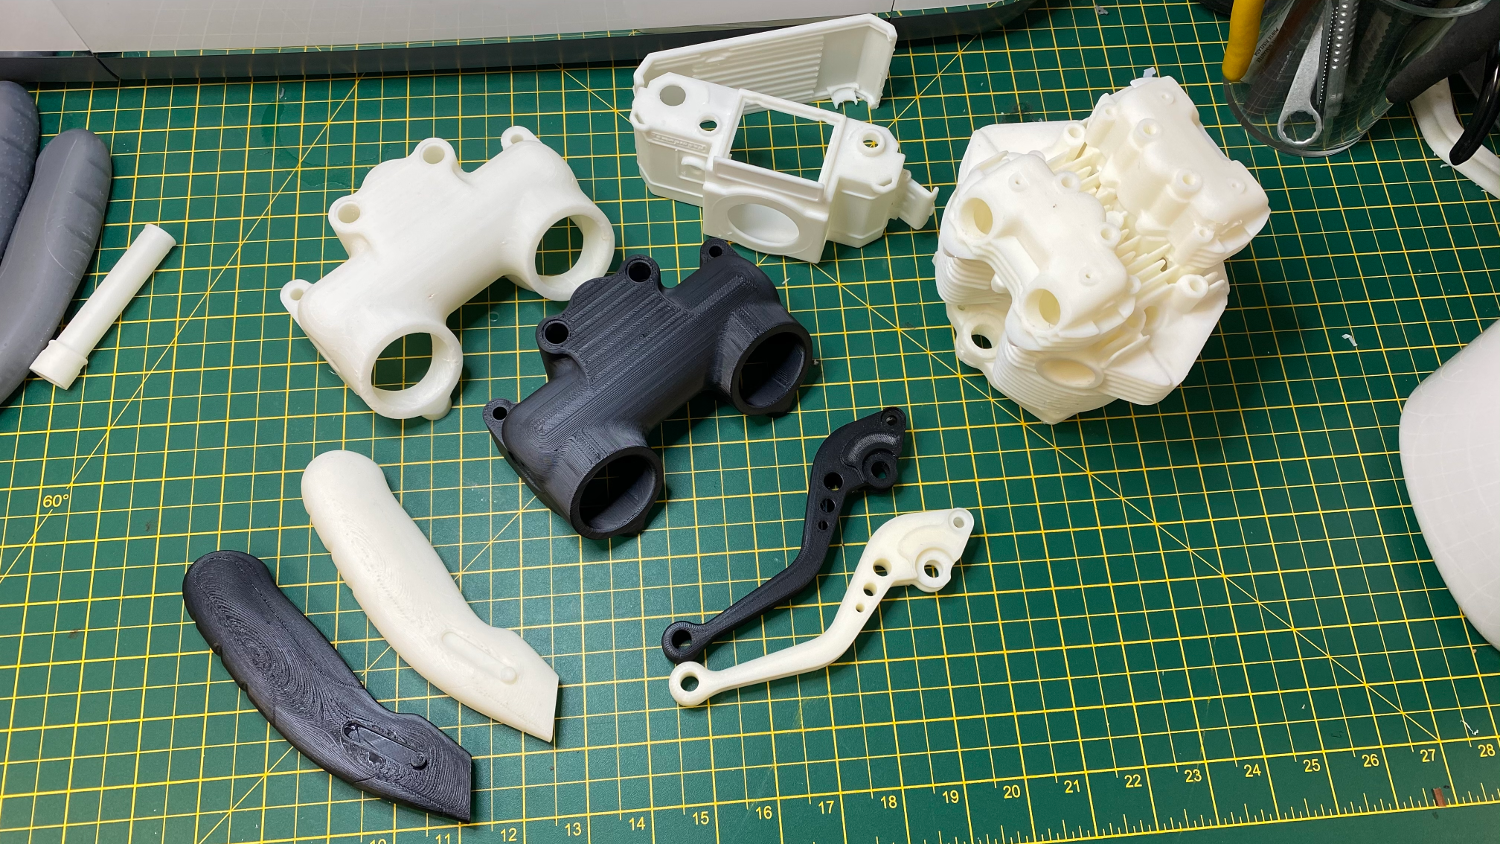
Small batch components
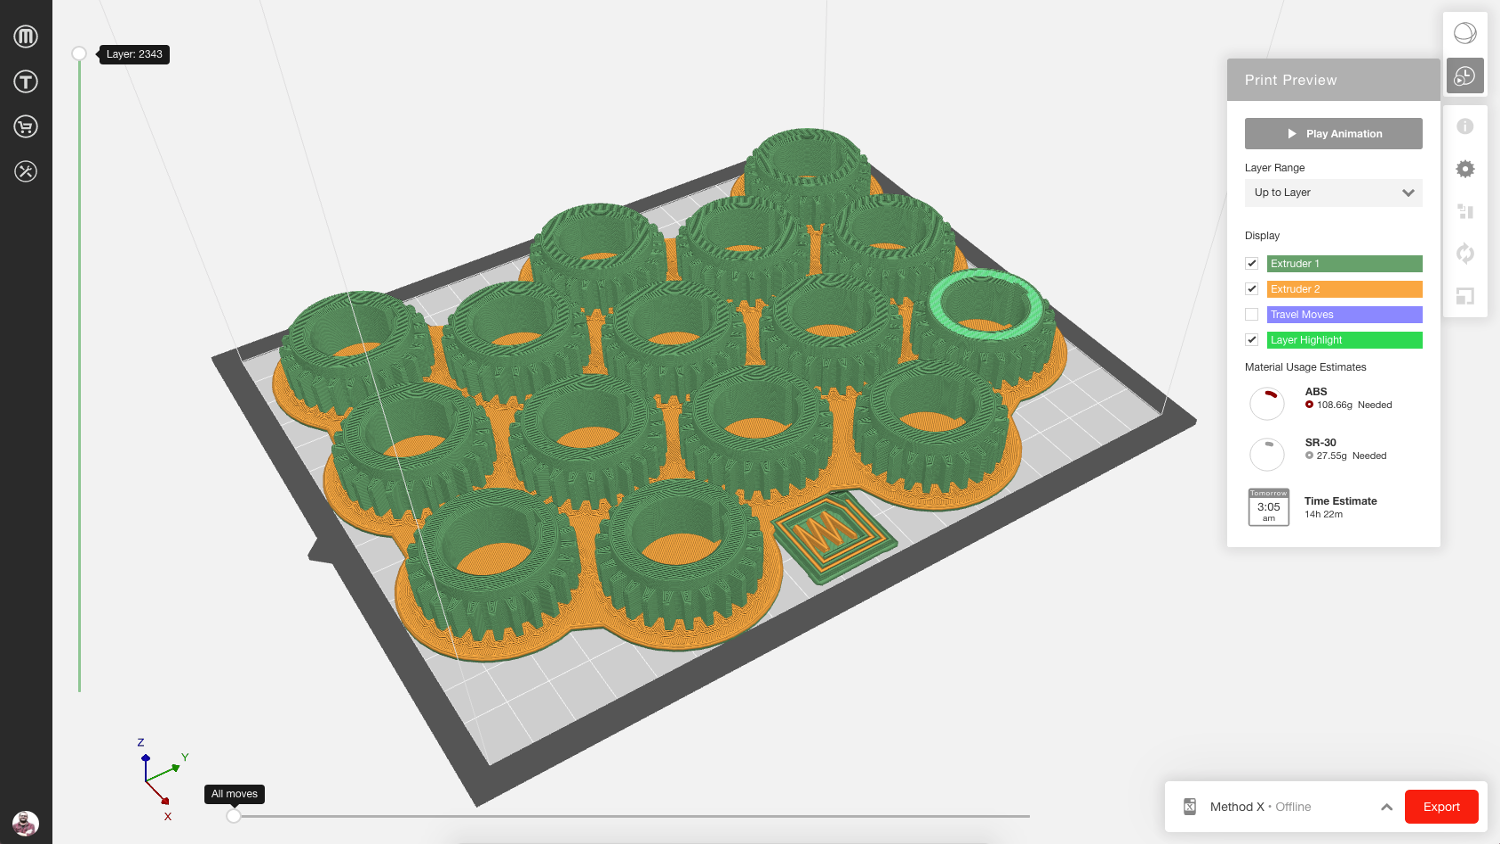

Test part & Challenge: This is a small, basic pinion gear, the type of thing that might be required in larger volumes, so makes it ideal for initial testing of 3D print machines. The Method X machine could fit 15 of these on a single build tray, and maybe 16 if you pushed things a little.
Material usage & build times: A single one-off took 8.12 grams of ABS and 2.24g of SR-30 support taking 1 hour 9 minutes. Building it solid added an 3g of material and added 30 mins. Building 16 units took 14 hours 22 minutes in Balanced Mode, while in Solid mode, this rose to 20 hrs.
Results: The Makerbot Method X is a consistently impressive machine, particularly when running more difficult filaments such as ABS. The combination of ABS + SR-30 makes things much easier and way more accurate. Everything was within the claimed 0.2mm of accuracy.
Form and block models

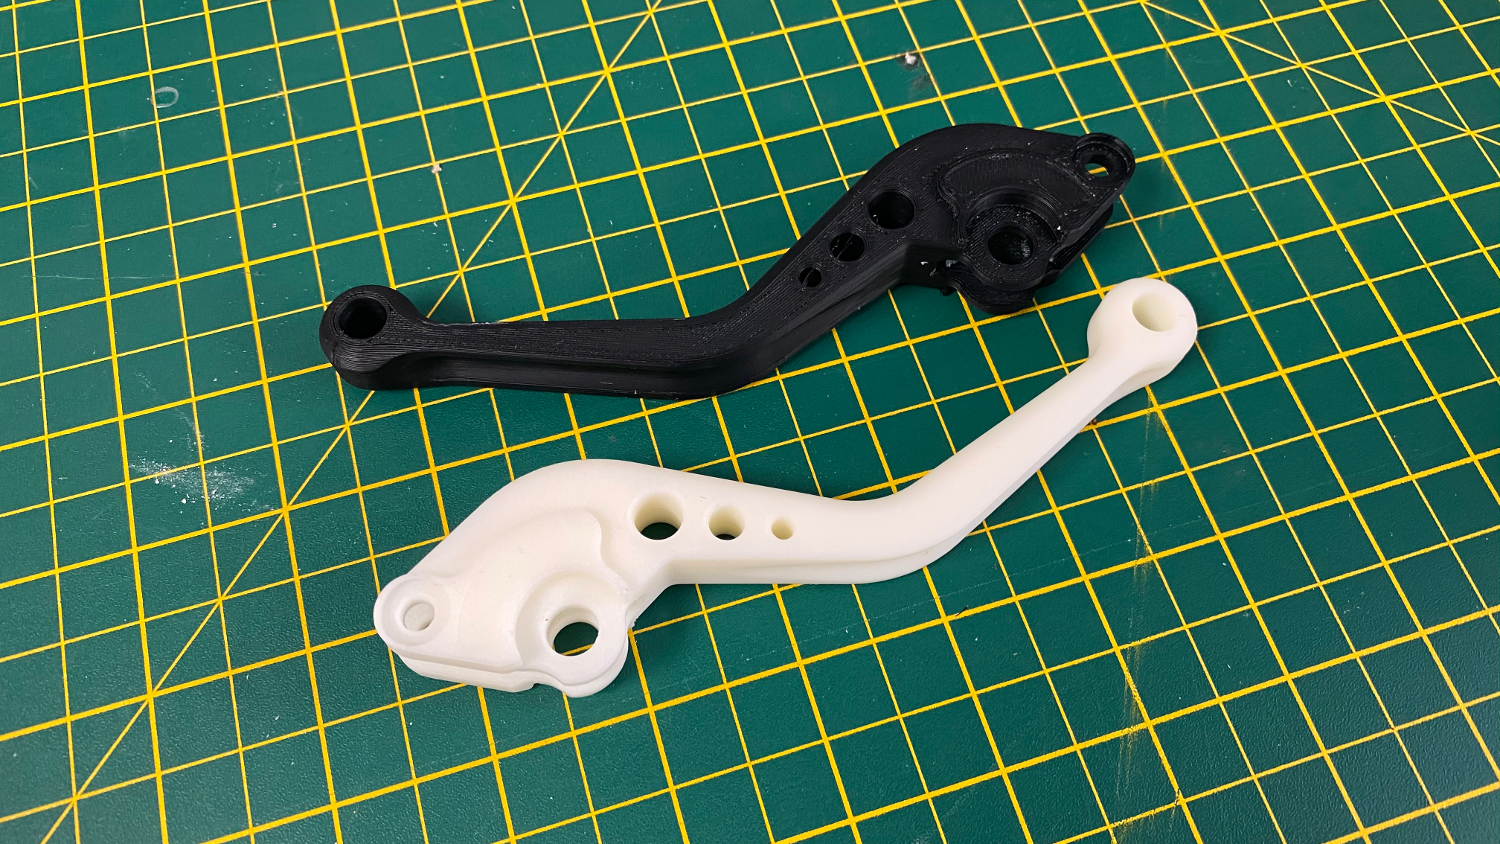
Test part & Challenge: This test part is pretty self explanatory: it’s a block model to test both surface quality on more contoured forms, as well as B-side build quality when using both build material supports and dissolvable filaments (such as PVA).
Material usage & build times: In Balanced mode, this part used 22g of ABS/ASA with 19.25g of SR-30 material and took 4 hours 28 minutes to complete. Switching to Solid mode added an hour and used 13g of build material to complete the job.
Results: These brake levers were a perfect example of where the Solid build option pays huge dividends, with stiffer, more robust parts resulting from only a fraction more build time and a little more cost. They’d be ideal for functional tests and the like.
Large and chunky builds

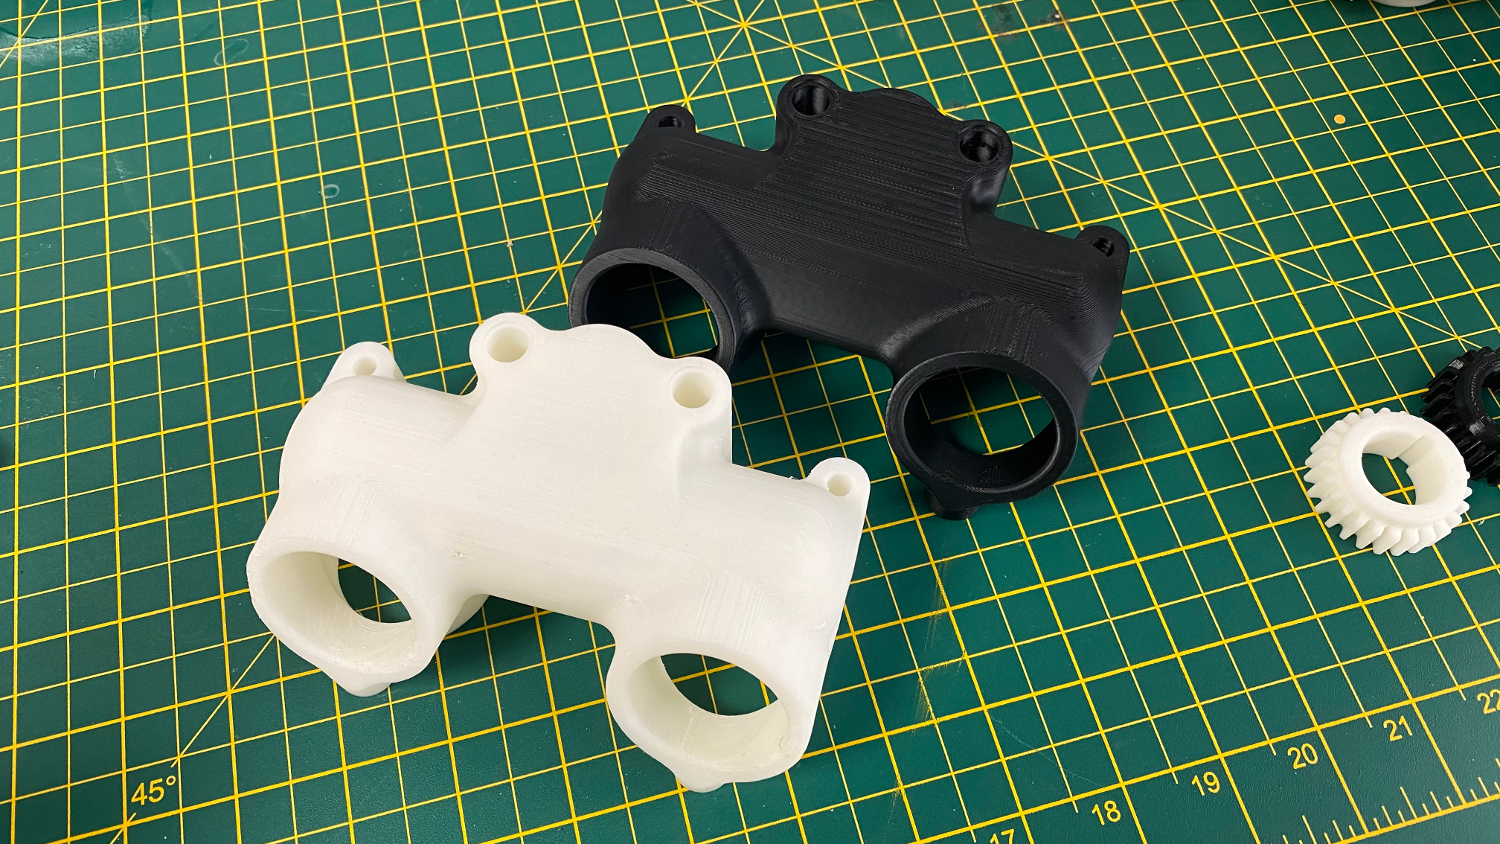
Test part & Challenge: While the Method X’s build chamber wouldn’t fit our largest test part, the rockerbox cover was perfect. It pushed the machine to build complex internal forms as well as those typically tricky circular holes in the Z direction.
Material usage & build times: 102g of ABS or ASA filament per part and 99.4g of SR-30 filament when built in Balanced mode and took 23 hours. Switching to Solid mode pushed up the filament requirement to 165g and build time to 14.5 hours.
Results: This part was a long one for the machine and the internal cavities meant that post-processing wash-out was pretty lengthy as well. That said, the eventual results were well within tolerance, even on those problematic vertical faces.


