

Markforged Mark Two – In the first of a two part review, we get hands on and look at the basics of how the 3D printer works
Markforged caused a bit of a stir when it debuted its Mark One machine a couple of years ago. While much of the 3D printing industry was going nuts for ever cheaper, ever crappier desktop 3D printers, the company came out of nowhere (well, out of the auto-sport industry) and delivered a desktop sized 3D printer that not only looked like it was a product intended for engineers and designers (rather than the yoda head brigade), but also had more than a few secrets up its sleeve.
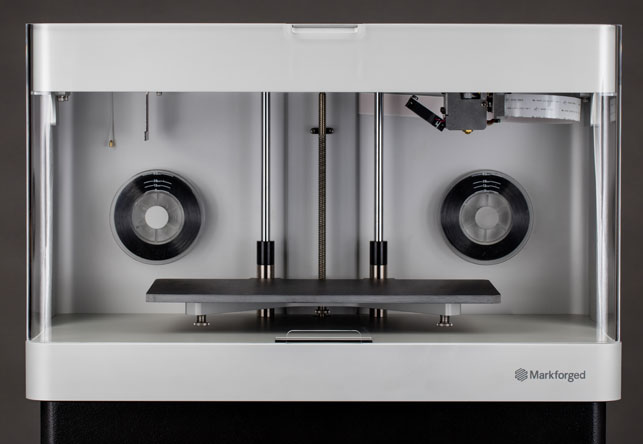
With it’s aluminium casing, the Markforged Mark Two certainly looks more the part in a design or engineering office than most 3D printers at the desktop level
Markforged’s products are centred on the idea that alongside nylon materials, it’s also possible to build in layers of fibre. That alone got the company some serious attention and some serious investment.
What differentiates Markforged’s process from other fibre re-enforced composite capable printers is that the fibre is a continuous strand, rather than chopped short strands.
That gives you superior mechanical benefits and the range of materials available are growing. But before we get onto the subject of composite reinforced parts, we need to deal with how the system works.
The reason for this is that we quickly realised that the Markforged Mark Two is a rock solid printer without factoring in the composites angle, so we’re going to look at how the system works with just the base nylon material this month, look at the set-up and build process, then look at the benefits of composites in part 2. Make sense? Good. Let’s go.
Markforged Mark Two – the machine and set-up
The Markforged Mark Two arrives in a clearly labelled box and unpacking it is pretty simple. You’ll need a decent space around the machine as the cover tilts right back over the casing. You’ll also need to find room near the unit to accommodate the Pelican Case that holds the nylon filament spool (Nylon is pretty hydroscopic in filament form, so the case keeps things close to air tight).
Connectivity is with a simple power unit and you have a choice of wireless or ethernet — we ran with wireless as it made life much easier for set-up in a corner of the workshop. You’ll also find all of the accessories in the accompanying box and we’ll step through those next as you set-up the machine.
There’s a powerswitch on the rear of the unit and it’ll boot up. You’ll immediately notice that the small touch screen at the front of the inside comes to life.
Compared to many desktop 3D printers, the user’s interactions with the machine are nice and simple — everything is done from this panel.
The first step is to connect it to wifi or plug in the ethernet cable to your network. Once it acquires an internet connection, the machine will update itself to the latest firmware. Again, this is a breeze and the machine handles everything for you — no messing around with SD cards or other such contraptions.
Once that’s complete, you then start to set-up the machine. As you’ll discover, the system guides you through the whole process, whether that’s feeding the fi laments through the machine’s casing (again, pretty simple) as well as adding in the build platform and levelling it.
Bed levelling is something that’s worth paying a lot of attention to. The build plates are solid aluminium billet with a special coating to help adherence of the model. Getting this dialled in is critical to effi cient model building.
Unlike some FDM machines, the Markforged Mark Two uses a three point magnetic location mechanism to hold the build plate in place. Adjustment is carried out using thumb screws beneath each of these locators. The system guides you through the process and using these on-board prompts along with the shims/feeler gauges, it’s done in minutes.
Depending on the material you’re building with, you’ll need to level the bed against the nylon nozzle, then the fi bre nozzle. There is a little fi ne tuning involved, but once done, you’ll have it dialled in and ready.
It’s worth noting that bed levelling isn’t required for every build. MarkForged recommends that if you’re building with fi bre, you need to level the bed every couple of jobs, but if you’re just running with nylon, then it should remain pretty consistent for 10 or so job — and our experiences back that up.
Last step before you start your first print job is to coat the build platform with the supplied glue. If you’re looking to invest in this machine, you might want to track down some of this stuff as it’s quite hard to come by in the UK — Elmer’s Invisible Glue.
This helps the model stick to the platform and gets you a solid result, so it’s worth the effort.
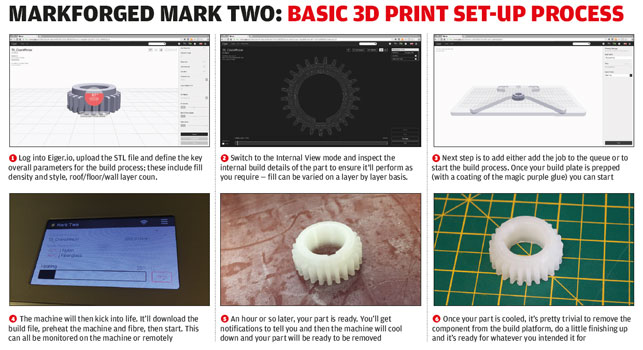
Click to expand
Markforged’s secret sauce
Now that the machine is ready, you’re then ready to start doing the set-up work on your fi rst build job. Unlike some older generation 3D printers, Markforged machines use a cloud-based pre processing and job management system (If you take on the Enterprise bundle, this is also available for non-networked environments). You securely log-in to the system and pair it with your printer (it’s capable of handling multiple machines).
What you’re presented with is a clean environment where you can set-up each part you want to build as well as print jobs (which is a platform that contains multiple parts). To begin, you upload your STL data to the sytem.
As you’ll see in the image above, the interface is clean and shows you the part and a reference for platform size. Here, you can rotate, scale and arrange your part. You also have the ability to defi ne the global parameters of the parts.
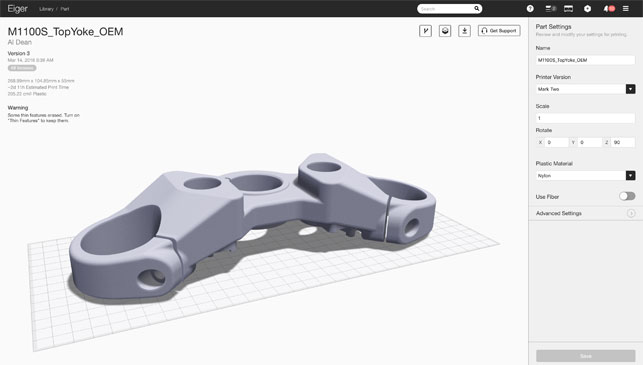
Markforged Eiger’s 3D view showing one of our test parts on the machine bed. Global settings are adapted here
As default, the Eiger has a good set of parameters set-up for the number of wall layers, the infill density and style (there’s a couple of options in terms of geometry) and top and bottom layers.
While those defaults are excellent, it’s also possible to expand the options and dive into the global details. This allows you to add more strength to the outer skin of the part or to vary the infill density.
If you then want to dive into the options further, you can also then switch to the “Internal” view. This gives you full control over what’s happening inside your build. While this is predominantly aimed at the lay out of fibre content (and we’ll cover this in part 2), it can also prove useful with pure Nylon parts without fi bre content.
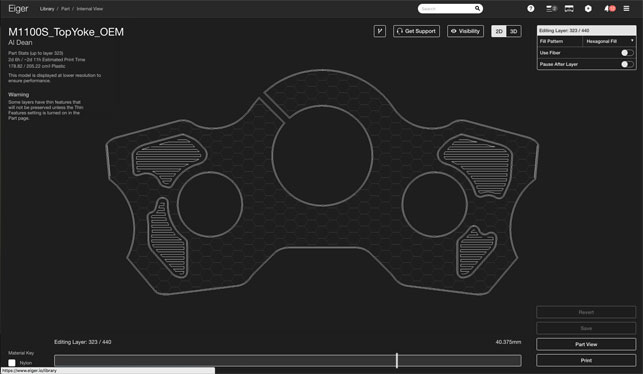
If you want to optimise the internal structure of the part, you switch to the internal view. This allows wall, floor and roof layers, as well as internal fills to be adapted on a layer by layer basis
One excellent example is being able to pause the build process at a specific layer. Why might you want to do that? The answer is pretty simple. As the Markforged Mark Two is a nicely sealed unit and the mechanics of the system mean that the build tray removal and subsequent relocation is both consistent and accurate, you can pause the build at a specific time and add additional parts to the build.
For instance, there’s the ability to add in fasteners, such as brass inserts, into the part, then have it complete the build. The set-up for this is a case of making sure you plan where the fastening features are going in your 3D model, then ensuring that you leave enough room to fix those fasteners in place.
The trick here is to get it dialled in, make sure that you can add the parts you want in and that the top of them remains flush with the top of the partial complete build. Otherwise you’ll end up with a machine crash as the nozzle catches it.
If you get that right, you start the build, have the machine pause where you need it to, remove the build plate from the machine, add your hardware, then snap it back into place and complete the job.
While fasteners, bearings and location hardware are the obvious uses, there’s the potential for much more here. With the rise of greater use of sensors, these could also be factored into the build, so the part comes off the machine ready to go. Yes, it’ll take some testing and experimentation, but it’s entirely possible.
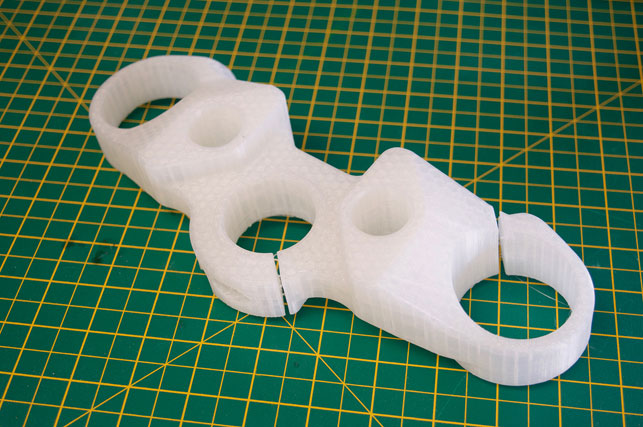
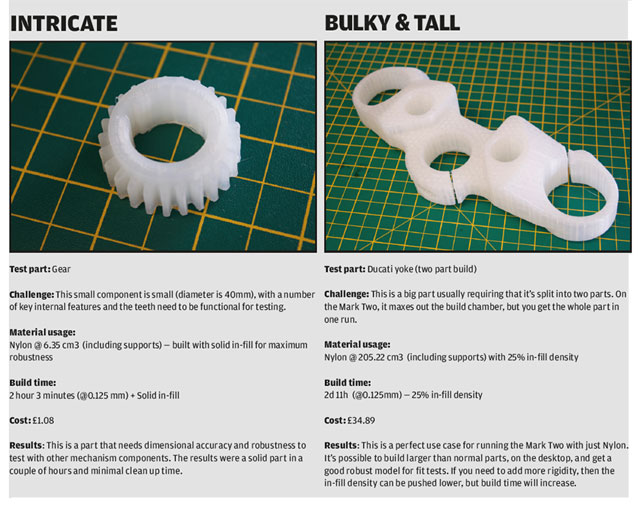
Our largest test part — a triple tree yoke bracket — a two day build that came out exactly as required
Markforged Mark Two – post processing
As with all single material build machines, MarkForged’s machine needs some attention when it comes to post processing parts. The parts are, unless you’re lucky, going to have some form of support structure in placement, so they’ll need to be removed manually. But if you’re clever in your placement and orientation, this can be reduced to a minimum.
In terms of getting the parts off the plate, it’s simple and you’re given all the hardware you need. The build plate will also need a bit of clean up once the jobs are complete — then you pop it back in ready for the next.
The end result of parts without fibre are excellent. It’s a filament based machine, so isn’t particularly suited to very fine detail but to mark it down for this would completely miss the point of the Markforged Mark Two. It’s a machine that gives a lot more than you might be forgiven for expecting from its desktop size.
Some clever engineering means that you’ve got a whopping 320 x 132 x 160mm. One of our test pieces (it’s a triple tree fork bracket) fitted on the build platform in one piece — a first for desktop sized machines. If you’re looking at producing smaller parts, then it means you’ve got enough room to get a good sized batch complete in one go.
Build speed is also good and the controls you have over the process means that if you’re wanting a quick sanity check for size and feel, rather than a more structural part, you can dial back the infill and get your part out of the machine much quicker.
Click to expand
In conclusion
While I’m going to give the full set of conclusions in part 2 of this review, it’s also worth noting that the software infrastructure that goes alongside the system really is first class. The fact that it’s cloud-based means that you have a resource that’s available wherever you need it. You can set-up jobs where you want to, rather than on a local machine. Multiple users can submit jobs to the queue whenever they need and yes, it gives you a full set of monitoring and notification tools as well. This is clearly a machine that has potential for short batch manufacture.
It’s also worth noting that the system also has a very slick version management and file handling infrastructure. Each change is managed, and it’s possible to branch a model and upload new STLs — so experimentation with both geometry and build parameters is done in a nicely managed environment.
Of course, what really makes this machine unique is the fibre capability and we’ll be exploring that in part 2. But as we said at the outside, purely focussing on that would do this machine a disservice. As a pure nylon build machine, it’s outstanding. MarkForged have also just released a new material that offers a single build material, onyx.
This gives you a black nylon fill with micro carbon fibres. If this is an indication of where Markforged are going with the Mark Two (and subsequent models) then it looks like excellent news for all.
Stay tuned for more in part 2 of this review. We’ll be exploring how you set-up fibre enforced print jobs and discovering where the Mark Two really comes into its own.
TECH-SPECS
» MarkForged Mark Two
» Nylon Filament + Single Strang Fibre
» 320 x 132 x 160 mm build volume
» 575 x 322 x 360 mm machine dimensions
» 13kg weight » 0.1mm layers
» Nylon + Fibre (Carbon, Kevlar, Glass)
» Material spool containment, build plates, model removal + clean up tools
» 1 year return to base warranty
» Price From $5,499 + VAT
» markforged.com


