A lack of focus on design for additive manufacturing means 3D printing fails to achieve its full potential. But DFAM doesn’t have to be intimidating, writes Nick Sondej. It’s just another everyday engineering workflow — and one that’s likely more familiar than you might think
Let’s face it: at one time or another, we’ve all probably hit a stumbling block in our design process and thought, “Screw it. Let’s just 3D print it and find out what happens!” I know I have.
The problem is that, far too often, we do this without first tailoring the design to the printing process. Disappointment soon follows, when printed parts break or fail to perform as expected. As a result, 3D printing’s reputation and use as a serious engineering tool suffers.
But good engineering demands both creative experimentation and detailed analytical design. So taking healthy risks and prototyping with uncertainty is a necessary part of the engineering process and 3D printing makes it easy to create a diverse array of part geometries that would challenge the capabilities of other, more traditional methods.
However, 3D printing is just another manufacturing process — or to be more specific, another family of manufacturing processes. If you want to get the most out of your chosen variety of AM, you’re going to have to intentionally design for it. What’s more, this thinking needs to be factored in even at the prototyping stage if you want to rely on 3D printing as a powerful tool at your side.
False starts and historical baggage
It’s no secret that the additive industry’s early days were characterised by unrealistic hype, and we’re still paying for it today. “A 3D printer in every home,” we were told, and, “You can 3D print anything.”
While many 3D printer manufacturers have since seen the light and pivoted towards highlighting intentional DFAM (design for additive manufacturing) and targeted best-fit applications of 3D printing, the echoes of this previous mindset still persist among vendors and users alike.
As engineers and designers, we’d be ridiculed if we tried to “just injection-mould it”, or “just machine it” on a project, without first considering both the technical and economic requirements of the parts under discussion, as well as the capabilities of the chosen manufacturing process. Typically, once that manufacturing process is selected, we then proceed through an organised design process, in order to ensure that the final component or assembly is designed specifically with the capabilities and limitations of that technology in mind. For example, you might design CNC-machined pockets with corner radii larger than a chosen end mill radius; or injection-mould components with consistent wall thicknesses to avoid warpage during shrinking.
But when it comes to 3D printing, this conventional design for manufacturing wisdom tends to get thrown out the window. Instead, the 3D printer gets treated as a ‘magic box’, capable of printing anything. When poorly optimised designs fail, the tool takes the blame and 3D printing is viewed as unreliable.
The good news is that driving successful 3D printed applications by designing intentionally for your printing technology, is simply designing for a different manufacturing process. It’s straightforward to integrate DFAM into your existing engineering design work as an addition to your array of existing tools. Here’s how that would work, step by step:
1. Uncover the root cause of the challenge you’re trying to solve
2. Identify the economic and functional requirements of potential solutions
3. Choose a specific manufacturing process, AM or otherwise, that can likely meet these requirements
4. Start designing a solution to meet your particular requirements
5. As the design progresses, begin to tailor your design to the chosen manufacturing process
6. Build (via AM or traditional manufacturing) your prototype design
7. Test component(s) and measure performance against desired operation
8. Repeat until a solution is achieved, changing manufacturing processes if necessary
You’re probably realising that this isn’t rocket science. You may even be wondering if I’m wasting your time. I’m not, but you’re right about the first part. DFAM doesn’t have to be complicated, and this workflow is probably similar to how you’re already designing for other manufacturing processes today.
There are two important points to be made about this workflow. First, it takes an integrated approach to 3D printing, adding it to your toolset, without replacing existing tools or encouraging you to view projects only through an additive lens. The world of engineering is large and full of diverse challenges, and you should choose the right tool for the right job.
Secondly, regarding Step #5, you need to consider that 3D printing is not a monolith, but instead an entire family of different technologies, each of which has its own subset of design guidelines and best practices.
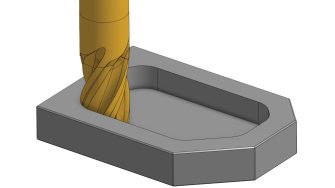
There are some similarities among these technologies; for example, 3D printers generally build parts one layer at a time. But even within that 3D printing process characteristic, some processes build layers upwards and others – notably stereolithography (SLA) or some flavours of digital light processing (DLP) – build downwards. Gravity has a very different effect on these processes, and the design of features like cantilevered overhangs must be approached differently based on the target AM process.
DFAM // Where do we go from here?
Everything you need to know about designing for a specific 3D printing process could occupy several dozen articles. (And I should know, because I built an entire course around the topic at my previous company.) But in more general terms, there’s an easy set of starting points to improve your DFAM techniques.
First, identify the type of 3D printer you have access to and learn how it builds a part, as well as the physics behind the process it uses (for example, FDM, SLA, SLS, DMLS, and so on). This helps you understand what kind of performance is realistic from the process.
The manufacturer’s website is often a great source for tutorial literature on designing for their process, as well as offering design guides that often detail the geometric limits of the technology, such as minimum feature sizes in different axii. These will help you understand what you can’t do with the technology, but not the full extent of what you can achieve, so don’t limit yourself to only what the supplier showcases.
Second, understand the materials you have available. Data sheets will enable you to compare them to the materials you currently use. Print some test parts and deliberately try to break them, in order to get a real feel for their mechanical properties and performance.
As always, best design techniques are learned by solving an actual problem, not as a theoretical exercise. Have a real project, and search for user groups, design tips and learning materials from others using the same types of printing to do real engineering and design work. Get advice and feedback from your colleagues, as well as external peers using the same technologies.
Finally, remember that 3D printing isn’t your only tool, and that you can often use off-the-shelf components or other traditionally manufactured parts to add capabilities to an assembly, just like you do with any other engineering project.
You won’t become an expert overnight, but you will begin to solve more complex engineering problems with less time and effort, ones that fluidly incorporate clever 3D-printed designs. And maybe, when you think about it, that’s the real magic at work here.
About the author
Nick Sondej is a mechanical engineer and the Founder & Principal of Matti Group, an engineering services firm with a focus on using advanced technologies to help clients solve technical and business challenges. Previously he was an early employee at Markforged, spending nearly a decade leading the development of an engineering first-principles approach to 3D printing application development, and building the Markforged University additive training curriculum. In his spare time he cooks well, cycles long, and surfs poorly, all with a side order of particularly dumb jokes.