A lot of 3D printing marketing material often promises that you can ‘bring your dreams to reality at the press of a print button’. Here Jeremy Pullin uses a real example that proves this isn’t quite the case
In response to a recent reader request, this month I am going to provide a real world example of a real world job which at the time of writing is still very much ongoing. I chose it for a couple of reasons; firstly, it’s a 3D printing application that is relatively well known and secondly, it’s by no means remarkable.
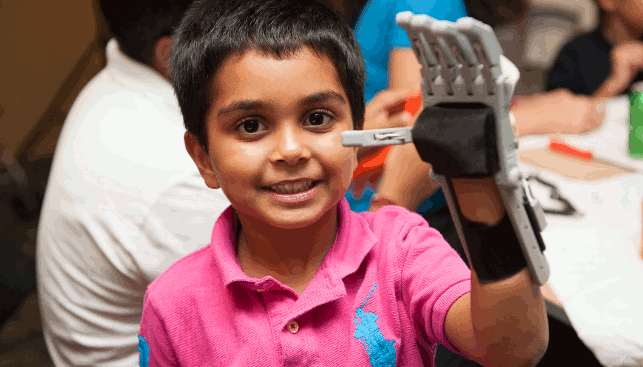
A smiling recipient of a new e-NABLE 3D printed prosthetic hand
What I mean by this is that it doesn’t push the boundaries of the technology instead, as far as 3D printing goes, it’s a fairly typical, straightforward ‘make something using 3D printing’ sort of job.
One famous 3D printing marketing slogan often used and reused is “if you can imagine it, you can make it.” However, this is not enough for some. For instance, just the other day I saw the following slogan on the website of a Swedish additive manufacturer of metal components, “Design beyond your imagination: free from the limitations of conventional manufacturing methods”.
Quite how you design and manufacture beyond your imagination was not made clear, perhaps they use CAD software which is supplied with hallucinatory enhancements.
Unlike this, the example I am about to talk about is of a device that has been made many times, whose parts are designed for 3D printing and where all the required part files can be found on good old Thingiverse.
Renishaw’s Additive Manufacturing Centre receives requests for a wide variety of jobs. In the last 12 months we have made parts for a prince, the deputy prime minister, a New York fashion show and even an art installation to go beneath a railway bridge in Folkestone.
In between these projects we still get people who ask us to use a half a million pound machine to 3D print a washer. So, it wasn’t a total surprise when a charming lady living close to our Gloucestershire HQ asked us to print a prosthetic hand for her seven year old son.
At some point she had been told of the Robohand project and had found her way to the e-NABLE website, a global online community of volunteers who design, build and disseminate inexpensive functional 3D printed prosthetic hands for people across the world.
It is amazing to see how an initiative that started from one small project is now changing lives globally and spurred the growth of the “3D Mechanical Hand — Maker Movement”.
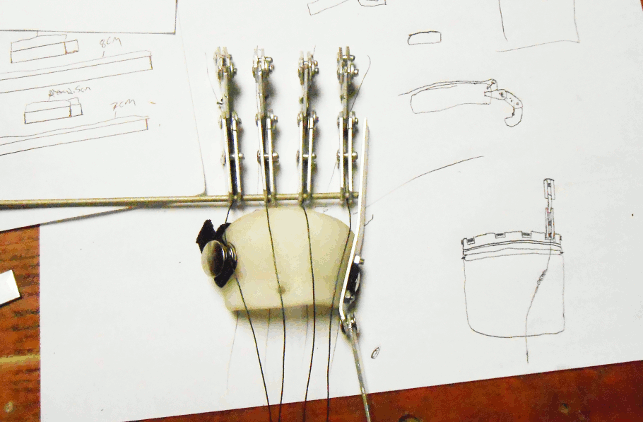
The first hand prototype created for a small South African boy Liam by Ivan Owen and Richard Van As. This led to the setting up of e-NABLE
To cut a fairly long story short, a South African wood worker Richard Van As cut off the fingers of his right hand. Not finding any suitable prosthetic devices he decided to create his own. So, he got in touch with an American special effects prop designer Ivan Owen to help him in his creation.
They used a Markerbot Replicator 2 to print the parts of their new design. Shortly after, they were approached by the mother of a small South African boy Liam, who had been born with missing fingers on his right hand due to amniotic band syndrome. So they used their design to create him a prosthetic hand too.
Realising that many others could benefit from this Robohand, they set up a website and gave their design away for free by way of the Handomatic web application that can be used to create custom sized STL files for printing prosthetic hands. And so, the e-NABLE website was born.
By making the design open source, people can contribute to the design, which has led to a collection of different 3D printable hand models that are free to download.
The e-NABLE online community has grown to include a wide range of people from tinkerers, engineers, designers, 3D print enthusiasts to occupational therapists, university professors, parents and teachers who are giving a “helping hand” whether it be contributing to the design, printing parts or guiding the users as they build their hand themselves.
If you have not visited the e-NABLE website I seriously recommend that you do. The readership of DEVELOP3D are exactly the sort who could make a huge difference to the brilliant work that these people are doing.
If you don’t feel the urge to get involved, by browsing the site you will at least find something that will put a smile on your face and a warm spot in your heart.
Anyway, back to the lady who approached us with her prosthetic hand request. She supplied the required photos and measurements of her son’s hands, which I fed into the website’s Handomatic file generator.
The idea is that the website scales the files to size and then emails them to you. As all the hands featured on the website are produced by FDM, I decided to use our Stratasys Dimension SST machine. I love this ten-year-old machine that has built thousands of parts, been very well supported and continues to probably be the easiest 3D printing machine to use that we have.
May it rest in peace in Stratasys’ end of product life heaven when it is fi nally retired as a trade in for a Fortus 360mc in the next couple of months.
However, there was a problem with the STL fi les. The Handomatic software had scaled the model by enlarging it in the X and Y axes by a factor relating to the input measurements.
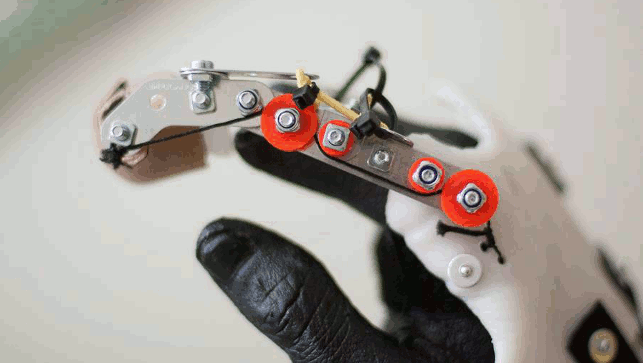
A prototype that Ivan Owen created when he was helping Richard Van As create a replacement finger design following his accident
However, it had not scaled it in the Z axes. The result was a part that looked as though Simon Cowell had dropped his wallet on it. Apart from an issue of fit, it also meant that all of the horizontal holes were no longer round and that the many curved surfaces were misshapen.
Other problems also arose such as the files being incorrectly named as a right hand rather than a left and the low resolution files resulted in faceted curves.
The resolution was probably kept low for ease of emailing and because the parts were designed to be produced on relatively low resolution machines. So, as often happens, the part file itself was the weakest link.
I went back to the website and downloaded the unscaled part files from Thingiverse. I then calculated and applied a scaling factor myself for all three axes. Once the parts had been printed and the support material removed I began to assemble them together.
The website contains a few different hand models. The one I had chosen was apparently the most popular and used snap fit pins that were printed as part of the kit. The assembly instruction video showed a guy firmly pushing the pins in until they made a satisfying snap as they clicked into place.
The pins that I had, however, pushed loosely into the holes and then fell out again. The parts simply weren’t produced to the required tolerances.
But it wasn’t just the fit of the pins, there was also far too much lateral movement on the finger joints. At first I thought that the designers had simply used large clearances to allow for the low accuracies of the hobbyist machines.
I then realised that the hobbyist machines produced parts good enough to allow the snap pins to work correctly, which is more than I had managed to do with my professional machine, albeit ten years old, that had cost me around ten times as much to buy.
I had to admit that in terms of accuracy, it couldn’t perform as well as its much younger and much cheaper counterparts.
I decided to try again using one of our Polyjet machines. This is in a different class to the Dimension SST in terms of resolution and accuracy but with a five figure price tag, so it should be. The first problem here was the amount of time and effort required to remove the non soluable support.
It took most of a day of messing around to get the parts cleaned up and all of the holes unblocked properly. Far removed from the marketing videos that show an immaculately cleaned part removed from the machine bed.
Although improved, the snap fit pins were still far too loose which dispelled my earlier theory concerning the Dimension machine so I decided to carry on with what I had and glued in parts that should have snapped together.
Having used scalpel and sand paper to get everything fitted and assembled, the device simply didn’t work as it should. This was due to a combination of the hinged joints being too loose and the tensioning strings working on the wrong part of the fingers.
Needless to say the workshop bin received an extra dent that day as the entire device was put into it less than gently.
I then went back to the website and chose a different model. I followed the link to Thingiverse where the part files can be downloaded only to find a message stating that some of the files are undergoing design changes.
While this was happening, they decided to remove the current version of the files which meant that there was no longer a complete set of parts available.
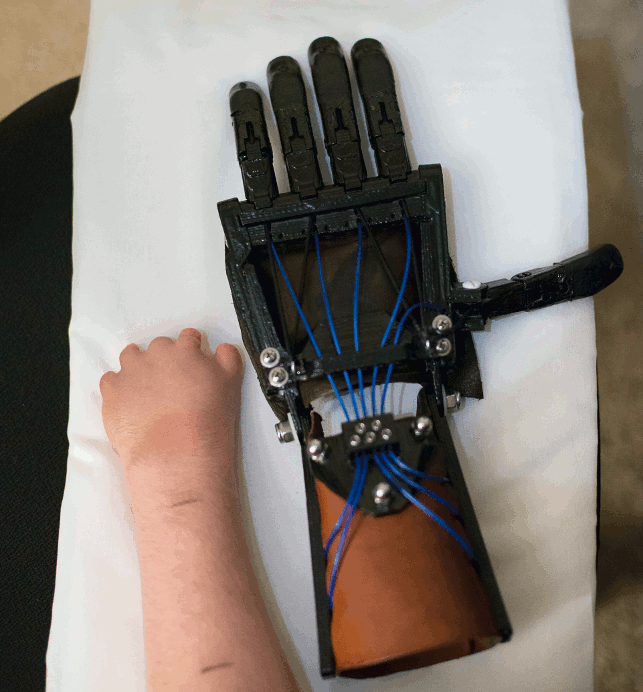
Peregrine Hawthorn and his father Peter Binkley created the ‘Talon Hand’ design after downloading the design files from the e-NABLE website
However, thanks to the magic of Thingiverse, somebody had produced a remixed version of the original product so I was able to cobble together a hybrid of standard and remixed hands.
Once again I used the Polyjet and after yet another bout of part cleaning I was ready to assemble. This version uses Chicago screws rather than snap pins but none of the holes were large enough so they all had to be drilled out by hand.
The knuckle joints were so tight that they had to be individually sanded but at least they now have a nice fit.
Once assembled, the device operates like a dream and at the time of writing we are ready for a fitting before doing a snazzy paint job and fitting a few extra features to make the whole thing a bit cooler.
This is not an exceptional or unusual experience but hopefully serves as a small illustration of some of the realities that lie behind those slick 3D printing brochures and videos.
The next time somebody tells you that you can “bring your dreams to reality at the press of a print button” just spare a thought for how annoying it is for those who are actually living in the real world of 3D printing / additive manufacturing.

Why ‘printing your dreams’ is still far from a consumer friendly reality
Default


