
The process of rendering a photorealistic image or animation of a current product iteration is something, most of us are familiar with.
Depending on your experience, you either find it to be a pain in the arse, or it helps you achieve a zen-like state of happiness seeing the fruits of your work rendering as they would appear in the real-world (I’m definitely in the latter camp).
The system or add-in being used, can vary the workflow greatly — from twiddling dialog boxes and dialling in numbers to simple drag and drop. Whatever flavour you prefer, there is always the ever present need for computation.

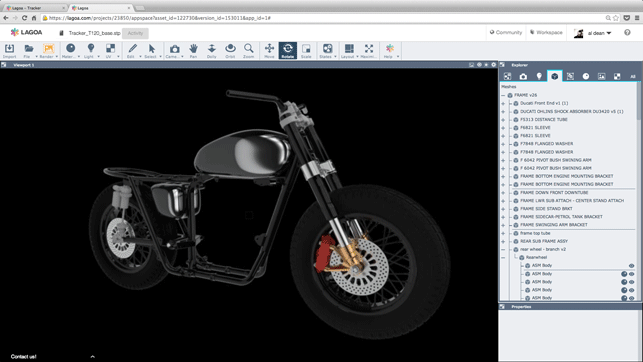
The web UI for Lagoa and the inherent interactions can make the learning process a little longer than normal compared to local client software. But once it’s clicked, it’s pretty straightforward
The shift towards progressive renderers has meant that we can now get a decent preview of a scene before the CPU goes into overdrive and the workstation fans start spinning. However, to get that crisp, final image, compute always needs to be done. And sometimes it can take an absolute age, no matter how hardcore your compute power might be.
With the cloud offering seemingly endless computation is there room to improve the workflow and speed things up a touch?
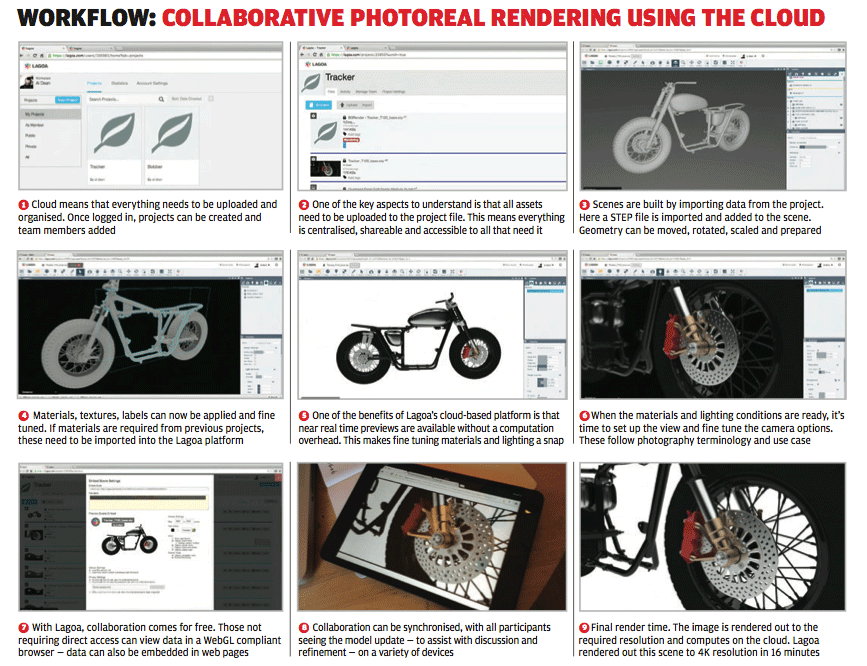
It’s this that new startup, Lagoa, is looking to solve with its recently released platform for rendering. And the best way to talk through how it works is to step through a scene set-up and render process. Before we do however, it is worth taking note of a few things.
The first is that this is a browser based application and as long as your browser supports WebGL, it should work (I’ve been using Chrome on Mac OSX effectively). There’s very little demand in terms of local computation power — I’ve run it effectively on a crappy, six year old white MacBook and an ancient ThinkPad.
What’s key is a vaguely reliable internet connection. The reason is that Lagoa keeps everything on the cloud-server and you’re essentially operating the system through browser. But once registered and signed in, you can begin.
Everything on the cloud
If you’re experienced in any other rendering application, then the core principles of Lagoa will be familiar. Yes, the ins and outs of set-up, editing, texturing and lighting differ, but you’ve got the basics.
The one thing to remember is that Lagoa is a cloud-platform. That means that everything used (in terms of geometry, material textures, HDR images etc.) needs to be uploaded to its servers so you and your whole team can use it — helping centralisation and standardising of assets. Once you have your head around this, it’s plain sailing from thereon in.
Let’s start with geometry import. The system comes with a tonne of format support. From the likes of STEP and IGES, through native formats (SolidWorks, Catia, Rhino, NX, Inventor) as well as Parasolid and ACIS. If you’re already working with a render focussed system, then it also supports the likes of OBJ.
Interestingly, the system can handle complex, multiple part assemblies from your CAD system and retains product structure.
If there’s an issue with this stage, it’s the lack of support for units. Everything the system imports assumes centimetres. If your CAD system allows you to specify export units, that’s not an issue, but many don’t.
Then it’s a case of import and scaling appropriately.
Projects
Lagoa works on a project basis (for reasons which will become apparent). To start a new one, log-in and set up a new Project. It’s into this that you’ll upload all assets — a bit of planning ahead here is essential.
While this might take time for some heavy CAD geometry, there’s a few tools to make it more efficient.
You can queue uploads as well as zip up large files which will then be automatically extracted on completion.
Scene Set-up
Once the basic assets are in place, you can start to construct the scene. This can either be done by opening the base geometry or creating a new scene and importing multiple geometry files.
The import concept is key to getting your head around the workflow. While you might have all your assets uploaded and ready, you still need to ‘import’ into the scene.
Hit the icon from the horizontal toolbar and you’re presented with a filterable and searchable list of all your assets. Select the ones you need and then they’re available, where appropriate in your scene.
The importance of import
Importing geometry obviously places it in the geometry window for positioning and such.
However, importing a HDR image for use as a lighting source doesn’t automatically apply it to your scene — to do that, you need to select the ‘dome’ light and switch the HDR image that’s used as the source. If you’ve imported it, it’s there to be selected.

Using the translucent material can be used to create a wide range of effects, such as tyre rubber which provides a much more realistic representation
Quick preview
When you first add geometry to a scene, it’s presented in the familiar flat shading you’ll recognise (see figure 3 in the workflow as an example). This gives you quick performance, but the real magic happens when you switch on the rendering.
The scene is rendered on the cloud and the images are passed back to the browser. You won’t hear the fan on your machine start screaming, instead it streams into the browser window. A preview image shows how the materials, lighting and such influence the look of the scene.
As you start to add in details and flesh out the model, you’ll see this preview update in real time just as you would with any progressive renderer but without the compute requirements, even on the crappiest of hardware.
Materials & Lighting
The next step is to start to define the materials, textures and lighting for the scene. Lagoa makes much of its physically measured materials and while the number of presets is limited at present, it does cover most of the basics.
What holds things back at the moment is the need to knife and fork most materials to get the visual properties you want.
Colour mixing is done using RGB values but not using the familiar measurement scales — rather a seemingly arbitrary value for each colour between 0 and 1.
What does impress is the physically measured nature of the materials. Rather than abstract values, most material types are presented using real world inputs — glass is controlled by IOR (index of refraction), reflection, absorbance etc. Car paint is split down by coating, flake, undercoat etc.
Labels work in the expected manner, using an image to project onto the surface of a model. That said, it also has a few extra tricks up its sleeve.
Each label can have its own material property, offering you more control, wheras other systems often inherit the materials from the underlying texture.
Alongside the usual array of metals, plastics, paints and such, Lagoa includes presets for more advanced materials — whether that’s fur or hair materials or even skin.
For the majority in the design industry, these might occasionally be useful, but they will come into their own with, perhaps, more obscure tasks.
One excellent example is tyre rubber. You can get close to a realistic material using a plain old diffuse material in the correct colour, but using the translucent volume materials (with a few tweaks to colours), you can get it almost bang on.
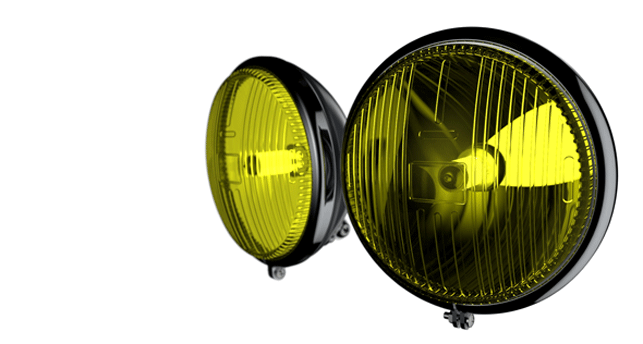
Lagoa’s materials give you quick effects for typically complex materials. Here, light is emitted from an accurate model of a bulb, bounced off a mirror and through coloured glass
Lighting with HDRi & Cameras
When materials are in place, it’s time to add in the lighting conditions. As you’ve probably guessed, Lagoa uses HDR images to provide the lighting.
Once uploaded (typically done using the standard EXR or HDR formats), your images are available to be applied.
You have control over how intense the light is and the positioning (in terms of rotation around all three axes) of the environment maps.
Combined with the real time preview, this is pretty easy to dial in and gauge the best orientation for your model and the required highlights/shadows
Alongside materials and lighting, one of the most effective ways to add extra realism to any render is to use Depth of Field.
Just as a physical camera can focus on specific objects while blurring those in the distance, so can many renderers these days. Lagoa’s camera controls give you real-world values with which to play with settings to achieve the look, focus and style you’re looking for.
Collaboration tools
Now, collaboration is something that should be an inherent part of any cloud-based service. Data is online, so you should be able to share and work on it with others. Lagoa doesn’t disappoint in this regard. In the first instance, two Lagoa users can connect to the same scene file, views are synchronised and discussed over the phone, with each seeing the live stream. That in itself, is incredibly useful.
It’s also possible to share a scene with non technical users, which allows them to view the scene, rotate, pan, zoom and such. These can even be embedded in a web-page, whether publicly or in internal systems. Both work well and while there are no commenting or markup tools as yet, I’d expect these to be on their way soon.
Final output
The final render can now take place. Again, the power of the cloud comes into play. Select to render in the background, choose the quality (which comes with a time estimate for each level) and send it going.
It can calculate multiple images concurrently, so while you might not get massive speed improvements on a single image, you can have multiples computing at once.
When it’s done, the image is available for download. Strangely, the time estimates for the ‘fine’ quality is always shown as 16 minutes — no matter the resolution or complexity of the scene.
Conclusion
Lagoa only launched last April and it’s clearly early days. That said and with the caveat that the workflow needs to be fine-tuned and thought through a little further, it looks promising.
A cloud-based solution isn’t for everyone, some people just aren’t comfortable with having their data on the cloud. For those that are or those interested in exploring an alternative to local compute heavy rendering systems, then it’s an interesting offering.
It’s clear that the team is hammering away at the service as we speak and are adding in all those little details that a professional audience is looking for.
The collaborative aspects are particularly interesting considering the dispersed nature of those involved in the development of a product, whether the tech savvy engaged in rendering, or those required for input.
An account is free and it’s worth spending a little while to learn how the system works and what you can get out of it.
Documentation is being fleshed out, so working through that should get you up and running much more quickly than me. The results are solidly impressive once a scene is dialled in and the requirements (in terms of hardware) to get to them aren’t taxing at all.
Give it a whirl folks and keep an eye on how it’s developing.
| Product | Lagoa.com |
|---|---|
| Company name | Lagoa |
| Price | Free to $50 per month |


