

KeyShot 6 is a major update to everyone’s favourite rendering system. Al Dean takes a look at what its developer Luxion has in store for users
First, a quick recap: KeyShot is a rendering and animation system that focuses on making the process of taking heavy, often highly detailed 3D geometries and turning them into photorealistic representations very quickly.
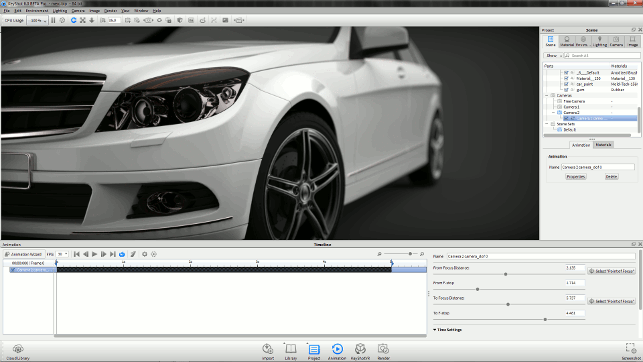
KeyShot 6 has greater control over animation of more items, including depth of field in camera views
It achieves this using a couple of key pieces of technology. The first is the core progressive renderer, which gives you a real-time streamed rendering as you work with a model, materials, textures and lighting. Instead of waiting for a preview render to complete, you get a near-instant look at how your scene will appear.
Second, KeyShot uses HDR (High Dynamic Range) images as its light source, so rather than setting up multiple lights to mimic real-world lighting conditions, you use an HDR environment map as the primary light source, taking a lot of the hard work out of the process.
That said, it’s worth noting that more recent releases have also introduced the ability to add in additional, more specific lighting sources.
Third, developer Luxion has focused on ensuring that CAD geometry comes into the system cleanly – a challenge with which many general-purpose rendering systems struggle. In other words, KeyShot doesn’t require users to figure out a random workaround. It loads the native CAD geometry and even establishes live links to it, so any design changes can be quickly pushed through the system.
Finally, KeyShot does a great job on providing efficient workflow: it’s all about drag, drop and render. KeyShot is not about spending hours creating materials from scratch or tweaking lighting set-ups.
It’s about getting the final image in front of the user quickly and making sure that final image is as good as possible.
So with that focus on efficiency in mind, it may seem counterintuitive that KeyShot 6, due for release in August, introduces more control and fine-tuning capabilities to the system.
The big question is: can KeyShot support more complex tweaks and refinements, without sacrificing the ease of use and speed that has driven its wide adoption in design and engineering circles?
Bear in mind that this review is based on beta software. The final details aren’t yet set in stone – but it should give you a good idea of what’s to come.
User interface changes
Let’s deal with the user interface (UI) first.
KeyShot’s UI hasn’t changed a great deal with this release at any fundamental level. When you open the system, you still have the model/rendering window, with its strip of global commands (for things like view control) running along the top.
There’s also a strip of pull-down menus, although experience tells me that this isn’t used much in practice, unless you’re delving into preferences and such. One new addition here is the Lighting preset menu. We’ll get onto this shortly.
The bulk of your time will be spent instead in the various panels around the edge of the UI, with several key panels to get your head around.
The first is the Library panel (by default, this is found on the left). This gives you access to all of your presets and your library of materials, textures, environments and so on. Each is categorised and searchable – useful for materials, in particular.
The Library panel also plays host to the Colours functionality introduced a couple of releases back, which allows you to swap out a material’s colour without affecting its physical properties, making experimentation with different colourways a snap. It even includes most of the Pantone colour definitions, too.
The other key panel here is the Project panel. While the Library panel focuses on common items, Project gives you control over everything you do with the dataset on which you’re working.
It’s from here that environment, camera, lighting and geometry are defined and where they can be tweaked if necessary.
For example, inside the Camera tab, you have control over position and field of view, as well as more advanced controls for depth of field. This is how you drive the look and feel of your render project.
Alongside these two key panels, there are also a couple of others to bear in mind. One is the Animation timeline, which gives you the familiar and logical display of everything that’s animated in your scene (such as model geometry or cameras).
With KeyShot 6, you have more options for animation of colours, depth of field and more. It’s also worth noting that the animation capability is no longer a separate add-on for KeyShot Pro. It’s included at no additional cost.
One other window to explore is the Geometry View. This is handy for more complex scenes, where you want to manipulate the camera view, but the system is lagging.
This gives you a more standard CAD-like view and it’s much easier to manipulate, using the same controls as in the main rendering window. You can see this in action in the image below.
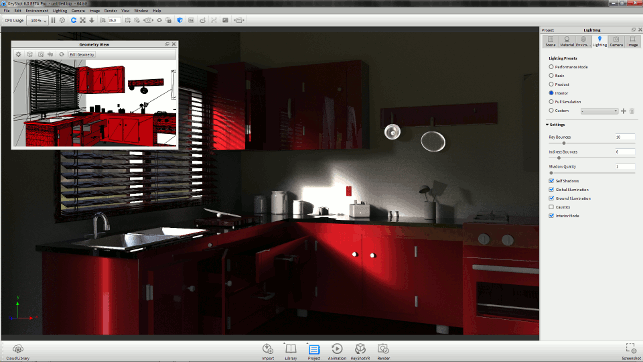
There’s now a set of lighting presets from the pull down or Project panel.
These include the new Interior mode, ideal for those working on these types of jobs
Keyshot 6 – Materials related updates
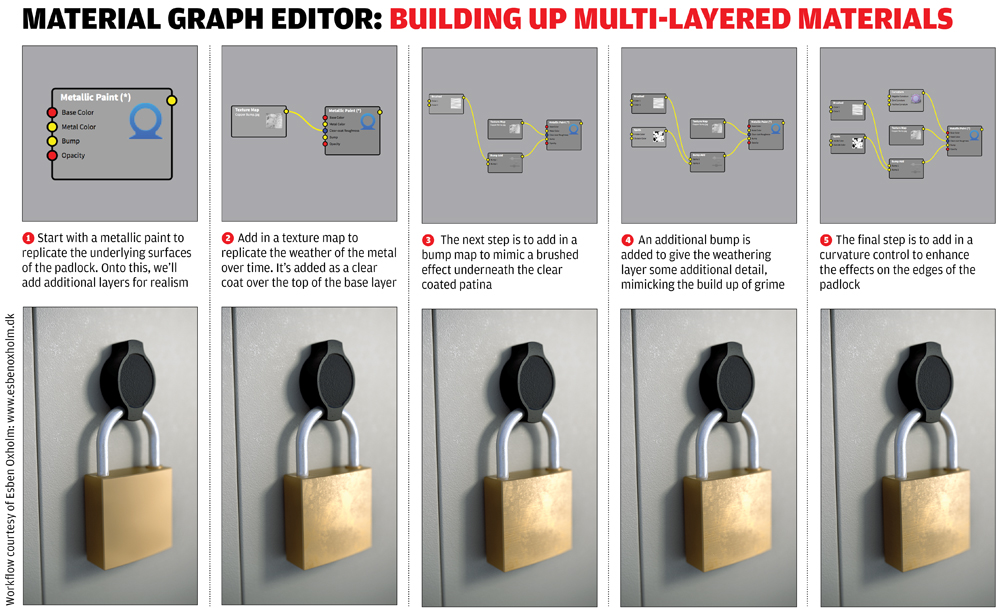
So now let’s dig into the headline additions to this new release. Perhaps one of the most important new tools in KeyShot 6 is the Material Graph Editor.
This may look strange, and possibly a bit confusing to those of you who have only ever used CADintegrated rendering systems in the past. But if you’ve used other renderers, the likelihood is that you’ll get it straight away.
The idea is that, while KeyShot gives you a lot of control over materials, textures and labels in the Project panel, once you get beyond simply tweaking standard materials, the job can get quite complex.
Now that KeyShot supports animated materials, materials on decals and so on, you’re going to get a bit of much-needed extra control.
The Material Graph Editor is a separate window that pops up and gives you a more visual representation of the current material. Each component is shown as a node and the connections between nodes are immediately clear.
We detail below how the Material Graph Editor works, but what’s most important to note is that, while this provides a different way at looking at material definition, you can continue to use the existing panel approach as well.
Elsewhere on the materials front, perhaps the most interesting update is greater integration between materials and animation, which manifests itself in several ways.
For one thing, the system now allows you to animate materials. For example, you can switch colours during the course of an animation, fading between two or more colours, or switch between different values on colours (a process referred to as a ‘number fade’).
Click the image to enlarge for more detail
One thing you can’t do, at present, is add animation to textures and labels, which would be useful for prototyping electronic devices and their user interfaces.
The other major update on the materials front is that it’s now possible to add materials to a label. These labels – often referred to as ‘decals’ in other systems – allow you to add graphic designs to a material, which isn’t easy to do with ‘whole part’ material designations.
With KeyShot 6, you can add a label to a material, then apply a material to that label – previously, the label inherited the material properties of the part to which it was applied. As a result, you can now add polished details to brushed metal, for example, or include engraved or etched details in your designs (such as the owner’s name on the back of a smartphone), without the hassle of setting up overly complex materials or geometries.
Keyshot 6 – Geometry editing
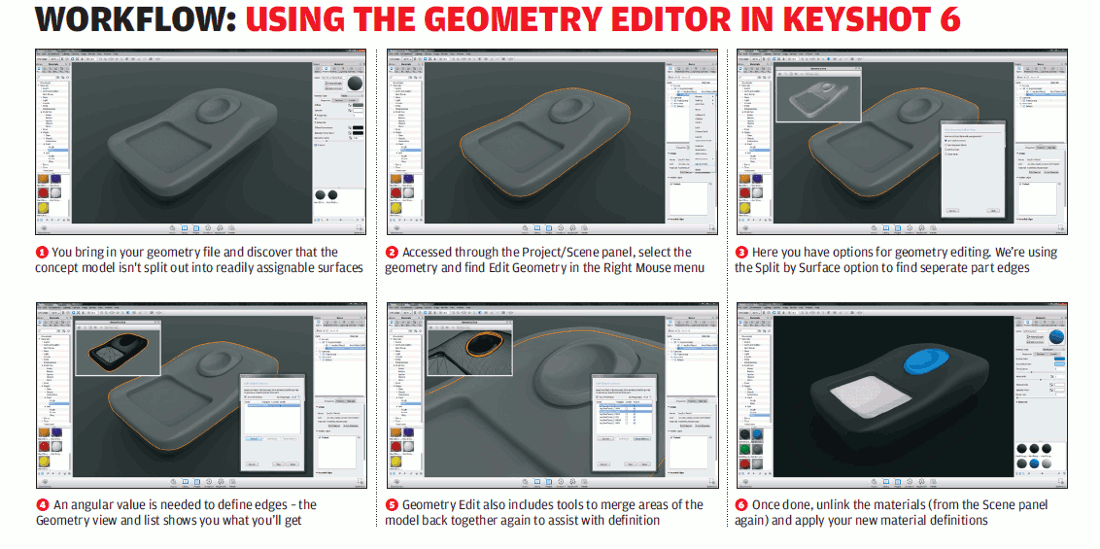
KeyShot 6’s new geometry editing environment may sound odd at first, but once you understand its purpose, it becomes clearer why this functionality will be useful for certain activities.
This is because, many times, when you bring a geometry into the system (particularly if it’s from a third party), you may not have all the parts separated out. That could be down to a quirk of the data format or it may be that you have a single model representing multiple parts – as is the case with a conceptual model showing just the surfaces.
What Keyshot’s Geometry Editor allows you to do is split these parts out. If you’ve got multiple body parts in a single ‘lump’, it’ll find separate shells and give you a list of parts. If you’ve got a single ‘lump’ of geometry with no defined components, meanwhile, you can use a curvature-based analysis to find surface breaks for individual features (as shown in the workflow below).
Handily, you’ve got a lot of control, a good preview using the new Geometry View tool and the ability to merge separate areas back together, if you need to.
Animatable items
Animation was introduced to KeyShot a few releases back and its toolset is expanding in the new release. We’ve already discussed the improved ability to animate some material properties, but there’s more in store.
As well as giving you new camera-path animations (rather than using pre-baked turntables and so on), you can also add animation parameters into effects such as depth of field.
This is the type of effect with which those accustomed to making movies will be familiar. With a physical camera, it would involve a simple twist of a dial, but in the digital realm, it’s a little more complex – but as you might expect from Luxion, the process here is nice and easy.
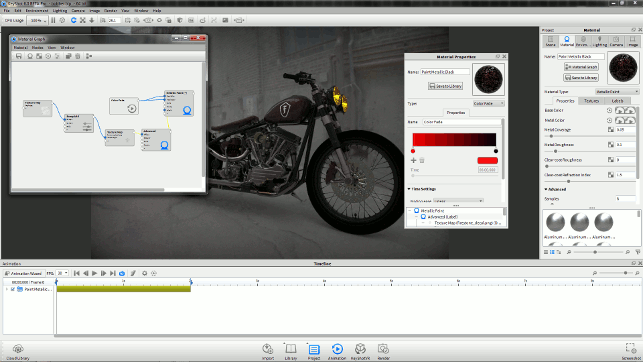
KeyShot’s new Material graph editor gives you a clear way of understanding your materials composition, particularly useful now given the systems updates to multilayer materials and materials on decals
You select the camera from the scene browser, right click and hit depth of field.
This gives you a new item in the Animation window and controls over focal point and F-stop at either end of the timeline segment. The system then calculates the changes required. This is highly effective for highlighting specific details of a product during an animated sequence.
Keyshot 6 – Lighting, interiors & architectural renders
Before we wrap up, there is one further area worth a closer look, although it might not immediately appear to fall within DEVELOP3D’s remit. This is the greater support coming in KeyShot 6 for architectural and interior renders.
There are two new tools that let you do this type of work, offering some specialist capabilities.
The first is that there’s a new lighting preset for Interiors. This cuts back some of the options, makes your system more efficient and gives you a better environment for adding in special lights.
To enlarge image click here
The second is called Vertical Shift. This helps to address KeyShot’s physically correct control over the virtual camera lens. Because of that realism, large, perpendicular geometry is always going to appear slightly curved, as it would in the real world.
The issue here is that, in the architectural world, where vertical lines need to be vertical, this is an undesirable effect.
KeyShot 6 introduces vertical shift control to allow you to account for this without having to do any post-production work in Photoshop in order to get the correct look and feel.
Conclusion
KeyShot 6 isn’t due to be officially unveiled until the beginning of August, but we’ve been playing with the beta version.
What has been interesting is how the system has grown in sophistication, without losing any of the special magic. In other words, KeyShot remains a system that’s focused on getting you from a rich 3D CAD model to a stunning image in the shortest time possible.
When KeyShot was first released, this was achieved by stripping away many of the arcane controls and capabilities offered by general-purpose rendering tools, in favour of giving designers and engineers a tool that simply worked well for them.
That meant creating a system that took in their data without too many issues, let them slap on some materials, add in an HDR environment and hit the render button.
Between then and now, the system has grown through the addition of new tools that give the user more control over the final result, whether that’s a static image or an animated sequence – but it’s managed to do so without any loss of workflow speed.
This may be its developers’ greatest triumph. So what you get today is a system that can still give you a great image very quickly, but will also allow you to refine it to produce something exceptional.
With this new release, there’s a whole swathe of new tools that aim to drive this vision forward: more animation possibilities, more control over textures and materials, and some new finessing of existing tools.
While it’s possible that some features and functions could change between the publication of this review and the system’s actual launch in August, KeyShot 6 is already looking like a solid upgrade for Luxion – worthy of its 6.0 release name and not just a point release to KeyShot 5.
| Product | KeyShot 6 |
|---|---|
| Company name | Luxion |
| Price | From $995 |


