Autodesk’s Memento system has been a labs project for the last couple of years. Combining cloud-based photogrammetry with scan data repair and repurposing tools, it’s now available as a public beta. Al Dean takes a look at what it can do
In the last couple of years, we’ve seen an explosion in geometry capture devices, driven by falling prices at the lower end of the market and wider choice at the top end.

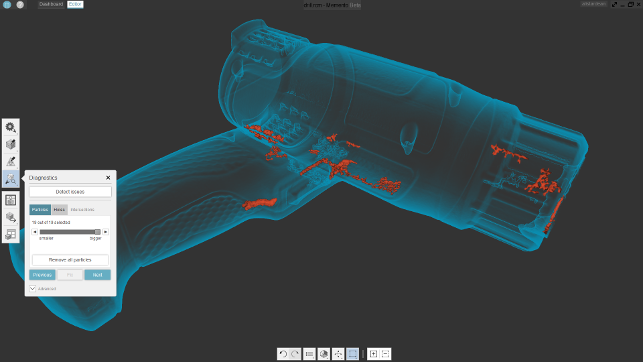
Whether captured using the built-in tools or from another source, Autodesk Memento offers a growing set of tools to help inspect, repair and repurpose mesh data, such as this scan from an Artec SpaceSpider. The orange sections are particles that need to be removed
There’s also been a surge in interest in photogrammetry as a means of capturing 3D geometry, combining photography with other technologies to create something akin to magic.
Autodesk has had a finger in this particular pie for quite some time – at the consumer level, with its 123D Catch applications for workstations and smartphones, and at the professional level, with its interest in the use of mesh or point cloud-based datasets, predominantly driven by its factory design and architectural applications, such as Navisworks and Revit.
But alongside these, it has also been developing another system, Memento. This initially started out as a photogrammetry solution, but its remit has expanded in the last year as it has moved closer to public beta testing, now live.
So now seems a good time to take a look at what’s coming.
Autodesk Memento is a cross-platform application, working on both Windows and Mac OSX. Once you’ve signed up for the beta test and got the applications downloaded, you’re ready to dive into it.
Opening it up, you’re presented with the window where you access existing projects, both those sitting locally and those that have been processed in the cloud. (For the latter, you’ll need an Autodesk account, which you’ll have already if you’ve tried Fusion or are an Inventor customer.) You’ll also be given import options.
It’s important to understand that Memento is split into two areas that are related, but represent two different workflows.
First, there are tools to assist with the creation or capture of 3D form and texture, which we’ll look at first. Then, there are tools to assist with enhancing or repairing that data, whether it was created or captured in Autodesk Memento, or not.
Autodesk Memento – Form & texture capture
Autodesk Memento started life as a branch of the Acute3D technology now in the hands of Autodesk’s arch-rival, Bentley Systems.
In terms of form capture, the initial focus was photogrammetry, but that’s now expanded to include non-contact scanning devices.
Let’s look at photogrammetry first. If you’ve not come across this before, it’s a means of constructing a 3D model using 2D images.
With information about the lens, sensor and image size you’re using, and a number of images of the subject, it’s possible to triangulate the position of each pixel in 3D space. These pixels are used to build up a point cloud, which is then used as the basis of a 3D polymesh.
Autodesk Memento also supports the stitching together of texture information captured, so you have a complete record, both visual and geometric, of the part you’re working with.
While early tools required you to use manual methods to define common points between different photographs, more recent tools go a long way to automate this process.
The issue with traditional tools in this space is that, due to the high-resolution nature of today’s photographic equipment, systems have pretty demanding computational requirements, leading to long processing times and a need for high-powered workstations.
Autodesk Memento sidesteps this issue by taking advantage of Autodesk’s cloud-based services infrastructure. You upload your photos of the target object, then upload them to the cloud for processing.
Once they’re there, you can safely close down Memento. Once processing is complete, you open up the application and can download the dataset locally.
(Of course, the process of uploading tens, if not hundreds of photographs from a DSLR is going to take a while, so the speed benefits of cloud processing must be offset against that, but at least your workstation isn’t tied up during computation.)
Autodesk Memento is also starting to support the direct integration of laser scanners, such as Artec3D’s scanners, which we looked at in the December/January 2016 issue of DEVELOP3D. Here, you connect to the scanner and stream your point data directly into Memento. And this is where Memento’s second set of tools come into play, for editing mesh-based geometry sets that are typically very large.
Autodesk Memento – 3D mesh post-processing
Whether you’ve generated your mesh data using Memento’s built-in scanner or photogrammetry tools or imported it via another format (the system currently supports the import of OBJs, STLs and ReCap files), it’s now time to start work on your mesh (and textures, if you’ve captured them).
One of Memento’s key differentiators is its ability to handle very large datasets.
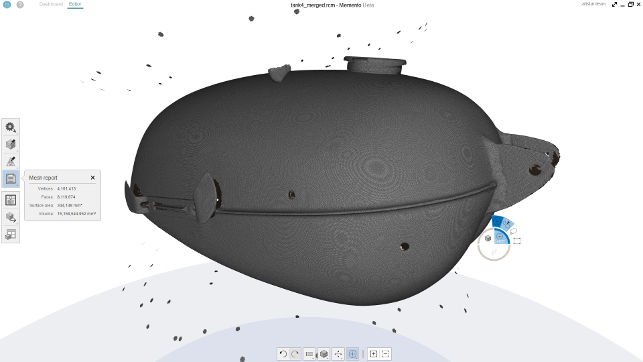
While we didn’t have anything truly massive to work with for this review, we did have a laser scan of a Triumph fuel tank that weighs in at 400MB and features a pretty hefty 8 million points.
We can report that Autodesk Memento loaded that with ease. We used the system on Al’s rather aging Dell Precision workstation and the computation took full advantage not just of the SSD, but also the AMD FirePro W8000 GPU, which took on a lot of the load.
Once your data is loaded, you have a set of tools and workflows to inspect, analyse, fix and repurpose your data as needed.
The best way to learn more about these is to consider a couple of workflows and use cases.

Unless you’re working with complex laser scanning focused point and mesh editing tools, there’s not much on the market that can handle processing a 400MB dataset with 4 million points (output from a SolutionIX scanner)
Autodesk Memento – Photogrammetry clean-up
If you’ve used Memento’s photogrammetry tools, you’ll find that the datasets are all-encompassing.
Unless you’re doing the capture in studio conditions (with plain backdrops), then you’ll not only find the data you’re focusing on, but also that your background has been mapped, so your first task is to clean this up and trim back to just the data you’re interested in. Autodesk Memento has a number of tools to assist with this.
First, there are tools to select portions of the model you want to delete, using a number of selection methods — lasso, paint, box and so on — and all are accessed through a radial menu on the right mouse button.
Select the geometry, hit the delete key and you’re done. If you’re looking to clean up large portions of the model or to split it, there are also tools to do this by defined plane. Again, position the plane, hit enter and you’re done. This is particularly useful for cleaning up the base of the object.
Of course, these tools are just as applicable to data imported from another source. It’s all about getting a nice clean mesh with which to progress.
Autodesk Memento – Geometry fix-up
Mesh geometry is notoriously sketchy, no matter what process you’ve used to capture or define data.
The process of triangulating a 3D form often introduces errors that are hard spot and fix. This is even more true when you’re using a 3D scanning method, as this can introduce small pockets of geometry that you’d never spot using a traditional tool and small holes or gaps in the mesh are just as common.
Autodesk Memento includes a number of tools to identify these issues and tackle them, in either an automated fashion or more manually in trickier cases.
The three categories of error that Autodesk Memento looks for are holes, particles and intersections. Holes are self explanatory and can be the result of an error in the meshing process or simply down to the fact that the method of capture can’t process that geometry.
Particles are similar, but the result is small geometry lumps that need to be removed. (Figure 1 shows the particles found in a scanset from an Artec3D scanner.)
Intersections typically occur when the triangulation process has gone awry and misconnected the points, resulting in faces that twist or skew incorrectly.
For those of us accustomed to dealing with analytic surfaces, where everything is nice and cleanly defined, all this might be unknown territory, but bear in mind that when you’re dealing with 8 million faces (as shown in Figure 2), the margin for error is much greater.
Autodesk Memento allows you to detect these issues, highlight them, flick through them, then either fix them automatically in one hit or deal with them individually. While this works for simple issues (such as deleting particles or closing simple holes), you may get stuck in problematic areas.
One such example is if you have an incomplete scan that can’t easily be patched. Here, the more manual tools come into their own, allowing you to add in bridging structures to give the system guidance before filling holes.
The mesh elements can be selected and worked with as you see fit — there’s a learning curve to these types of tools (irrespective of which system you’re using), but once you get a handle on it, it’s possible to fix up a mesh pretty quickly.

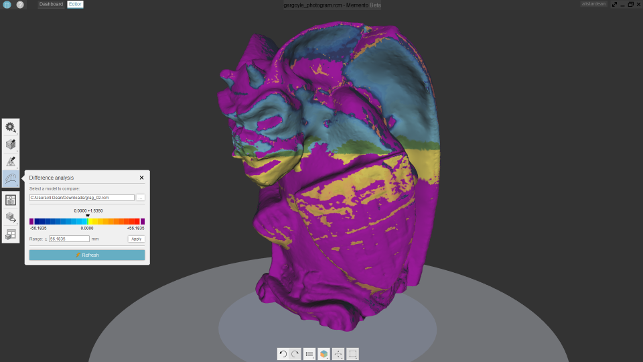
Memento also includes tools to compare two different datasets, whether that’s CAD to captured or two different versions (pre-clean and fix and final model)
Repurposing data
Aside from capture and repair, Memento has another interesting use case in the design world — repurposing data. Scan data is typically heavy, as are some STLs from other sources.
Autodesk Memento has a set of tools that allow you to take that geometry and remesh it, decimate the number of points or polys, while retaining the form and make it much more efficient.
Whether that’s making data more useable for rendering or for visualisation (rendered or real time), it’ll allow you to take your OBJs, strip back the detail and make them more usable in your system of choice.
Want an example? Let’s talk about getting STL data into Autodesk’s Fusion 360. While Fusion can handle loading and displaying hefty mesh data, it currently has a limitation of 10,000 faces when converting mesh data into a more usable B-Rep model.
Autodesk Memento lets you load up the data (be STL or OBJ), set a limit on the output in terms of face count and then works to readjust that geometry accordingly.
For that reason alone, Memento will be handy to have around if you’re looking to use mesh data as part of your design workflow, especially while it’s still free of charge to users.
Conclusion
Remember, Autodesk Memento is still in beta, so it’s not entirely fair to judge the system in terms of its suitability for professional tasks just yet.
There are some tools that users of systems like those from Geomagic/3D Systems, or Delcam’s PowerShape Pro mesh editing tools, will find less than complete.
In particular, the tools for reconstructing holes and gaps in a mesh, are basic at best, particularly when it comes to control over filling holes with respect to surrounding curvature.
But what Autodesk Memento lacks in maturity, it certainly makes up for in user experience and novel capabilities. The idea of a single system that not only allows you to load, edit and repair highly complex and unwieldy meshes, but also gives you a growing set of tools to generate those forms (using scanners and photogrammetry), is fascinating.
The interface is clean, efficient and works across both Windows and Apple OSX and the period of discovery is very short.
In terms of the usefulness of the photogrammetry tools, if you’ve used high-spec laser scanners, then you might be expecting some sketchy results. I think you’ll probably be pleasantly surprised.
Autodesk Memento won’t capture all of the detail you’d expect from £30k worth of hardware, but you can get a decent scan, cost effectively, using the DSLR that is in every office these days, and there are a multitude of uses, whether for reference models (for modelling to), for including rendered scenes, or whatever.
Autodesk Memento has huge potential and given Autodesk’s interest in all things digital design, in both product design and architecture and construction, it should find plenty of adopters.
All of this, of course, depends on the toolset being fleshed out and the pricing being set correctly, both of which are a little way off being resolved just yet. But right now, it’s looking good – very good indeed.
Six pro tips: Photogrammetry with Memento
Camera: According to Memento product manager, Tatjana Dzambazova, the camera you use isn’t as critical as you’d imagine for good quality photogrammetry. As long as you understand how to control it, you’re golden.
Reflection & transparency: As with laser scanning, photogrammetry struggles with both dark surfaces and highly reflective ones. If possible, spray the object or dull it down with polish. Transparent objects are a no-no.
Lens: A fixed, non-zoom lens is recommended, as is setting the aperature as wide and the shutter speed as long as possible, so that more of the object is in focus. That of course, demands a tripod and remote.
Nail your photos: Dzambazova recommends your object fills at least 70% of the photo. While that’s an ideal and will depend on the object you’re capturing, it gives the system a fighting chance to track position of each pixel.
Lighting: Good, consistent lighting is key. Avoid TFL lights, avoid harsh shadows (diffused, indirect lighting is recommended). For our tests, we used a cheap light box and a set of tripod mounted LED lights – all in for £40.
Plan your capture: Memento’s algorithms work best when you’ve got good overlap between each image and they’re taken sequentially, moving around the object (or moving the object), with scale markers in place as well.
| Product | Memento |
|---|---|
| Company name | Autodesk |
| Price | TBC |


