
SolidWorks Visualize – Dassault Systèmes’ latest photorealistic rendering engine is all about presenting your product’s best face to the world. Dan Herzberg grabbed a first look at SolidWorks Visualize during SolidWorks World 2016
The latest product to launch under the SolidWorks umbrella, Visualize was developed by the rendering experts working at Bunkspeed before Dassault Systèmes acquired the company in 2014.

SolidWorks Visualize has two modes. Easy Mode strips back the UI to give you a clear, five-button workflow to set up your renders
The team behind the new product is helmed by Brian Hillner, who met with me at SolidWorks World 2016, on the very same day that SolidWorks Visualize went live to the public, to answer the questions about the product that users seem most likely to ask.
Once Visualize became a SolidWorks product, Hillner said, the entire business strategy was hammered out in two straight days of gruelling talks with SolidWorks execs. Part of the strategy they came up with is to expose non-SolidWorks users to SolidWorks products and hopefully generate interest in the rest of the portfolio.
Visualize is the first step in this ‘SolidWorks is Everywhere’ campaign, hence one of its most interesting traits — it’s a standalone product. It imports many different file types from almost every CAD programme out there, so even if you’re not using SolidWorks for CAD, you can still use Visualize.
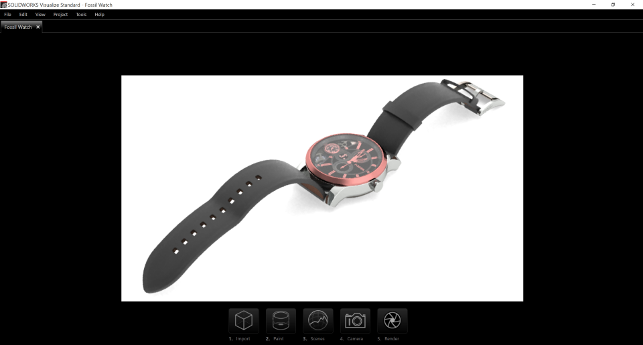
The most immediate benefit of SolidWorks Visualize is the enormous library of high-quality appearances, environments and cameras to choose from. Visualize comes pre-loaded with dozens of good-looking appearances and textures — including dozens of metallic paints, several species of wood and even the transparent film of a soap bubble.
In addition to these installed appearances, Visualize is also directly connected to an online library of hundreds of additional ones, all downloadable at no extra cost.
The library is continuously updated with appearances created by Visualize users, so you’ll always be able to find what you’re looking for.
Another one of my favorite features is the eyedropper. Like other eyedroppers you’re familiar with, it allows you to pick and replicate existing appearances.
However, the Visualize tool also allows you to select colours from sources outside the application, such as online Pantone charts or company style guides.
Finally, one of the greatest advantages of SolidWorks Visualize is the fact that you don’t have to use it yourself. As a standalone product, Visualize can be installed on any PC and the license isn’t directly tied to your SolidWorks installation.
This allows those high-quality visuals to be created by the marketing team, rather than being shouldered by the engineers.
Since the ‘Easy Mode’ interface has only five buttons, the marketing team will have no excuse for not picking it up quickly.
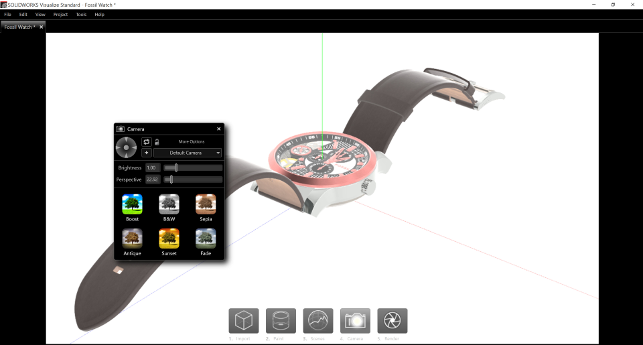
The Camera stage gives you control over field of view (perspective), brightness and allows you to add depth of field as well as a set of Instagram-like filters
SolidWorks Visualize – Getting access
If you’re already a SolidWorks Professional or Premium subscription customer, you’re entitled to a free license of SolidWorks Visualize Standard, which can be downloaded from the SolidWorks Customer Portal immediately.
Additionally, subscription customers will receive an email within a week or two of the public launch date, instructing them on how to download Visualize and directing them to tutorials and training on mySolidWorks.
If you’re interested in Visualize Professional, it looks like you’ll have to go through the same old-fashioned process of requesting a quote from a SolidWorks reseller.
Once you’ve installed the software, it will ask you for a serial number. If you’re a SolidWorks subscription customer claiming your free download, just use your existing SolidWorks serial number to license Visualize, even if it’s installed on a different computer or a different network.
Then it’s time for new users to get to grips with that five-button Easy Mode interface, which will walk them through the process of creating high-quality renders from scratch.
Step 1: Import
Import your CAD model in any one of over 20 different file formats.
Remember, you don’t need to be using SolidWorks to use Visualize. There’s no conversion or plug-in required, since Visualize opens all these file types natively.
At this point, Visualize will allow you to choose some import options. You may want to check the ‘Monitor File’ box, which is supposed to continuously check the source file for changes — such as changed geometry or appearances — and offer to update the Visualize project when those changes are saved.
However, I’ve only been able to get this feature to work intermittently and, when it does, it overwrites all the appearance, scene and positioning changes I’ve made in Visualize.
Luckily, SolidWorks executives admitted at the launch that the company is already working on improving the Live Update feature to make it more robust.
Step 2: Paint
Apply appearances from the Visualize library by dragging and dropping them onto your model. Alternatively, you can retain some or all of the appearances you imported with your model.
Visualize carries over all SolidWorks appearances and textures. This is only possible because it now has access to the SolidWorks code base.
Any appearances applied to faces or features (rather than entire bodies or parts) carry over just fine and can be changed once loaded into Visualize.
Decal importing is also supported, but only projection-mapped decals work at this time. Other decal types, such as spherical, label, cylindrical and so on will be supported later. Those decal types can also be recreated easily within Visualize.
Step 3: Scenes
Apply a scene, which includes a background image and lighting scheme, by dragging it into the model space.
Similar to appearances, SolidWorks scenes can be imported and reused and dozens of additional scenes are available to download from the online library as well.
Step 4: Cameras
Position your cameras and adjust the settings for each one. Set the position, orientation, perspective and zoom of a camera with simple mouse movements.
You can adjust the brightness of each camera and there are even some Instagram-like filters included to quickly give your image a different feel.
Click More Options to fine-tune the position, or adjust more advanced settings, such as depth of field, aspect ratio and more.
Step 5: Render
Render your image. In Easy Mode, leftclicking the Render button instantly starts a render with the last-used settings. Tweak these settings or choose from pre-saved profiles by right-clicking.
If you find yourself needing a little extra control over your project, hop out of easy mode by hitting space bar and you’ll have access to every detail of your materials, backgrounds, cameras, lighting and even the position and motion of your model.
Create and save new appearances by combining colours, textures, alpha images and bump maps.
Explore your model’s assembly tree to make individual tweaks to appearances or positioning.
If you’re anything like me, you’ll find yourself using this mode most of the time within a few days.

Sample renders, both using an Nvidia Quadro 600 and Intel Core i7- 2600K – PhotoView360 (‘Best’ Quality, 4K x 3K) 25:15 to render

Visualize Standard (1,000 Passes, 4K x 3K) 11:24 to render
SolidWorks Visualize – What’s next?
From here on out, major releases of Visualize are planned to coincide with major releases of SolidWorks, meaning that Visualize 2017 should debut alongside SolidWorks 2017 in around September of this year.
One or two minor ‘dot releases’ or Service Packs can be expected between major version updates, bringing improvements to existing features, such as the CAD Live Update and Decal Import previously mentioned.
Brian Hillner also mentioned that one of their next enhancements will be the ability to import cameras created in SolidWorks.
You may also be wondering about the future of SolidWorks’ existing rendering package. Yes, it’s true that SolidWorks users have had access to photorealistic rendering for quite some time.
So is PhotoView360 being phased out, and if not, why should we bother opening up a separate programme to do our rendering now?
First of all, PhotoView360 isn’t going away and it’s still plenty useful. PV360 is still best for rendering models still under development, because it’s so well integrated inside SolidWorks.
SolidWorks users will continue to be able to use this product to check the look of basic reflections, shadows and highlights to guide their design of geometry that’s still undergoing a lot of changes.
Yet when it comes to creating marketing-quality content you’ll want to use Visualize.
The quality of the images it produces (in a shorter span of time, thanks to Hybrid Mode), coupled with easy set-up and flexible installation options, make this new product a must-try for anyone interested in photorealistic rendering.
SolidWorks Visualize options: Standard versus professional versions
SolidWorks Visualize comes in two flavours: Standard and Professional. As I’ve found with many SolidWorks products, the standard version is more than enough for casual to moderate users, while Professional opens up a wealth of new features to those who need them.
Standard: The most noteworthy aspect of Visualize’s release is that the Standard version is free to all SolidWorks customers with an active Professional or Premium subscription.
For every license of SolidWorks Professional or Premium owned, you’re entitled to one free Visualize Standard license.
For example, if you have 20 SolidWorks Professional licenses on subscription and 10 SolidWorks Premium licenses on subscription, you’re entitled to 30 Visualize Standard installs.
For non-SolidWorks users, or users without Pro or Premium subscriptions, Visualize Standard costs $1,495 and must be bought through a SolidWorks reseller.
An additional $374 (25%) is required annually for subscription service, which provides access to software updates and new releases.
As fantastic as the quality is, the Standard version is limited to single-frame still renders.
Professional: If Standard is ‘point and shoot,’ then Professional is the equivalent of a high-end video camera.
In addition to supporting animations and camera motion (such as flyins and 360-degree spins), Visualize Pro offers some other interesting features for power users.
The render queue allows users to set up multiple renders and let them churn. Choose from rendering multiple cameras, configurations or different models entirely.
However, Visualize Professional can also create more than just videos and stills. The upgraded version can also create interactive content, such as 360 panoramas and ‘VRs’ (multiple images stitched into a rotatable model at photorealistic quality), which can be embedded into a webpage.
The pro version also offers feature enhancements like motion blur, baked lighting and multiple viewports for power users.
The cost for Visualize Professional – whether you’re a subscription SolidWorks user or not – is $2,995. Similarly, a 25% annual subscription fee ($749) is required for access to updates.
SolidWorks Visualize: What hardware do I need to get the best from it?
SolidWorks Visualize is built around Iray, the physically based rendering technology also used with a number of other 3D applications, including Siemens NX, Catia, 3ds Max, Maya and (soon) Rhino.
As Iray is owned by GPU manufacturer Nvidia, it will come as no surprise to learn that it runs much faster on Nvidia GPUs (with CUDA cores) than it does on CPUs.
Iray can be accelerated by CPUs, but compared to CPU-only renderers, such as Luxion KeyShot or Autodesk VRED, the performance is nowhere near as fast.
DEVELOP3D’s Al Dean found that, when rendering purely with CPUs, SolidWorks Visualize took significantly longer to achieve similar results.
HP has shared some SolidWorks Visualize performance benchmarks with us, which compare CPU and GPU inside one of its Z240 workstations.
The results show that an Intel Xeon E3-1245 v5 (a pretty decent 3.5GHz quad core CPU) took almost six times as long to render 500 passes as an Nvidia Quadro K2200, a popular GPU for CAD users.
Performance does increase with CPU cores. For example, a dual socket Intel Xeon workstation with 36 cores will cut rendering times significantly, but it still can’t compete with a high-end Nvidia GPU like the Quadro M6000.
So what GPU should you use? It all depends on budget, of course.
I’d recommend a Quadro K2200 or Quadro M4000 for starters, going up to a Quadro M5000, Quadro M6000 or multiples of these for more hardcore users.
Multiple GPUs can also be beneficial when you want to use the same machine to render in SolidWorks Visualize and model in SolidWorks CAD at the same time.
In the past, with Bunkspeed Shot (from which SolidWorks Visualize evolved), we found that using one GPU for both operations sometimes made it hard to rotate models smoothly in the SolidWorks viewport.
With that in mind, it’s beneficial to reserve one GPU for interactive 3D graphics in SolidWorks CAD and use the other(s) to render.
Then, when you really need to crank out a render as fast as you can, use all the GPUs (as well as the CPU).
You can also ship out renders to a network of workstations using Iray Server.
If you have serious money to spend and want renders back in a matter of seconds, consider a GPU render farm or Nvidia Quadro VCA.
We will be doing some indepth testing over the next few months with a variety of Nvidia GPUs, so stay tuned.
by Greg Corke
| Product | SolidWorks Visualize |
|---|---|
| Company name | SolidWorks |
| Price | From free (see text) |


