BP Riduttori, a family-owned company based in the province of Venice, may be small but its technical expertise has been relied on for over 46 years by renowned companies in the transport, railway and pharmaceutical industries to supply a vast array of gears and gear teeth.

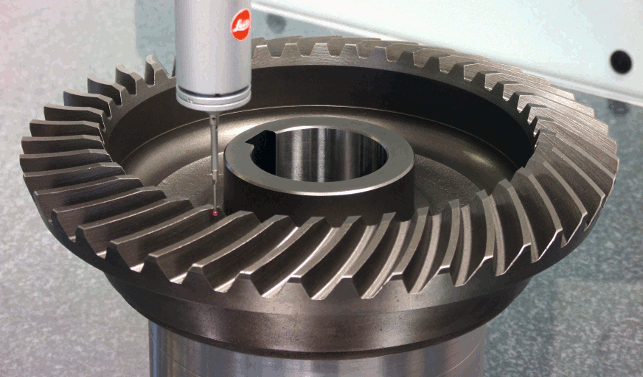
The new coordinate measuring machine is equipped with a Leitz LDP-X1 continuous scanning sensor
Its product portfolio is wide ranging from common spur gears and helical gears to Gleason spiral bevel gears, differential reduction gears, bevel gears, worm screws, drive shafts, gearbox speed multipliers, angled gear units and worm screw jacks.
Federico Bortolami, second-generation owner and the company’s technical director, explains, “The applications of gears in the real world are extremely varied and although gears may meet specifically defined requirements, they are subject to a good deal of variation.
When the kinematic system that the gear is a component of has relatively simple characteristics, you can use off-theshelf gears.
“However, as the system gets more complex and accuracy requirements get higher, dedicated gear profiles and couplings become necessary. They allow the correct, efficient and effective transmission of motion and minimise the wear, noise and loss of precision.
As a result, the mechanical designer will create the gear geometry as a function of the characteristics of the machine that is going to hold the gear, not vice-versa.”
Different requirements
From the most traditional but demanding applications for powertrains through to highaccuracy machines for the pharmaceutical industry and to gyro control mechanisms, each application has different characteristics and requirements.
“Our company did not want to step on the throttle with mass production. On the contrary, we wanted to make our experience of over 40 years available to those who require specialised components and consultancy at the design and manufacturing stage,” comments Bortolami.
“We often support the technical departments of our customers to assess the best solution as early as the design stage.
Less frequent, but not uncommon, are cases in which we have to reproduce and possibly alter existing gears whose geometric characteristics or mathematical models are unknown, and real reverse engineering is therefore required.”
Inspection challenge
As a solution to its dimensional inspection challenge, BP Riduttori recently purchased a DEA Global Silver 9.12.8 coordinate measuring machine, equipped with a TesaStar-sm indexable probe head, a Leitz LSP-X1 continuous scanning sensor and QUINDOS 7 software.
“Before acquiring a measuring machine, we used traditional measuring tools and equipment. These were certainly very reliable, but less effective, and sometimes they struggled to provide an overall evaluation of not only gears but also drive shafts, slots and bearing seats,” says Bortolami.
“Opting for a tool like a measuring machine has therefore been the obvious choice. Our DEA Global Silver has a comprehensive range of equipment as regards to both sensors and software. We have a continuous scanning sensor, which is essential for the accurate probing of profiles. It is attached on an indexable head, allowing repeatable orientation in hundreds of positions in space.
“This enables us to access and measure even the most complex gears. With the high degree of specialisation in the field, we’ve opted for the QUINDOS measurement software, complete with several application modules dedicated to the various types of gears.
This gives us a full detailed analysis of every gear type and allows us to generate inspection reports that go with our products and certify their quality.
We can also rely on Curve Analyzer, a very useful application package for the quick analysis of the 2D profiles that are typical of our daily work”.
Full support
The measuring system supplied by Hexagon Metrology supports various stages of the manufacturing process for the BP Riduttori gears.
Some measurements are performed on drive shafts and bearing seats after the turning operations that are carried out before the gear teeth are cut. After machining and final processing of the gear teeth there is the metrological sampling of the lots, and in case of very particular gears or limited quantity runs, the certification of every individual part.
“The QUINDOS software and its application modules have been created with attention to the specific requirements of gear manufacturers, and this is apparent,” continues Bortolami.
“It is unlike other more general packages, which require more processing and are not always capable of providing all the results we need. Moreover, a measuring machine is a general purpose tool that allows you to inspect not only the gear tooth characteristics, but also the geometry of drive shafts and wheels – all with a single system,” comments Bortolami.
Learning processing
The staff have gradually learnt how to operate the measurement system with one-on-one training from skilled Hexagon Metrology engineers.
“The measuring machine and the control and inspection software are very easy to use, but our applications are often rather complex and above all very varied. The advice provided by the Hexagon Metrology application engineers has been essential for us.
They’ve helped us to better define methods and strategies for measuring components that would be very difficult to analyse,” adds Bortolami.
“One of the future steps will be the inspection and reverse engineering of gear teeth that we have only physical samples of, which our customers want to reproduce and possibly improve.
“We rely on our measuring machine to perform these tasks in a more efficient and accurate way than we’ve been able to do so far with traditional tools.”
BP Riduttori reaps rewards through using a digital measurement machine
Default


