Materialise Magics is a pre-processing system for those working at the business end of additive manufacturing.
Just as machinists have CAM software to create nc-code to drive CNC machines, those using additive manufacturing systems require specialist software to optimise build processes and ensure that the results are as fault-free as possible.
For many of these users, Materialise Magics is the hands-down market leader.
Before we get into discussing some of the meatier updates to Magics 24, there are a number that may not qualify as headline features or upgrades, but will still be of benefit to most users.
For example, the last release saw the addition of a view cube, situated on the lower left-hand side of the screen.
Most CAD users will be familiar with this onscreen widget, but for those who aren’t, the view cube gives you a quick visual reference for X, Y and Z axes as well as ‘clickable’ faces that snap to orthographic views of your on-screen model.
View cubes can be found in a wide number of systems these days, but Materialise’s initial implementation of this (in Magics 23) was missing the very useful view name labels (indicating top, left, bottom and so on).
This has been fixed in Magics 24 and will make the view cube far more usable, particularly for new users.
Work has also been carried out in terms of making batch renaming possible for data inside Magics.
To understand why this was needed, it’s important to bear in mind that, in many use cases, Magics focuses on bringing together multiple parts into a single build.
As a result, the ability to reorganise parts that you have imported, fixed and nested is very useful for downstream processing and data organisation.
New batch renaming capabilities mean that you can name parts by sequential numbers, for example, or apply a prefix to all parts associated with a particular client or project.
While this is primarily focused on data within a Magics project, if you then want to export your fixed and pre-processing data files, you can do that as well.
Elsewhere, a lot of work has been done to overhaul the Boolean operations in Magics.
Many of the commands in the system rely on this technology to function, including hollowing out parts, adding holes to drain resin or powder, shelling, adding labels to a part and so on.
The Booleans now work more quickly and just as importantly, more robustly.
Alongside user interface and data management improvements, there’s a new functional update that appears to have been really popular with beta testers, and that’s the ability to add in a chamfer to the edge of a part.
To CAD users, that might sound like small beans, but considering that Materialise Magics works on mesh data, this is no small feat of geometry and mesh wrangling.
It builds on the ability to add in a fillet added to the previous release and works just as you might expect, with options for how the chamfer is built (angle and length, two distances and so on).
For those who don’t get too involved in the meat of additive manufacturing, sharp edges can be a nightmare, due to heat build-up, particularly in the metals world (although they can also be an issue in polymer sintering, too).
Being able to break them quickly and efficiently with a chamfer is very useful.
Nesting for sintering & MJF
Now let’s turn to some of the bigger updates in this release.
For some time, Magics has offered a well-respected and heavily used nesting module for those using powder based polymer machines such as sintering machines, or perhaps more recently, one of HP’s Multi-Jet Fusion machines.
These nesting tools allow you to take your parts (the number of which can range from a handful to thousands) and ensure that they are as closely packed into the build chamber as possible.
What’s key here is that this is done with a great deal of control.
This control focuses on both the process and the parts.
Let me explain. Each process, material and machine comes with its own guidelines on how close parts can be to one another, whether you can have parts inside another part, and where the sweet spots lie in the build chamber for particular machine/material combinations.
Then there is control over per-part considerations: you may want to keep tolerance-sensitive parts in the centre of the machine, where thermal issues aren’t quite so evident, for example, or you may want to control how parts are oriented.
All of these controls, and more, have been available in Magics for some time.
But that’s not to say that there isn’t room for improvement.
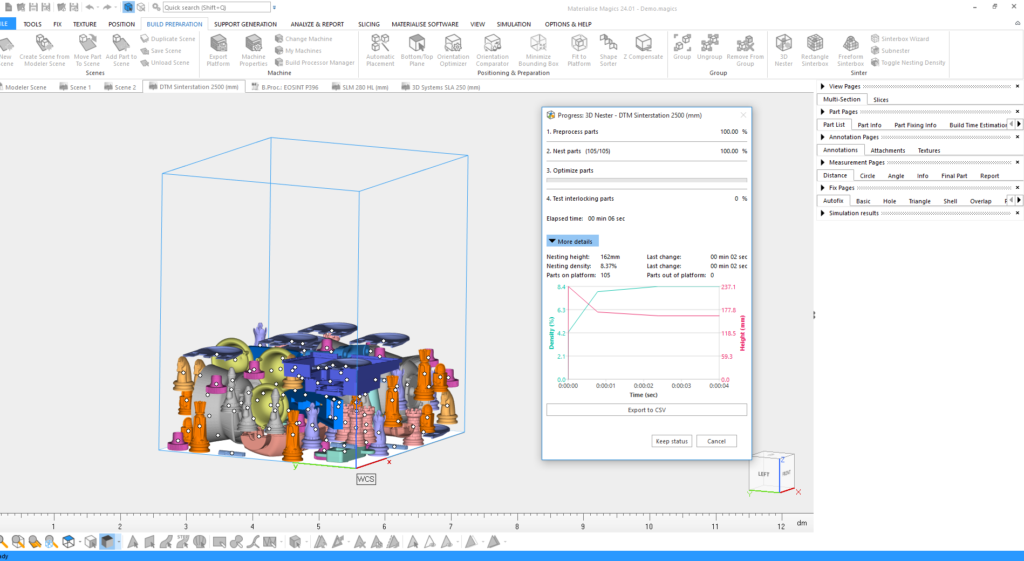
First, the nesting algorithm has been reworked so that it’s dramatically faster.
As you might expect, the process of computing the arrangement of 2,500 parts in a build chamber so that each part is less than 2mm from all adjacent parts, allowing you to reduce your vertical build height and thus complete your build more quickly, is a complicated business and can take time.
The good news is that the time needed is now typically measured in seconds, rather than minutes, depending on complexity.
And if you’re still struggling with the process (and/or perhaps a particularly large numbers of parts), then a new simple nesting option is now available.
Whereas the traditional nesting tools use the geometry of your part, this uses a simple bounding box, so it calculates almost instantly.
It is worth noting here how well-developed Magics’ tools are for this process.
I’ve seen a number of CAD vendors start to introduce nesting tools for additive into their product sets, but these are often just bounding-box based, and offer very little control over all of the key factors you need to consider.
In other words, they make nice ‘demoware’ for vendors, but rarely are these tools useful to real-world users.
Magics, on the other hand, has been built for exactly this purpose and gives you the control you need, along with the reporting capabilities.
Maintaining link to STEP file in Materialise Magics
As we’ve already discussed, Magics is primarily built to work with mesh-based data, but it also has a range of options to help you bring in CAD data and convert it internally.
As you might expect, this is typically a one-way operation: once you import and convert the part, the link to the originating part is broken.
The good news is that this is changing for the Magics 24 release and specifically for STEP import.
The STEP import module now brings your STEP file into Magics and maintains the link with the mesh-based version of it. This gives you three benefits.
First, you have adjustable controls over how that part is tessellated, so you can edit settings as you need.
Second, having the CAD data effectively co-located with your mesh means that you can select faces of the STEP file, which will then select the associated mesh facets – much easier than picking them from the mesh.
The third benefit is that as you adjust the orientation of the part within Magics, the STEP also follows that workflow, adapting to new orientations and such.
Now, when it comes to removing your part supports using CNC techniques or even (as is becoming popular in some processes) carrying out post-build machining on the part itself with supports and build plate still attached, you can export your STEP file, on which to programme your operations in the correct orientation, rather than trying to match it up after the fact.

Build simulation for metals in Materialise Magics
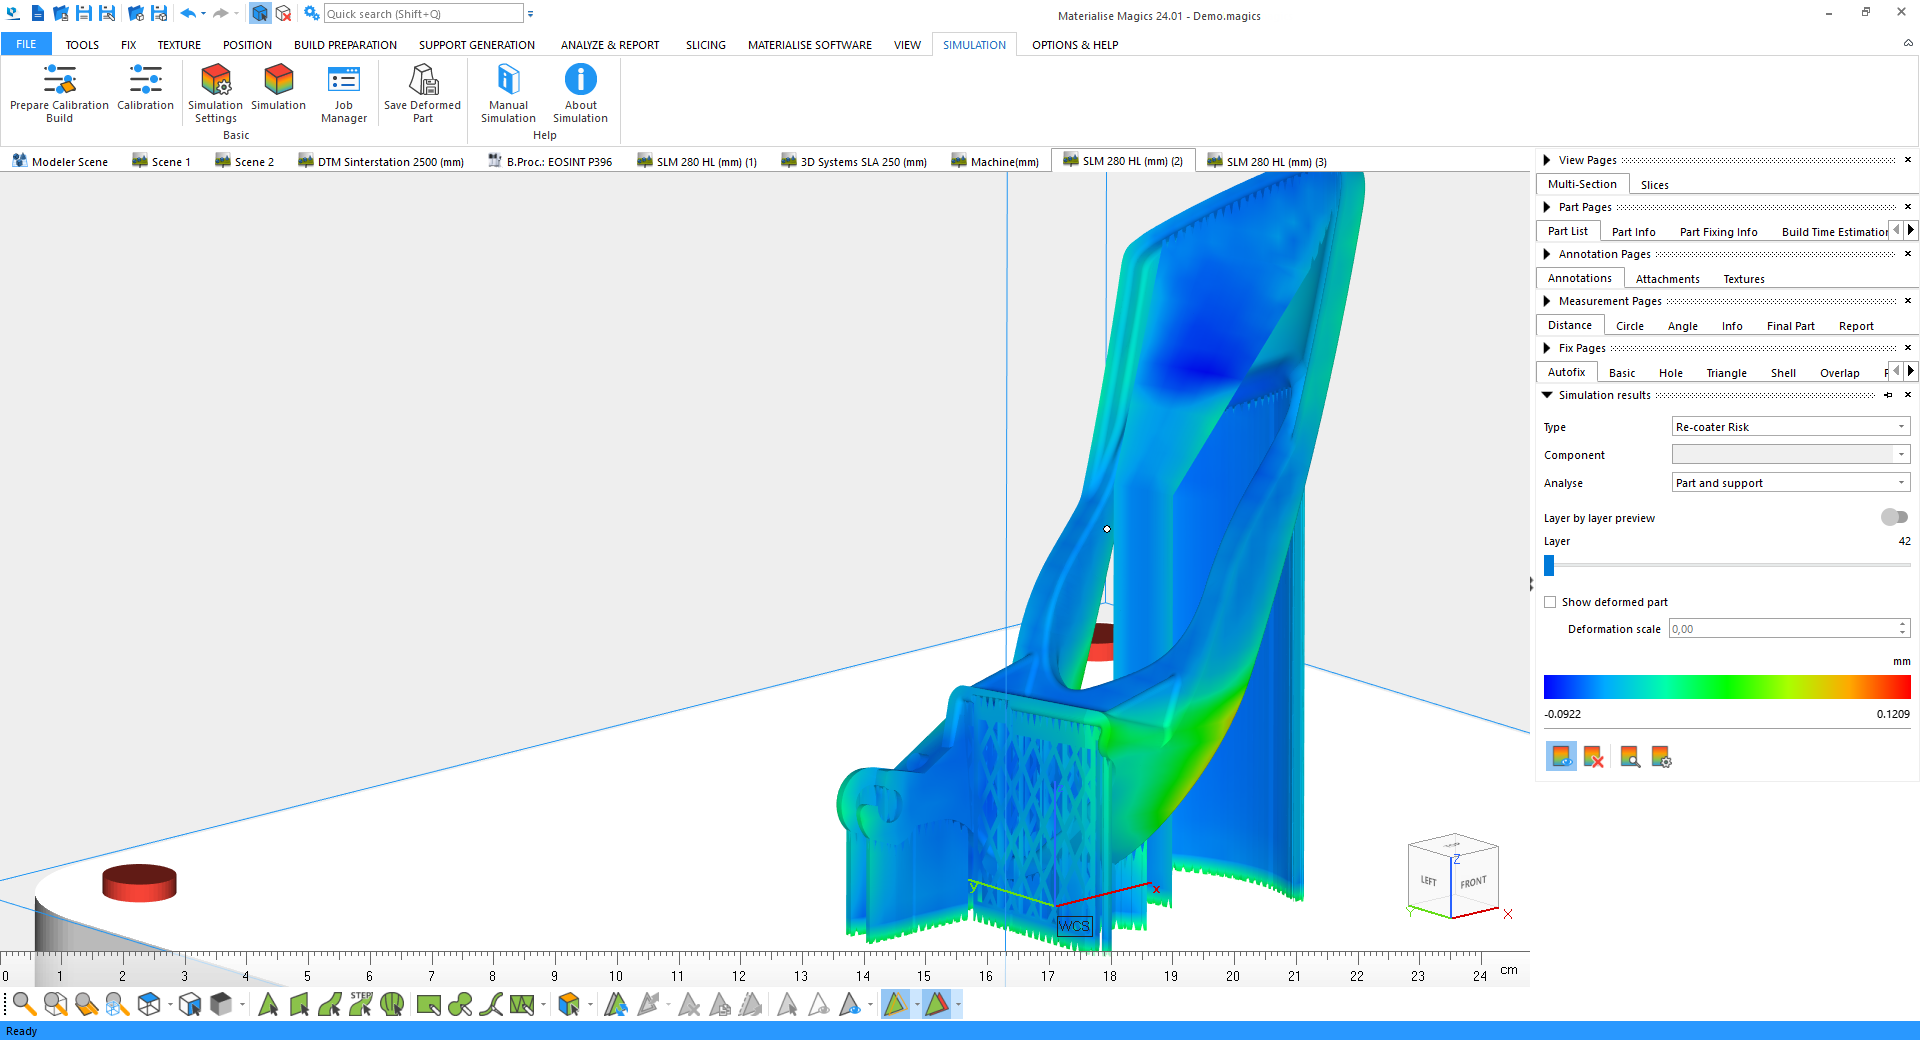
Magics 23 saw the introduction of simulation tools for metal additive. From looking at Magics 24, we can see that these have improved significantly over the intervening point releases.
The tools cover the mechanical performance aspects of additive builds, but also include thermal simulation tools, too.
Both types are based on a voxel-led approach, so you have full control over the nature of that voxel mesh, as well as the ability to either look at the raw and sometimes blocky results, or alternatively, have your data mapped to the actual geometry of your part.
The mechanical simulation tools allow you to carry out standard strength and strain analysis of your part during the build process.
This will use the parameters of the build, along with details of the material and the machine used, and give you a whole host of feedback about areas of high stress and/or displacement.
This means that not only can you identify areas of stress that might mean heat treatment, but also that you might well be able to eradicate that stress with judicious editing of supports.
The thermal simulation tools, meanwhile, focus on how a part heats up during the build process and how it cools.
This means you can get a good estimate on areas of overheating, insight which, when linked with that from the mechanical simulation tools, can be really valuable for trouble-shooting.
Materialise Magics takes this baseline of data and uses it to provide real-world information or make predictions about your build.
For example, displacement or deformation of the part during the build process could interfere with the recoater process, so Magics gives you a ‘recoater risk’ analysis. The same is true of potential areas of shrink lines.
Other updates for this release give you greater control over both the size of voxels (this module is built on Simufact’s voxel based simulation technology) and how you interpret results, with a wider spread of visualisation options.
Probing has also seen some work, so you can inspect explicit temperatures on the surface of your part.
If you want to investigate internal temperatures, then you need to view the raw voxel mesh and use a slice or section.
Another key update in the most recent release is the addition of a simulation job queue, meaning you can use your local workstation resource without having to wait for each simulation to complete before moving on to the next one.
Supports & base plate
These last two updates really show off the maturity of Materialise Magics.
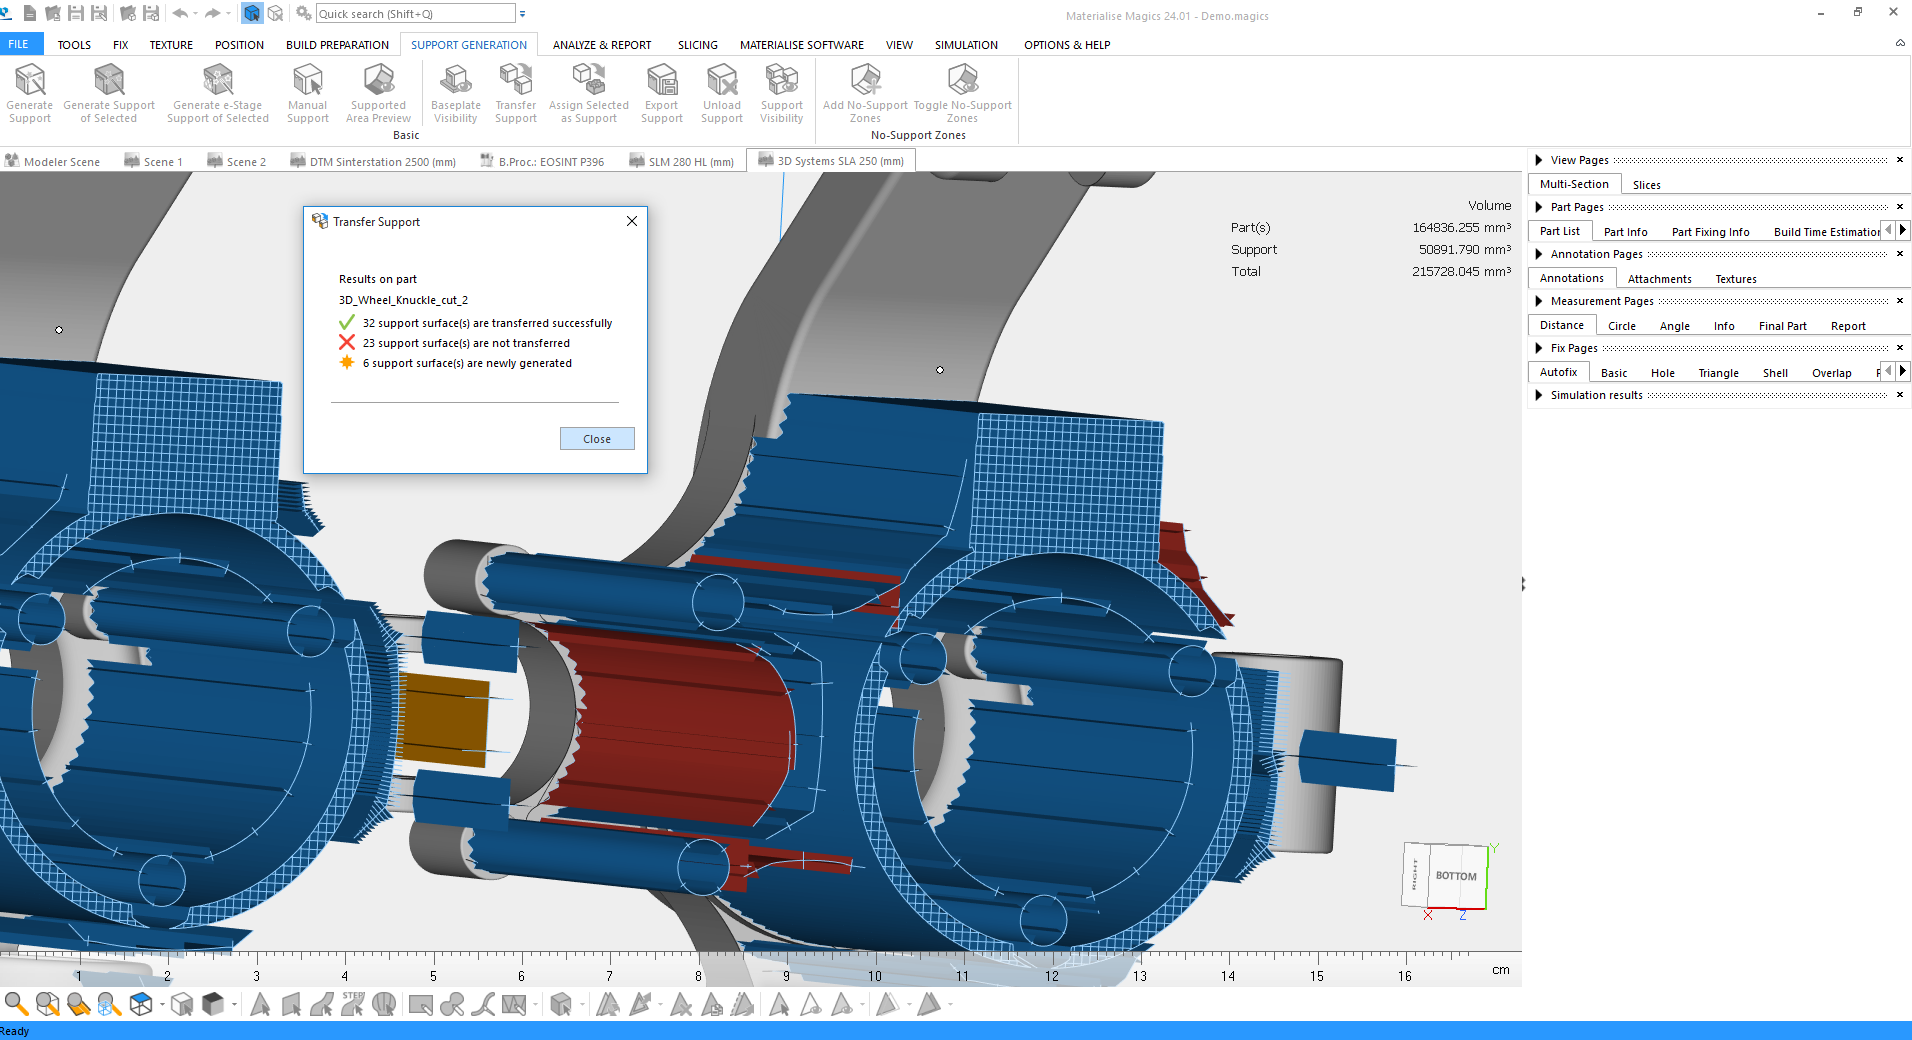
The first, transfer support, allows you to take the support network that you’ve carefully crafted and slaved over in order to achieve the minimal contact points versus the best surface finish or structural robustness and very quickly apply that same learning to another part.
While this might at first sound somewhat counter-intuitive, there are in fact many instances where a user might be preparing a series of very similar components, to which the same support structures can be applied, perhaps with a few tweaks.
Traditionally, you’d have to re-work everything manually.
By contrast, this tool will also remove supports that aren’t needed on a new part and add in additional ones where the are required.
The very last function we’re going to look at harks back strongly to Magics’ very reason for existing.
Alongside its track record in STL file-fixing, Materialise Magics very quickly gained a reputation in its formative years for providing those who were running SLA equipment with software that was much better than the software that came packaged with the equipment.
In other words, Materialise Magics allowed users to really dial in their support structures and ensure that machines were producing parts exactly as required.
This thinking still lies at the heart of the product and the capabilities that it offers, although it is clear that the company has since expanded its remit considerably.
So it is nice to see that new baseplate updates have been added in, especially the tools for adapting the baseplate in SLA systems on which parts and structures are built, and in particular for those parts that are built in an inverse manner.
You can now add in perfections to your baseplate, as well as automatically lift up edges, adding a small chamfer that will help your finished parts to pop off the build platform with ease.

In conclusion
As we move into a period where more and more organisations are learning about, experimenting with and then going on to adopt additive manufacturing, it’s clear that they are going to need a new set of tools to help deal with these processes.
What’s interesting is that while there is a whole slew of new technologies available that focus on design for additive, when it comes to preparing new forms for manufacturing, the most mature, robust and well-developed solutions have been on the market for decades or more.
To use the analogy with which we began this review, while there may be plenty of brand-new tools for CAD, when it comes to CAM for additive manufacturing, users have a particular need for tools that are battle-hardened by experience and that have been developed over years.
This is where Materialise’s real strengths lie, both as one of Europe’s largest service providers for additive manufacturing and as an accomplished developer of software.


