The ability to simulate a product’s likely performance before building a physical prototype has been around for decades. Whether using Finite Element Analysis (FEA), Computational Fluid Dynamics (CFD) or other methods, we should all be aware of the benefits.

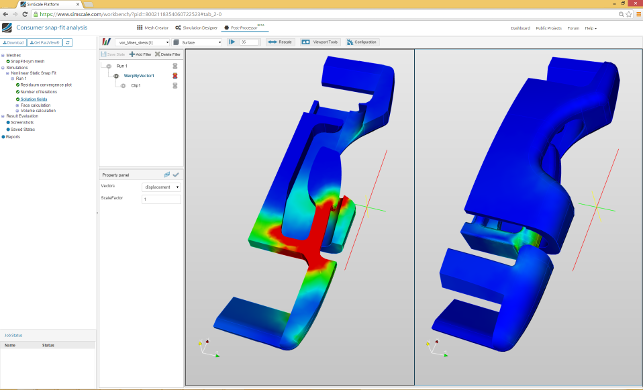
Dynamic simulation of a consumer snap-fit stress analysis using SimScale
That said, significant barriers to greater adoption persist, preventing such technologies from becoming more widely used. One of these barriers is down to skills — designers and engineers not having an adequate level of expertise to take their product into the simulation environment — but there are others; namely, cost and access to computational resources.
When it comes to cost, traditional simulation tools are expensive. The CAD-integrated tools offered by traditional 3D design systems don’t come cheap either – particularly if you’re looking to mix and match your physics models.
While FEA is suitable for mechanical performance analysis, for example, if you then want to add in CFD to simulate fluid flow and thermal considerations, you’re looking at a decent wedge of additional cash, whichever way you want to cut it.
Computation is also an issue. While basic FEA can be conducted on the desktop, the limitations of the average workstation mean that if you want to ramp up the complexity of your simulation work or to carry out other tasks while a simulation is calculating, you’re looking at a completely different set-up, whether that’s based on dedicated workstations, formal or informal clusters or another approach.
It’s these two factors that Munich based start-up SimScale aims to address.
Launched in 2013, its platform promises to widen access to advanced simulation technologies and, at the same time, offer some serious computational resources to make them work – all through the cloud.
SimScale – User interface
SimScale is an entirely cloud-based service. All work is conducted through your web browser of choice (as long as that’s not Internet Explorer). Once you’ve signed up, you’ll have a log-in and password. At this point, it’s worth discussing how SimScale structures its offering.
As with many such cloud-based services, the company is operating a ‘freemium’ model. Freemium models typically come with some restrictions, whether that’s the amount of storage on offer, the jobs you can perform, or the number of compute hours available. In SimScale’s case, it’s built around the privacy of your data and the number of compute hours.
Essentially, you can carry out any number of simulations, as long as they’re public and you don’t use up your 3,000 compute hours or go over your 500GB of storage.
The first step to using the tools on offer is, as always with simulation, to bring your geometry into the SimScale environment. As with all things cloud, that means uploading it over the Internet to the company’s servers.
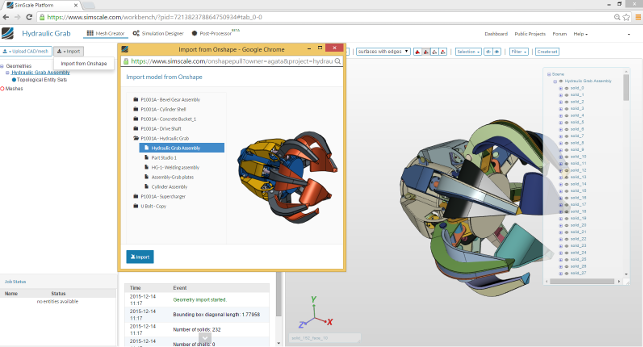
SimScale supports a variety of geometry formats, but the most reliable will be STEP (skipping IGES, for reasons we all know). Interestingly, there’s also an option to cross-load from Onshape if you have an account to that service.
Doing this is simple: you simply authorise a connection between the two services, then select the data you want. (It’s worth noting that, at present, you can only select the current version and last-opened branch from your Onshape model, so you’ll need to bear that in mind when prepping your data.)
The data you bring to the SimScale platform will vary, of course, based on the job at hand. I think it’s fair to say that you’ll need to do any preparatory work upfront, since SimScale doesn’t include any pre-processing tools for de-featuring or abstraction.
So if you’re working on internal fluid flow studies, for example, you’ll need your fluid volume data ready to go.
SimScale – Meshing
Once your geometry is loaded, the next stage is meshing. Here, there are a couple of different options for meshes for structural studies, then the CFD related meshing options, too.
With each option, you’ll get some guidance on the most appropriate option for your task – something that’s essential for those new to FEA and CFD.
The meshing process takes place in the cloud and you have the ability to define the number of cores used to do it. This is an interesting capability, particularly when you realise that, while you might want to ramp up that number (to 32 cores) and get your mesh back quickly, you’ll burn through your compute hours more quickly.

Hydraulic grab assembly model imported from Onshape to SimScale, via the integrated SimScale Connector App
This process, of course, doesn’t tie up your workstation and can be done, pretty much, on any computer with an Internet connection. Once underway, you can monitor progress on the web or wait for the notification email that will be sent to you once it’s complete. You’ll also be informed, again by email, if it has failed for any reason.
Pre-processing & set-up
Once meshing is complete, your next step is to switch to the Simulation Designer tab.
This allows you to start to flesh out your study, assigning boundary conditions, materials and other study variables.
The workflow for each step will vary on the type of study you’re conducting, but it’s all pretty clear and straightforward, assuming you know your product’s characteristics and are familiar with the ins and outs of the simulation process you’re working with.
Once set-up is complete, you then send the job off to compute. Again, the system gives you control over the number of processors used to calculate your results, as well as all those details you’ll need when working at the more complex end of the simulation spectrum (for example, convergence).
As with the meshing computation, you can monitor progress live, or simply close down your browser and carry on with other tasks until the email notification arrives to tell you that the job is complete.
SimScale – Post-processing
When it comes to post-processing, SimScale has integrated tools from Paraview.
These let you set-up the various views, charts and other results inspection and data extraction tools that you’ll need. Interestingly, it’s also possible to download the Paraview desktop app, along with your results dataset, and do the work locally.
Whether you’re looking for stress/strain concentration in structural work, or inspecting flow in fluid volumes, the tools are there to help you document those results (it’s also got one of the common report-generation tools).
Because of the cloud-based nature of the tool, these are also readily shareable with others on your project and both screenshots and view states can be saved easily for later review.
In conclusion
While we’ve primarily focused here on how the system works, many readers might be concerned with the freemium model and, in particular, the idea that any projects you carry out will be made public, at least within the SimScale community. This does have some benefit, though.
First, there’s the learning aspect: the more folks that share their projects, even with test data, the more knowledge transfer occurs within the SimScale community.
Everybody benefits. You can see how other users have carried out their work, even adapting their use cases and applying them to your own problems.
The second benefit is ease of access: the freemium model means you can try out the system without too many hassles.
While you may not want to share highly confidential data on the platform, you do at least have the opportunity to do some meaningful testing of its capabilities, before making any financial commitment.
Once you start to think about making that step, there are currently two paid plans available.
SimScale Professional gives you private documents, 3,000 compute hours a month and 500GB of storage space for €170 per month. SimScale Enterprise ramps this up with 30,000 hours of compute time and 5TB of storage data.
That comes in at €850, but can be shared among five named users. Both plans include telephone and email support.
SimScale isn’t the kind of pre-baked, wizard-driven tool that many are familiar with if they’ve used the types of simulation tools built into their workhorse CAD systems.
Rather, it’s a fully featured system that gives you a lot of capability and a lot more control over the process. As such, if you’re experienced in working with FEA and CFD systems, then you’ll feel right at home.
If you’re not, it may not be the best place to start. It’s also worth noting that it includes particle and acoustics. The range is likely to expand in coming months.
The good news is that it’s available now and you can find out whether you’re ready or not to use it — for free.
A good way to think about SimScale’s offering is that it gives you access to a number of different simulation capabilities and some pretty serious processing horsepower, on a pay-as-you-go basis.
There are no massive licensing fees and no massive requirements for in-house computational resources. All you need is your geometry and a web browser.
You also get a lot of learning resources to guide you through the system and assist you if you come up against any tricky problems.
Simulation at this level has traditionally been a costly business, but it’s clear that, as many adopt CAD-integrated simulation tools, they quickly run up against the limits of the capabilities on offer, both in terms of functionality and computation requirements.
SimScale offers a different approach, one that takes advantage of the cloud and looks to solve both issues with some advanced simulation tools combined with highly scaled computational resources in a very flexible and accessible environment.
It’s definitely one to keep watching.
| Product | SimScale |
|---|---|
| Company name | SimScale |
| Price | See text |


